Wednesday, November 26, 2008

Wall quotes.....

I know many of you have tried this already but this is my first one. I want to do so many but thought I should do the guest room right now since I am expecting company in a week. Back in 2002 one of my best friend's house burned, she and her kids came to stay with me while they got a house built. One day after they got into their new house she came to me and gave me a little gift. It was a little plaque that had a Thomas Kincaid house with the quote "Happy is the House that Shelters a Friend". I cried when I read it because.....well, it really touched me. I had put the plaque in the guest room last night thinking it was perfect for a guest room. After thinking about the quote I then decided it would make the perfect quote for that room.

I used Stamped for the letters and flowers on this. I decided on Stamped because it has that vintage look. I would have liked to use Storybook.....but I don't have that one!! LOL I am really happy with the way it turned out. I did cut it rather large because I wanted it to take up quite a bit of space above the bed. The letters were cut at either 4 or 4.5 inches. I used a blooms laser ruler to get the letters straight.


For those of you who haven't tried wall quotes.......TRY IT!! It is really easy and it is limitless to what you can do!

Tuesday, November 25, 2008

Chipboard Albums.......DONE!!

I got my Bind It All wires yesterday and was able to put my chipboard albums together. I was quite surprised how easy it was to do! Of course I watched a video first to make sure I was gonna do it right since my BIA didn't come with instructions.

You can click the pictures to see more detail if you wish.

This is the cover of the album. The chipboard pieces are 4x6 inches. Using Design Studio made it very handy to make sure I had the sizes of my objects right for cutting. I used the Martha Stewart branch punch to add some decoration along with the Merry Christmas. The title has diamond stickles on it. The small dots on the branches are Robin's Nest embellies.

I did ink all the pages and shadowed everything with brown paper to keep it tied together. I also used brown 1" wires to put the album together.

I tried to make the pages tie together with the cut outs as much as possible. I am including a piece of white cardstock that can be removed and used as a pattern for cutting pictures to fit on the mat. The present is made from some Bazzil Bling paper that I had. The tree is decorated with Robin's nest Embellies and some Stickles.


I wanted mittens with the cup of hot cocoa but for some reason they wouldn't cut. The Cricut would start to cut them and then just sit there. I decided to make something look like a sugar cookie. HOWEVER.....a bunch of the MB sisters decided that it looked like an alien eating a cookie. They are no longer on my Christmas list!! *actually okie has no one left on her Christmas list at this time and has no idea what to do with all the cards she has made*I used a light green metallic paper for the cup, hard to see here and then added some white fuzzy sticker to dress up the cup a little. The cookie is with green Bazzil Bling and Stickles.

Here I used some white fuzzy stuff that had sticker on the back. It added a great touch to the stocking and Santa's hat. I used the D'vine swirls cuttlebug folder on the stocking and added some Robin's Nest embellies.


I love the ornament cuts!! I used Mica paper for the base of the ornament. On one I used the branch punch and the other I used a puffy reindeer off some ribbon that I got from the LSS.


WHO DOESN'T LIKE DECORATED GINGERBREAD?? You can say you don't like the taste of gingerbread but no one can deny the beauty of gingerbread when it is decorated! Even if it is paper and Stickles!! HA HA HA I did do some doodling with a white gel pen also.


The back cover is just plain. Well I used my stamp.....and as you can see I messed up a bit...OOPPSS!! Think that happens to all of us sometimes doesn't it! LOL


Anyway hope you like the album. I made 3 others but didn't take pictures. The background papers are different but all the cutouts and pages are the same.

Sunday, November 23, 2008

SweetArts Paperie

Krista Norman from the Cricut messageboard has a site where she sells the most adorable embellishment kits!! It is SweetArts Paperie. You guys should really check them out!! If it wasnt' so close to Christmas and me being broke as a....well broke *okie thinks sometimes it's best not to post what she is thinking* I would be so into these!!

Saturday, November 22, 2008

Do you recyle?

I DO! Okay with finding stuff to papercraft with anyway! I found some boxes today when I was looking in my gift wrap/box cabinet. They are like cardboard with one side of smooth paper missing. They are the collapsible kind of boxes that gift stores use. I found them at Walls Bargain Center for a dime a piece years ago. I remember the LSS having some of this stuff and it was like 6 bucks for 5 small sheets and thought to myself "HEY! I CAN USE THOSE FOR SOMETHING!"

Then I thought about the tins I am altering and thought I would try some of the paper on it. I LOVE IT!! I used some Prima Hydrangea flowers and some Kaiser pearls. The pictures and wording are from a K & Company pack that had punchouts. The beautiful ribbon is some that my friend Theresa from the cricut MB sent me.

Thursday, November 20, 2008

I KNOW I KNOW

I should have worked on my recipe books tonight.........but I didn't *okie sighs at self*. I had gotten a bunch of small Tim Holtz tins from the scrapbook store a few months back and have decided to alter some of them for prizes at my Christmas party. I am going to put some little Bath and Body Works stuff in them.

I used a K & Company paper on this.....raise your hand if you are surprised! HA HA HA. The flowers are Prima's and yes....you do see stickles!!

O wires....

WILL BE HERE MONDAY!! WOOHOO!!! I was able to order some through my LSS owner. She is closing her store on Nov 29th. But good news is she is gonna do shows and sell online. So I will still be able to get stuff from her.

I will be posting my little chipboard albums once I get the wires on them. I think they turned out pretty nice!!

Saturday, November 15, 2008

okie's theory on paper hoarders

Okay know it is late....or early....not sure why I am still up other than I was painting earlier and I am waiting to for it to dry so I can see what it looks like. Also I was worried about my cricut and wanted to make sure it is working okay since it wouldn't cut the mittens I was trying to cut.....and it is, except for the mittens.

Anyway I was sitting here reading the Cricut messageboard and began to theorize why we are paper hoarders!!

Animals work by instinct. They have a sense of when things are going to be rough for the winter, therefore they hoard food. Much like squirrels do nuts.

So I got to thinking about people who hoard paper. You know the ones, I wont mention any names *okie rattles them off in her head though*, they seem to have enough paper to last every winter for the rest of their lives. My theory is these folks have some kinda papercrafting instinct. They knew the economy would get bad and so they started buying paper to store for the hard times to come.

The next time someone says you are nuts for having so much paper just tell them you are not nuts, but instead you are a squirrel!!

Thursday, November 13, 2008

Been working hard.....

On my chipboard albums. They are 4x6 *okie thinks she mentioned this in a previous post, but isn't really sure as she has been huffin stickles all evenin* and there isn't a lot of room to work with but I think they are coming along nicely. I am using a DCWV Christmas Stack for the base papers. All four of the albums have different papers but all the cuts are gonna be the same. I know I posted the gingerbread but I couldn't leave well enough alone and had to add more stickles.

Here is a little poem about stickles...

My Lovely Stickles
Ahh my lovely stickles
how you make my projects shine
Oh it just tickles
to see that shimmering line!!

*okay it is official.......okie HAS lost her mind*

Anyway here are what the pages are going to look like.....well not all of them but these pages anyway *okie is beginning to think she needs to stop posting after 10pm as she doesn't even know if she makes sense*. This is the gingerbread pages....click the photo to see it bigger.


This is the page with the stocking and Christmas tree. I used stickles OF COURSE on the tree but then added some Robin's Nest embellies for ornaments. I think they turned out nice. For the stocking I did run it through the cuttlebug using the D'vine swirls folder. For the cuff I used some fuzzy stuff that Grammat sent me. I dotted the swirls with a white pen and also added some silver Robin's Nest embellies on the cuff.

Here is a close up shot of the stocking...remember to click the pic if you want to see more detail. The fuzzy stuff cut great with the cricut. It didn't cut through the backing but it did cut through the fuzzy stuff just fine. The paper is some Mica card stock I got at the big stamp sale, not sure if I bought this color in the spring or this fall, or the other night during stamp club....but that is where it came from. I know I saw some at Michaels the last time I was there, think it was in 12x12 sheets.
My progress at this point is that I have all four albums inked. I have all the cuts ready for the cricut but for some reason my cricut froze up on me so I gave up for the night. I will post more as I get them done.

Wednesday, November 12, 2008

Gingerbread........

Almost good enough to eat! HA HA HA I always play around with DS with different cuts from the carts I have but of course I don't always cut the stuff I am playing with. Tonight I was working on some 4x6 chipboard albums and had to find Christmas theme cuts for the albums. One of the things I decided on was gingerbread. I got the house from JOTS *okie thinks that is what it was....she can't remember right now* and the Gingerbread man from Stretch Your Imagination.

While I might still go back and embellish them a little more I seem to forget what all is possible with the carts I own. I didn't plan on using so much stickles but my daugther came in and said "the white icing needs stickles". That girl is ALL ABOUT THE STICKLES! Have no idea why she likes them so much! *okie falls out her chair laughin*. Anyway, I will post the albums when I get them done.

Sunday, November 9, 2008

Oh this is very sad!!

THE MESSAGEBOARD ISN'T WORKING FOR ME!! *tear streams down okie's cheek* Well the good thing is that I was able to get my guest room cleaned up! WOOHOO!! Oh let me tell you....that place was a disaster area for sure! I kept putting it off and putting it off until I could put it off no more. I had stuff in there left over from 2 garage sales and I had been going through stuff to throw away or give to salvation army. Well now it is done! I still have to take the 8 foot tables to my neighbors garage but the biggest part of the mess is done!

When my grandma died two years ago my cousin Lisa had gotten two beds of grandmas. She wanted one of them and thought I might want the other. It is an old iron bed, probably close to 100 years old, that one of my aunts had spray painted a hideous gold color. I used a brown hammered metal and it turned out a lot better! The springs are beyond their prime but I think I can make it work with some ingenuity. There are some dents and dings in the metal posts, and there is a slat missing in the footboard....but it was grandma's so I love it just the same!

A couple of years ago I had found an ecru comforter that has the double wedding ring pattern crocheted on it at a garage sale for $10. It only came with one sham but I was able to find one on ebay!! Still waiting to hear from the seller if they combine shipping because there are some crochet valances I would like to have. I have the comforter and pillows on there just to see how it was going to look, the mattress isn't on there yet. Since the bed frame is old I want to make the room my "grandma" room. I will be decorating with old photos of my family.

So while the MB isn't working I was able to be productive again and now I will have a guest room again! I need to paint and pull up the carpet...but I think that will have to wait until spring.

Saturday, November 8, 2008

Getting ready for the Christmas party.....invitations

This year will be my 4th Annual Girlfriend Christmas Party. I didn't really start this as a tradition but it is quickly becoming one. I actually just decided to have a Christmas Party one year to help kick off the Christmas Season and it has just gone from there. Everyone brings a gift for Dirty Santa and an appetizer. I have games for the guests to play and prizes they can win. Well not really win prizes, they actually get Santa Bucks and then I have an auction at the end of the games. The twist is the prizes are all wrapped so they have no idea what they are bidding on! HA HA HA *okie can be so cruel*

Since my party is traditionally held the first Saturday in December I need to get the inviations done. I have always handmade my invitations but this year is special since it was my girlfriends that pitched in last Christmas to get me the cricut! I have the invitations designed, I have them cut and I even have part of the stuff shaded. I just don't have them all put together. STORY OF MY LIFE! *okie scrunches up her face and blows a raspberry*

The over all card size is 3.5x5 inches, more small inviation size than the traditional A2 I usually make. I was able to cut 3 card bases from 1 sheet of 12x12 cardstock. I used a Bella Stamp for the image, however I don't know the name of the stamp. I stamped the image on Georgia Pacific cardstock and then used a fiskars oval template I had to cut it. I colored the image with Stampin Up markers from the earth elements set. The mat cardstock is Fancy Pants, the name is Flurry and is from the Holly Jolly collection.

I used a glitter pen on the ornaments, star and bow on the pot for the tree, then I added glossy accents on the ornaments. I used a Quickie glue pen on the fur of the hat and boots and then used white doodlebug sugar glitter to give it some blingy da bling *okie so loves blingy da bling*. If ya want to see the card better then just click the picture.

The doodling is done with a white gel pen and then on the oval I used a SU marker *sidenote: if you haven't tried the Stampin Up markers might I suggest you DO NOT try them, cuz if ya do.....WILL WILL SOOOO WANT THEM ALL!! okie will eventually have them all!*

The lime green color is Mica cardstock. OMG HAVE YOU TRIED IT?? IT IS SO PRETTY!! The cricut cuts it quite nicely, you just have to have max pressure and blade depth. Oh I used Alphalicious for the oval, of course I had to squish it so it would fit the oval I had my image on. The book plate with the Holly Jolly Christmas is from Fabulous Finds. The words Holly Jolly Christmas is computer generated with Microsoft Word and using the text art feature, the font is fletch. Oh did ya notice the little gold brads? Well they aren't brads.....HA HA HA I TRICKED YOU! *okie thinks she might have over medicated herself this evening* Oh well yes, back to the brads that aren't brads.....they are the Robin's Nest embellies, quite nice aren't they!!

Thursday, November 6, 2008

Going to Stamp Club....

This evening!! I love stamp club! It is only one night a month, the first Thursday, but I would love to go twice a month. It is a great fun! The people who sponsor it bring everything you need to make cards. Of course I have to pack my scrap tote. I like to take my cuttlebug, adhesives, markers, ATG gun, glitter, brads, eyelets.......well you get the picture. It takes me longer to pack than stamp club lasts! HA HA HA

Tonight we are doing fall and Thanksgiving. Well I guess I better be off! Will be sure to post picture later!

*********************BACK FROM STAMP CLUB***************************

Had a great time! LGuild came this time and we actually got some cards done. Which is amazing for the two of us to get together and get anything done! HA HA HA *okie hopes Linda doesn't read this*. I got two cards done during stamp club, but I did get quite a few other images stamped to use later.

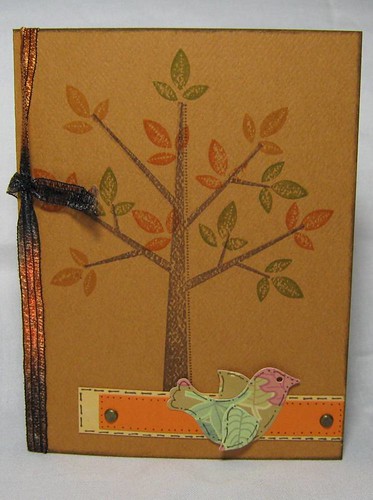
I did use the cuttlebug on this one as you can see. I am not sure what stamp set the images are from, but I have seen it in the catalog I think. If not then I have seen one similar.


I have seen this set in the Stampin Up catalog. Well not with the Give Thanks stamp, but the chef and turkey anyway. ADORABLE!! I colored him using my SU markers. I stamped him on some paper for the pants and then cut out the rest of him and cut off his pants and put them on the colored paper. I am not too pleased with this but it will do for someone! HA HA HA

Oh yes.....LGuild told me I had to post these pictures so she could copy the designs.....but she said no one else was allowed to copy them...they are for her only. I think she is delusional.......what do you think?? HA HA HA

Tuesday, November 4, 2008

Interruption of regularly scheduled posting...

I now interrupt my regularly scheduled posting style to say this.....


This is a great day in American history. We now know that every American is genuinely created equal and have equal opportunities offered to us if we can believe in ourselves and our country.

We will be able to look back at this moment and tell our grandchildren how we as Americans were present, whether it be by television or internet, as we saw Barack Obama be elected as the 44th President of the United States.

Whether the candidate you voted for won or lost in this race it will be a day placed in history where you can say you were present as history was made.


Now back to my regularly style of posting....

SCRAP ON!!

The love hate relationship with fall.......

I love fall!! I love all the color changes here in Oklahoma we have on the trees. I love the cool crisp mornings. I love the semi warm days and then the cooler evenings. The air just seems to be fresh, like it blew in from the north to remind us that the heat of summer will always come to an end. It is just energizes my system!

But now for the hate part of the relationship. The damn leaves are everywhere on the ground and ya gotta rake them up *however okie prefers to mow the yard one last time and think of it is mulch for next year* and they blow around with the strong Oklahoma winds and get caught in swirls on the porches and patios blowing in the doors as you enter or leave. The garden beds have to be cleaned out and tilled readying them for the winter and an easier task come spring.

I just spent the last hour and a half using my machete to chop down the dying Canna's. Who knew that 10 years ago when my daughter brought home 6 Canna bulbs it was going to lead to hundreds upon hundreds of cannas years later? NO ONE TOLD ME! I have dug the suckers up, I have not watered them, I have sliced diced and juilenned them. Only for them to return in full force! About 3 years ago I dug up bulbs in the spring and gave away about 50 plastic Wal-Mart bags full of them.......I MEAN FULL. I could probably do it again this coming spring and it wouldn't make a dent in my Canna population. Sometimes I really detest those Canna's. Yet.....they are so pretty in the summer with their deep green and purple leaves and little red spiky flowers.

So now that the little task of cutting the Canna's has been done I only have to finish cleaning out the flower beds and the garden, mow the yard one last time and my yard will be ready for winter.

HHMMMM....all in all I still think I really do love fall........

Sunday, November 2, 2008

A few cards from a Stampin Up workshop

I went to a Stampin Up workshop party on Saturday. They had the Big Shot there and showed how to use it. I think I will stick with my cuttlebug since it seemed really huge and doesn't fold up. But it was kinda cool.

We also made a few cards.


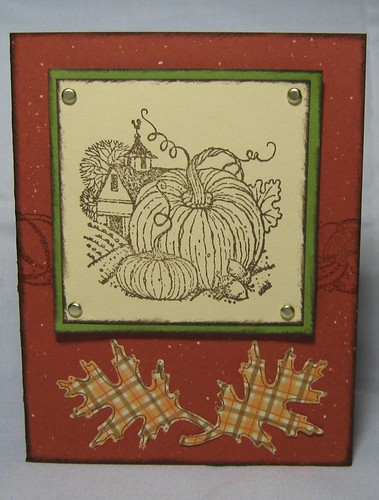
I have the stamp set that this one is made with. I think it is called Harvest Home or something like that. I inked the edges after I got home and also added the leaves to it. We used a roller stamp on it but you can't really see it.


I have seen this stamp set in the SU catalog and really liked the looks of it, but I like it even better after using it!! I think it has a lot of possibilities for sure!!


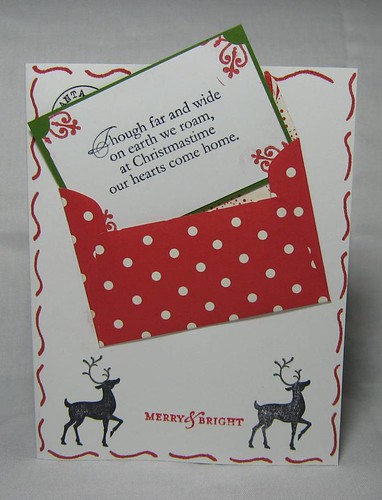
This card used a variety of stamp sets. Can't remember them all. We used the Big Shot with a envelope die cut to make the envie. I think this one is cute! However.....I went overboard and put the red squigglies on it and messed it up. OH WELL! I like how there is a greeting on the inside of the card. Now I have a new use for all the little envie cuts I can make with my cricut! WOOT WOOT!


Trying a new button storage

I totally have a thing for glass jars. I like being able to see what is in a container. I got some of the $1 candles from Wal-mart that have the cute little glass lid for the candles....but also thinking I could use them for storage afterwards. So for now I am using them for buttons. Of course I have to burn some more candles to organize the rest of my buttons....man is my house gonna be smellin good! HA HA HA

This also freed up some of my Frap bottles so I can put some flowers I need to organize in them. One day I will have total organization.....YEAH RIGHT!!


Friday, October 31, 2008

The recipe books.....

Aren't done yet! LOL But I do have all the appetizer pages done and one of the main dish pages so I thought I would post them and see what you guys think. The books are only going to be 6x6 so I had limited areas to work with.

This is the Bacon Crisp and Chicken Tortilla Soup recipe pages. I did use the Cricut Markers on some of the elements and I think I like them! Of course I inked all the edges.....it is compulsive with me now! HA HA HA

I pop dotted the pigs nose and used small brads for the chicken's eyes.


Here are the Olive Garden Zuppa Tuscana soup recipe and the 7 Layer Salad recipe. Luckily I was able to cheat on some of these since I had the recipes saved for my own use and also on the 7 layer salad I had used it for a recipe card for part of a swap I did. The lettuce is made from handmade paper and the tomatoes are Robin Nest embellies.


Here is the Steak Marinade recipe, again I had used this one on a recipe card before, and the steak is from a swap I did. The blank page is where I will put Main Dish, but I don't have it done yet.


This one is the first page of the Main Dish section, it is my daughters favorite thing I make, which isn't often. Ya know you don't want to make too much of a good thing...well that is my excuse anyway! HA!


So ya'll let me know what ya'll think!


Happy Halloween!!

Just a quick greeting to my readers!!

Thursday, October 30, 2008

Do you ever.......

Think you have a grand idea and that the project will be just fabulous?? Well I had a grand idea to make 4 recipe books for prizes for my Christmas party. Now I am doubting myself. WHAT WAS I THINKING?? Do you know how much stuff there is to cut out?? *okie gives a deep sigh* I will finish them and I will use them as prizes. I just hope the other scrappers coming to the party don't get these as prizes. My friends that don't scrap will think they are fabulous. ROTFLMAO

Luckily I am only doing 15 recipes. I plan on using my Bind It All to put them together. I have to wait until I am completely done with them before I can order wires because I have no idea how thick these things are going to be, maybe somewhere between 200-5,000 layers by the time I am finished!! AACCKKK!! *okie certainly hopes there are BIA wires big enough to handle the job*

Monday, October 27, 2008

Home again home again.......

Jiggity jig jig!! Made it home safe and sound from Phoenix. Had a wonderful time. The Tina Turner concert was FAN TAS TIC!! I would love to say I hope I can be in that shape when I get to be 70, but let's face it, I am not in that great shape now being almost 30 years younger than her! HA!

I got to meet two messageboard members while in Phoenix! WOOT WOOT! It is always nice to get to meet our cricut sisters!!

I would write more but I am bushed!! I will try to share some photo's later on in a post but for now.....I am just too dang tired! LOL

Wednesday, October 22, 2008

I'm leavin on a jet plane........

Don't know when I'll be back again....

Okay I really do know when I will be back, Monday. Tomorrow I fly out for Phoenix for an extended weekend with my sister and her 2 sister in laws. We are going to the Tina Turner concert and going to the Grand Canyon. Other than that I am not sure. But I am sure I will have fun.

HOWEVER.......I can't take any papercrafting stuff with me! *okie gasps* I think that is just cruel and unusual punishment!!

Sunday, October 19, 2008

Mailing Template

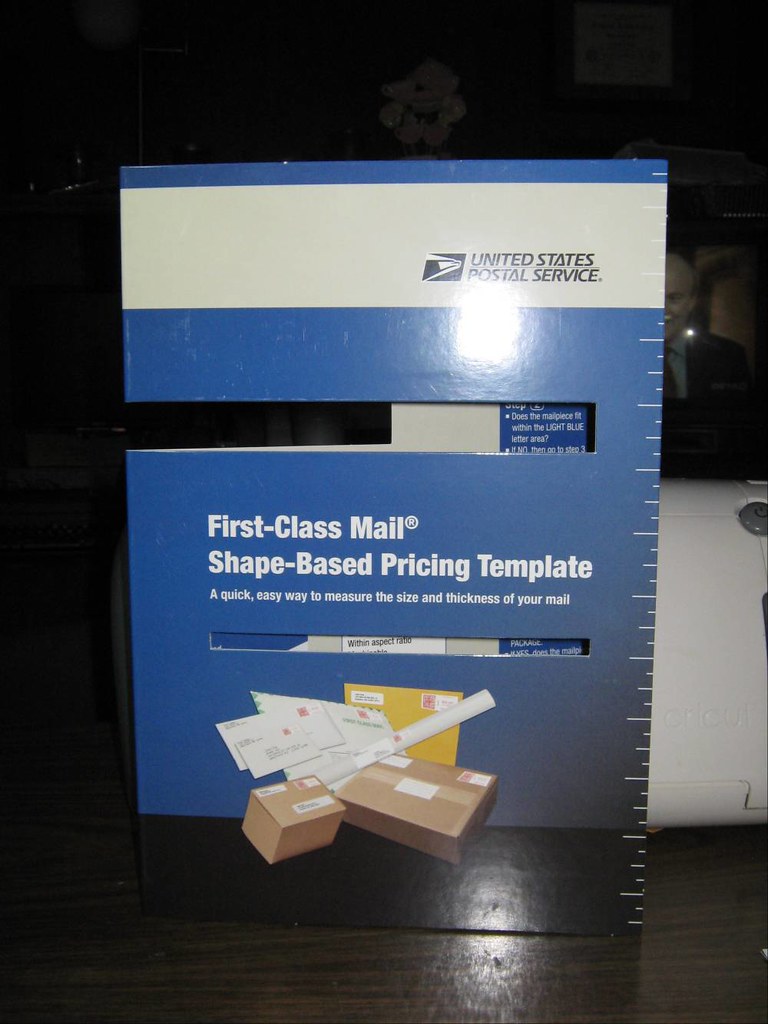
I got this handy dandy mailing template at my Post Office. I was asking one of the clerks about envie size and such and he handed me this to take home with me. I use it often! He didn't charge me for it so I would assume you can ask for one free of charge.


This picture shows the inside that has useful information about sizes and such. Notice the slots. The large slot is for measuring depth of larger envelopes and the smaller slot is for smaller envelopes. There are a few useful guides on the template, and some useful information.


Here is a picture of the square envie I made showing how the envie fits through the small slot. You can not force the envie it has to fall through on it's own. If it doesn't, then get ready to pay extra postage. While it did fall through easily right now it probably won't after I stick it another envie for mailing.

Making my own envies.......Crafters Companion HOORAY!

Months ago I received a Crafters Companion from a MB member as thanks for sharing my .cut files. I used this often!! I do have tons of envies but sometimes I like envies that match my card. I made some envies for my square cards and thought "huh.....maybe I should post pictures of how this works". So that is what I am doing!! You can click the pictures if you want a closer look.

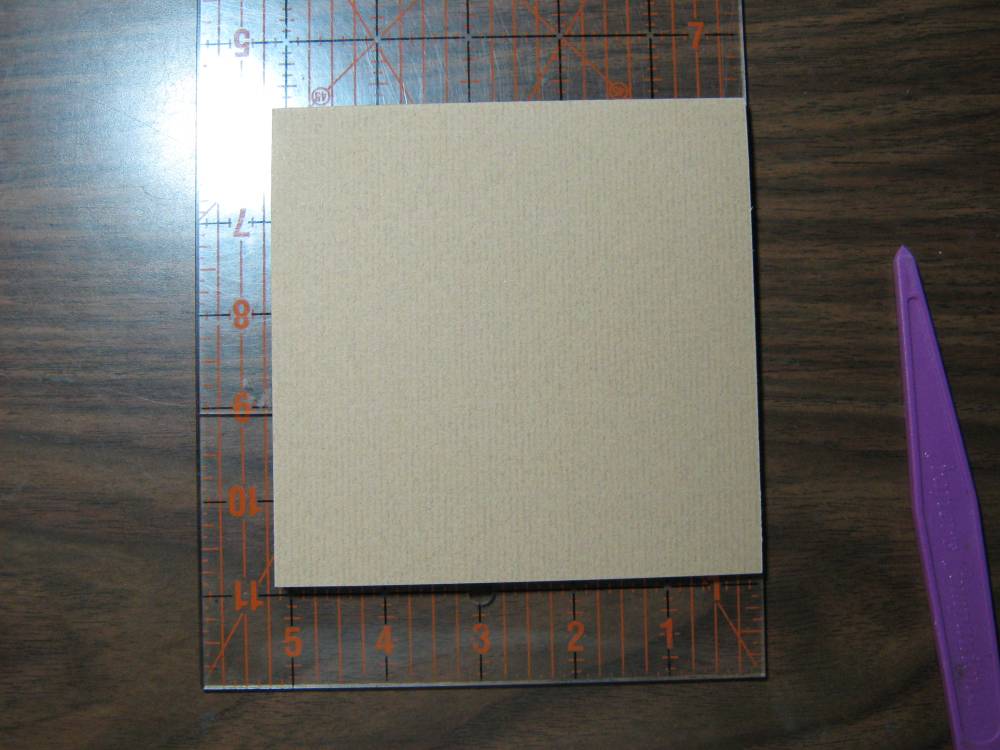
I needed envies for my square cards that I got at the stamp garage sale. The card measure s 5 1/8 inches and there wasn't a guide for how to make that size so I had to figure out the size of square I needed for my envie *okie sometimes wishes she had paid attention in math class*.

I figured out that for this size card I needed a square of 8 3/8 inches for this card. Don't ask me how I figured it out, I have no idea. I also figured that I needed to use my "E" guide lines. I wanted to make a gusset envie because my cards I had made had skittles on them.


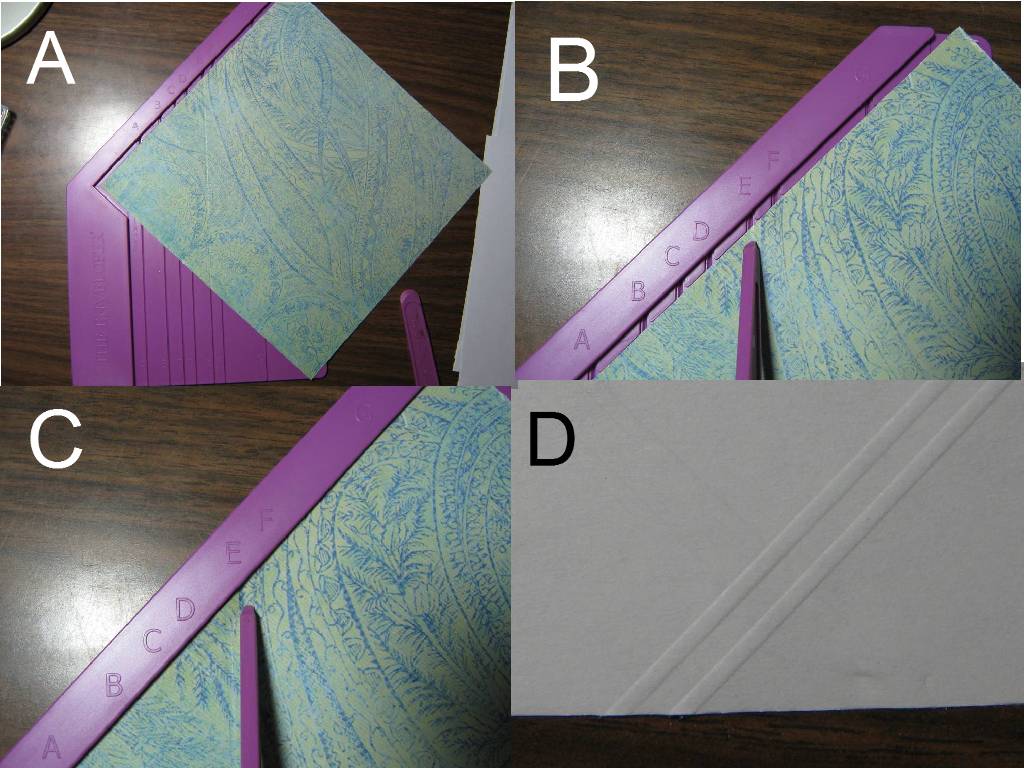
A. That is the 8 3/8 paper I cut.
B. I scored at the inside of the template on "E"
C. I then moved my paper to the outer guide and scored again on "E".
D. That gave me two score lines. I did this on all sides of the paper.


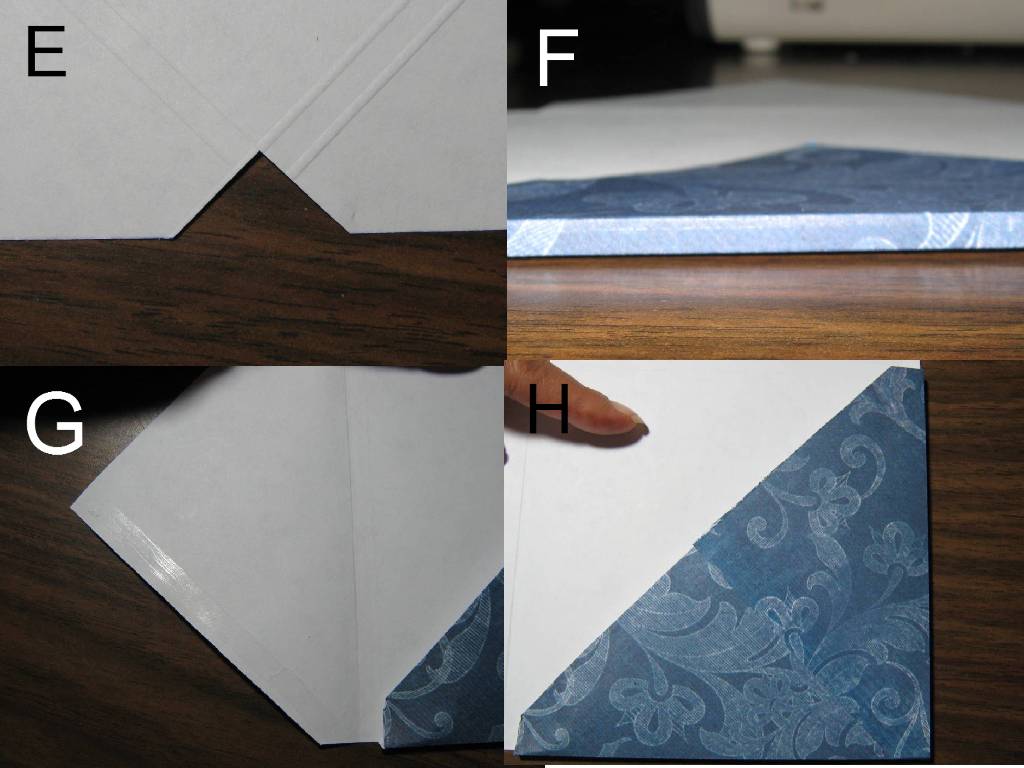
E. I cut notches where the score lines met, cutting on the OUTER score line.
F. I then folded on all the score lines, this gave me the gusset.
G. I used my ATG gun and added adhesive on the lower part of the triangle on the SIDES of the envie as shown.
H. I then folded up the bottom and them the side and pressed.


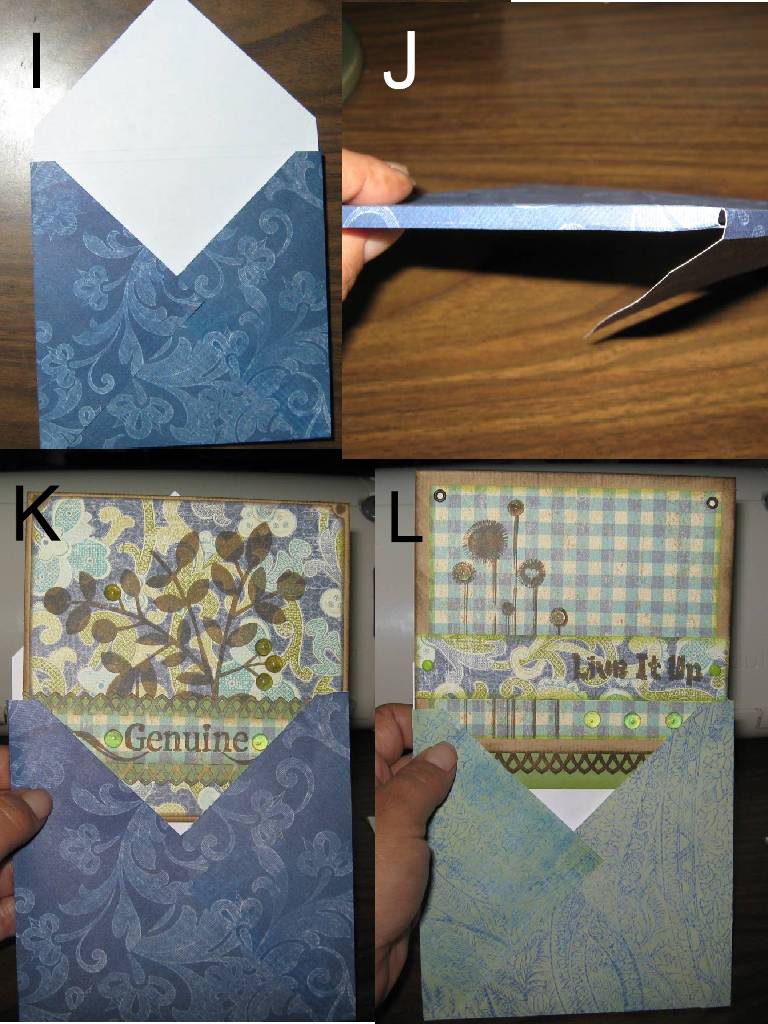
I. I then folded the other side in.
J. shows how it looks after folding
K & L. Show how the cards fit in the envies.

And that is all there is too it! I just love being able to make envies that match cards! I do this also because a square envie takes more postage. This way I can pop the card in it's custom envie in a larger envie and use just one stamp. Of course that is unless it is over the 1/4" guideline, then I still have to use extra postage.

I love square cards!

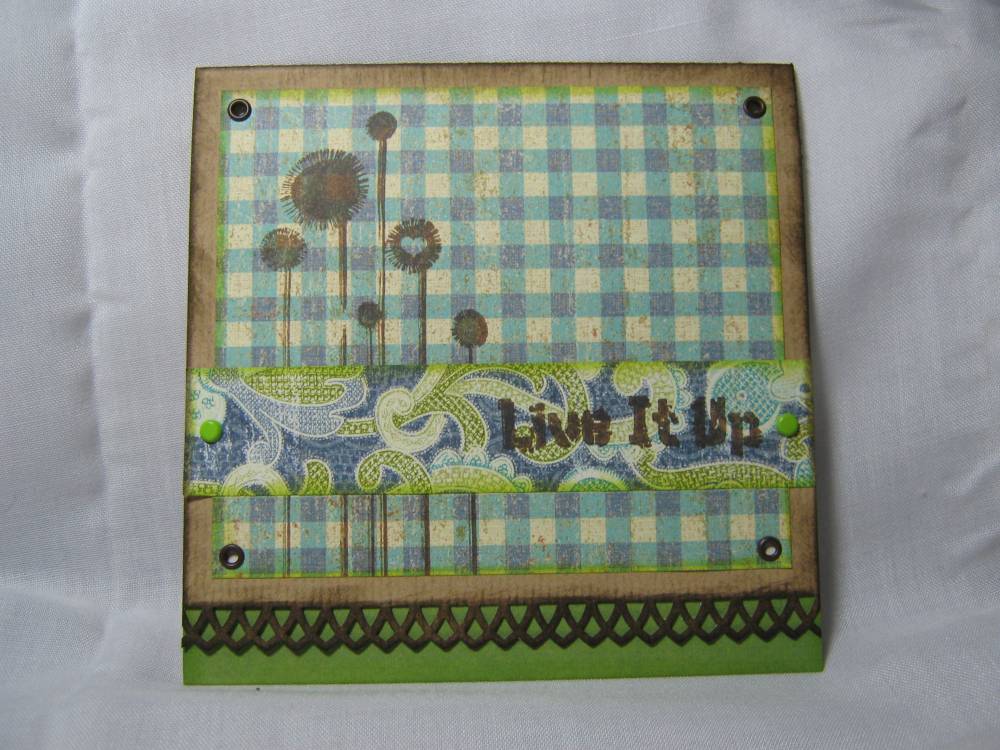
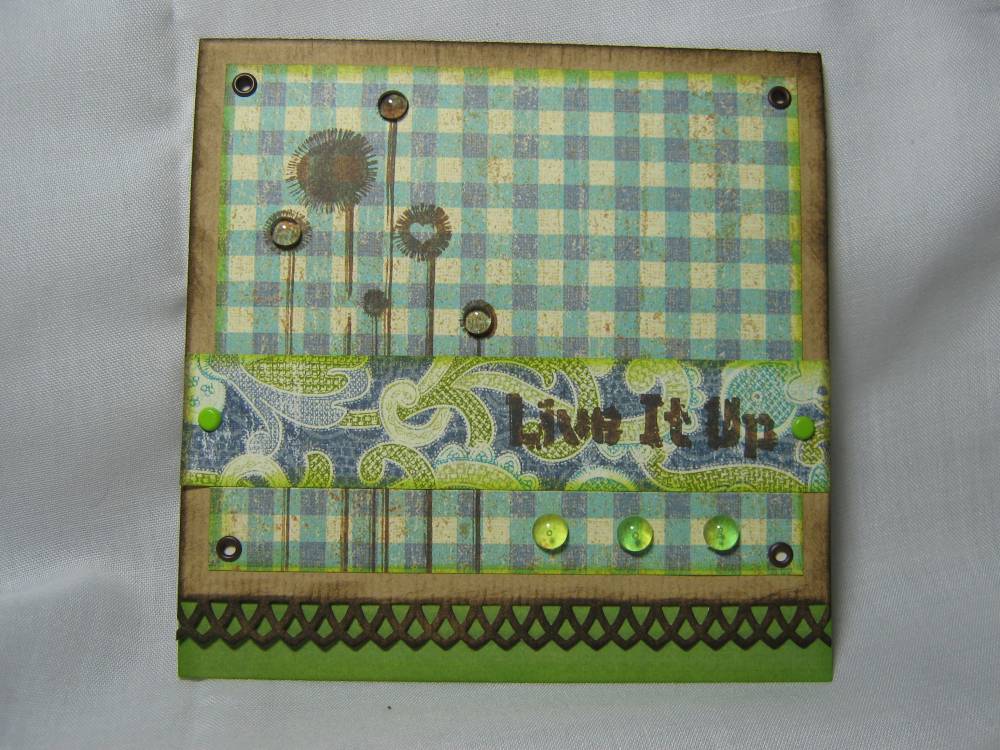
I made two square cards last night. I used a K & Co. paper pad that I got from Scraparazzi. I did use the Arch Lattice Border punch on the Live It Up.....soooo lovin that punch!! The stamping is from the Fancy Pants Fresh Mod 12x12 set. Also the Live It Up was the one I was working on when my eyelet setter died. Guess the setter won't be living it up any longer *tear runs down okies cheek*


When I looked at the cards again this morning I thought they looked kinda plain. So I decided to jazz them up a bit. I went to my faithful skittles and added some of those. I think it gave them just the right touch. I just think it is amazing how just adding a little embellishment can really make a card so much better!

The death of an eyelet setter.....

It is a sad moment at okie's house......my eyelet setter died last night.

There I was making a few cards and thought I would use eyelets. I grabbed my ever faithful eyelet setter and went about to punching the holes. I got two done and then all the sudden.....IT DIDN'T POP! The setter I have is a spring loaded type gadget.

I tried to do CPR but it just didn't respond. I then tried open heart surgery *okie was quite impressed with the genius simplistic design of the setter* and that didn't work. I would have tried organ transplant but a compatible donor could not be found.

Afterward I did an autopsy to try and find the cause of death. But alas, since I know nothing about eyelet setters I still wasn't able to find the cause. So the poor little eyelet setter sits on my desk not breathing, not working...not moving. I have been able to pull myself together and write an obituary.

***************************************************************************

ADA — Services for Eyelet Setter, Ada, are noon Sunday at okie's craft room. Burial follows at okie's craft trash can. Eyelet Setter died Oct. 18, 2008, at okie's craft table. Date of actual birth unknown but Setter came to live with okie in February 2008. She attended crops in Ada, OK and OKC, OK. She worked for okieladybug for 8 wonderful months and had perfect attendance. Setter did have a good sense of humor and would often hide from okie during crafting projects but she would always show herself and go straight to work. Survivors include her faithful companions, large hole punch head, medium hole punch head, small hole punch head, large setter head, medium setter head, small setter head and self healing mat. Ms. Setter will be greatly missed by all that knew her. Bearers will be Circut, Purple Cows Ultimate Cutter, Bic Mark It's, Fiskar Scissors, Sunlight Lamp, and Plaid Essentials Spinner. Honorary bearers will be K & Co., Basic Grey, SEI, Cuttlebug, Prism paper and DCWV. Family has asked that in lieu of flowers please donate to your favorite local scrapbook store. Condolences may be expressed to the family at Okieladybug's Crafts N' More.

Saturday, October 18, 2008

OKAY WHO LET ME FORGET? LAST TWO CUT FILES

I still have to other Stampin Up replica .cut files to release! Oh I don't mean the last two cut files I will ever release, just mean the last two from the whole adjustable set I did! HA HA HA

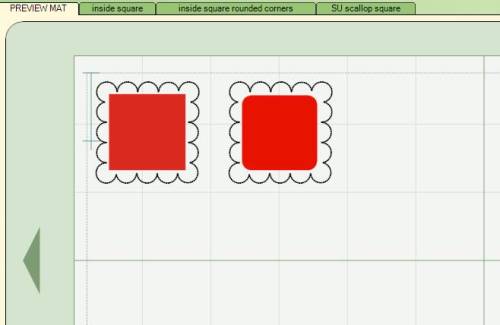
First we have the STAMPIN UP SCALLOP CIRCLE REPLICA. It has the 14 bumps just like the punch. I measured and certainly hope it works right, if not let me know and I will see if I can do some adjusting.


Next we have the STAMPIN UP SCALLOP SQUARE REPLICA. I measured this one too. I also measured this one, by that I mean I checked the measurements I found, and I did do the bumps according to the pictures of the punch. Let me know if it works okay!!

Friday, October 17, 2008

The infamous moving card!!

So if you guys remember I had told my cousin I would make her moving cards for her, thinking she would want about 15-20. Well she said she needed 50! I was like WTF?? 50 SERIOUSLY?? But I'll show her. I only made 48! HA HA HA

This is one of the cards I made. I think they looked cuter on the mat when I was designing. BUT OH WELL!

For the inside I put "A house is built by human hands, A home is built by human hearts" and then put "announcing our move (then the address)" I printed that on the computer on the same cloud background paper that I used on the front of the card.

I did send her a picture and her husband said "we don't have a fireplace and that is too many windows....and the pine trees are too pointy". I told her "(cusswords) cards are going in the trash!" Of course her husband was only teasing with me. AT LEAST HE BETTER HAVE BEEN! When I told her I was only sending 48 she said "well I guess I don't have to send you one" and I kindly replied "I never want to see the $#*@ again!!" HA HA HA She said she loves the cards and can't wait to get them.

Holly Border Merry Christmas

A little early huh! HA HA HA This is a card I made this week. I call it HOLLY BORDER. The card base is with George and Stretch your Imagination and the Merry Christmas is with Joys of the Season.

I had some gold card stock that I got in the scraps my LSS owner gave me and used that for the Merry Christmas. I think this makes a nice little card. Well an A2 card, so it's a nice standard card.

In the cut file I also have a mat that will just cut a holly border mat if you are just wanting a mat and not the whole card.

Oh I should add....that on the mats I was able to cut the holly at the same time as the card. I just cut the card stock at 9 inches I think and then added a 2 inch strip where the holly is placed. Saved time that way.


****UPDATE 11/18/08****

It was brought to my attention that the second object on the "mat only" mat didn't cut right. I forgot to burp it! Sorry for the inconvenience. It is now fixed and the download is corrected. Thanks SwimMom for pointing this out.

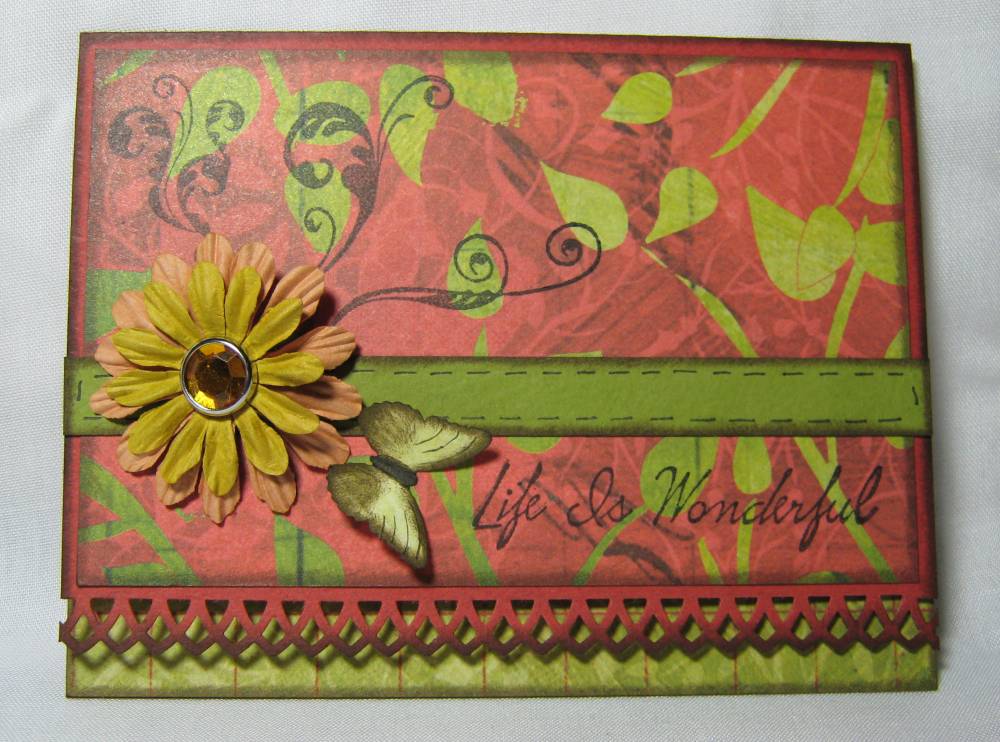
Life is Wonderful...........

I made this card real quick just to see how the Martha Stewart Arch Lattice punch worked. I LOVE THIS PUNCH! It has a bit of an simple elegance look about it. I got the punch from my friend Scraparazzi who often picks things up that she thinks people are looking for and then sells them for the price she paid (she loves using coupons, and sells for that price) plus shipping. THANKS RAZZI!! You can check out her blog Just call me Razzi and see what she has available.

The flowers are prima, the little butterfly is a Martha Stewart punch also. The flourishes and the Life is Wonderful are Fancy Pants stamps from the Fresh Mod collection. I can't remember what the paper is. Since I just grabbed a card base I had on hand I to use the punch on I just a scrap of double sided paper that I thought matched the card base. The strip of green is Prism card stock *okie's favorite brand of card stock hands down*. I was going to heat emboss the wording and flourishes but I can feel a serious nap coming on so I just stamped *okie gets lazy at nap time*.

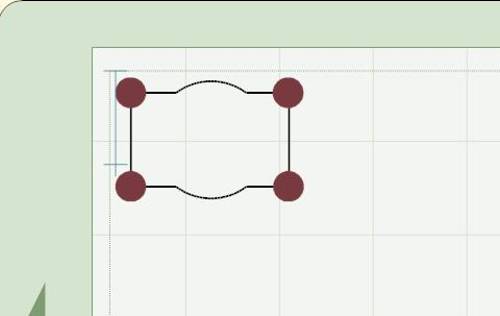
Stampin Up Designer Label Replica - DOWNLOAD NOW!

I forgot to post the STAMPIN UP DESIGNER LABEL replica .cut file last night. Please forgive me. I have been trying to design a cookbook and worked on that yesterday. Good news.....I have all my papers picked out, recipes ready for printing and my .cut files for the books are designed and ready to cut! Bad news is........I still have to finish my cousins moving cards, which will get done today so I can get them in the mail to her as she moved in I believe yesterday.

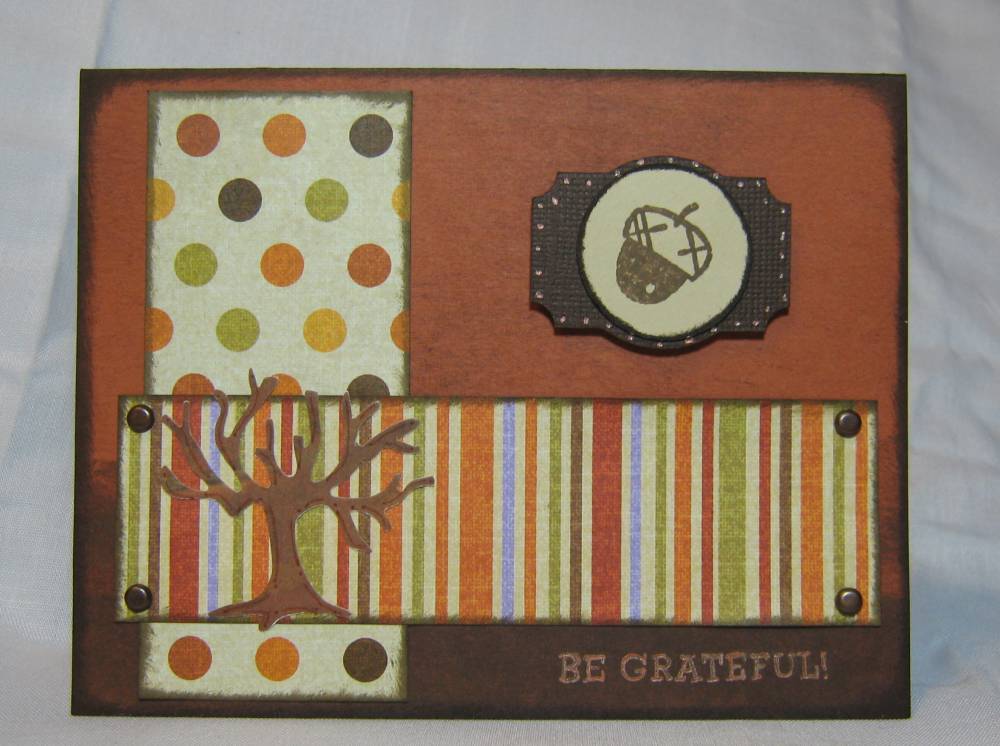
In case you have forgotten what this one looks like I used it on this card. I did size a small circle to stamp the acorn on. It is smaller than I though it would be but I tried to measure it according to the Stampin Up punch. If anyone knows if it is off please let me know and I will adjust it if I can.

It is made with GEORGE as are the other SU replica and adjustable .cut files I have posted lately. Thanks Joy for pointing out that I forgot to mention the cart used. Sometimes I do forget.....okay I forget a lot of stuff a lot of the time, but we won't talk about that LOL.


Now remember this is a two layer design. Meaning there is one image on top of the other. In order to get the little ticket punch like designs on the corners I had to lay the circles over the base. If you want to cut multiples just copy and paste the base, slide it over and then do the same for the cirlces. I don't have any stamps that go with this punch so I am not sure if it good enough. SSSOOO.....if any of ya'll do please let me know!