I am planning to attend a Swarm January 16th in Norman Oklahoma. The last one that Linda and I went to I didn't get a thing done! I was just sitting and looking at my stuff and wondering where to start. I was also really nosy on what others were doing, which kept me from working on my pile of "crap" on the table. This time I am determined to get something done! I have prepared a total of 3 two page layout kits and 4 one page layout kits to work on. I am hoping to get some more done before the Swarm so I have plenty to work on.
I made a short little video tutorial on how I put my kits together in case anyone is wondering how I do it.

Sunday, December 27, 2009
Thursday, December 24, 2009
MERRY CHRISTMAS!
Just wanting to wish all of you a Very Merry Christmas!
We are snowed in here in Ada, Oklahoma *okie still can't believe she was able to type that*. Not that we have that much snow but in Oklahoma anything over a few inches shuts the state down. There are places with lots of snow in Oklahoma right now. I hope everyone is safe and sound and staying warm.
Here are some pictures I took this evening. For once I will have a white Christmas!


Saturday, December 19, 2009
Sour Cream Containers.....Video Tutorial
I finally got on the stick and made the video tutorial for  the sour cream containers. They are super simple and fast to make. I am trying to get the hang of making videos and having problems staying within the area so you have to forgive the chopped off top parts of the video LOL.
Here is the video tutorial....
 the sour cream containers. They are super simple and fast to make. I am trying to get the hang of making videos and having problems staying within the area so you have to forgive the chopped off top parts of the video LOL.
Here is the video tutorial....
Tuesday, December 15, 2009
Sour Cream Containers.......HOW EASY!
I decided to make these for the kids at the school where I work of the  morning time. I have been wanting to try some of these ever since my friend Amy aka Scraparazzi posted some she made on the Cricut message board.
I can't believe how easy they were to make! I made about 40 in about two hours...of course Gibbs *okie wonders if people will know she means NCIS* kept interrupting me. And man oh man...who doesn't want to be interrupted by Gibbs! *okie drifts on in a dream land and smiles slightly*
 morning time. I have been wanting to try some of these ever since my friend Amy aka Scraparazzi posted some she made on the Cricut message board.
I can't believe how easy they were to make! I made about 40 in about two hours...of course Gibbs *okie wonders if people will know she means NCIS* kept interrupting me. And man oh man...who doesn't want to be interrupted by Gibbs! *okie drifts on in a dream land and smiles slightly*
Sunday, December 13, 2009
Painting on Acetate
I posted a card sometime ago where I had stamped and painted on acetate.  Today someone on the Cricut MB asked what to do with acetate and I posted pictures of the card. I then thought it might make a good video tutorial.
Here are some close ups of the cards I did in the video. I know pictures are easier to see sometimes than videos. Click on the pictures if you want to see the details better.

Sorry the video is a little blurry. Not sure why that happened.
 Today someone on the Cricut MB asked what to do with acetate and I posted pictures of the card. I then thought it might make a good video tutorial.
Here are some close ups of the cards I did in the video. I know pictures are easier to see sometimes than videos. Click on the pictures if you want to see the details better.


Sorry the video is a little blurry. Not sure why that happened.
Saturday, December 12, 2009
Snowflake card Video
I decided to try some different papers with the Cuttlebug Ice Crystal  cut and emboss set. My friend Karen liked the bronze Mica with the opal snowflake, but I thought I would try a pink snowflake since there was some shades of ink in the Basic Grey Eskimo Kisses paper.
I took a picture so you can see the detail better. Sometimes the detail doesn't show up on video too well. You can click the picture to make it bigger if you want to see it more close up.
I really think this one turned out nice. It will be one that I will be sending to Karen! LOL *okie hopes Karen doesn't read this post*
Here is the video.
 cut and emboss set. My friend Karen liked the bronze Mica with the opal snowflake, but I thought I would try a pink snowflake since there was some shades of ink in the Basic Grey Eskimo Kisses paper.
I took a picture so you can see the detail better. Sometimes the detail doesn't show up on video too well. You can click the picture to make it bigger if you want to see it more close up.
I really think this one turned out nice. It will be one that I will be sending to Karen! LOL *okie hopes Karen doesn't read this post*
Here is the video.
Coloring with Cat Eye Inks
I had a few requests to do a tutorial on how to color with the Cat Eye Inks after I posted my Christmas cards of the Lace Tree Cuttlebug folder earlier in the week. It is very simple to do and can really jazz things up!
I believe in Santa Claus.....
And I got the pictures to prove it! There is something about the spirit of Santa Claus that just brings the warm fuzzies to me. I know Christmas is about the birth of Christ but I also believe that Santa Claus helps bring the spirit of giving to others. I can't imagine anyone not loving Santa!
I started collecting Santa's a few years back. My friends think I have enough Santa Claus's. I think they are just jealous because they don't have any! LOL
Here are some pictures of my living room decorated.


I started collecting Santa's a few years back. My friends think I have enough Santa Claus's. I think they are just jealous because they don't have any! LOL
Here are some pictures of my living room decorated.


Snowflake Card
I used the Cuttlebug cut and emboss Snowflake set for these cards. They were super simple and fast to make! This was another one where I was showing my friend Karen how something worked, the snowflake, and she made me make a card. But I am glad she did since I made a few of them because they were so simple.
I cut my mat at 4x5.25 inches and embossed using the Cuttlebug Joy & Cheer folder and then cut a 3x3 inch mat for the snowflake. The one on the left has some simple small silver brads and the one on the right has a rhinestone brad. I did used opal Mica cardstock for the snowflakes.
 They were super simple and fast to make! This was another one where I was showing my friend Karen how something worked, the snowflake, and she made me make a card. But I am glad she did since I made a few of them because they were so simple.
I cut my mat at 4x5.25 inches and embossed using the Cuttlebug Joy & Cheer folder and then cut a 3x3 inch mat for the snowflake. The one on the left has some simple small silver brads and the one on the right has a rhinestone brad. I did used opal Mica cardstock for the snowflakes.
Friday, December 11, 2009
Look what I scored!!
The sewing store here in town is closing down due to the new owner doubling the rent.  I stopped in to see what she had and I saw this pegboard spinner and asked her if she or her husband made it thinking I could make one. She asked me if I needed it and told me to name my price. I told her I had no idea how much and she said "just give me a price". When I didn't give her one she said "how about 3 dollars". I was thrilled!!!
It has the pegboard on all four sides and spins. It does catch on one corner but my friend said he would sand that down for me. The lady even threw in a ton of hooks!!
I think I will really like this because I won't have to dig through drawers to find my things. I do need to organize a bit better but for now it will do.
 I stopped in to see what she had and I saw this pegboard spinner and asked her if she or her husband made it thinking I could make one. She asked me if I needed it and told me to name my price. I told her I had no idea how much and she said "just give me a price". When I didn't give her one she said "how about 3 dollars". I was thrilled!!!
It has the pegboard on all four sides and spins. It does catch on one corner but my friend said he would sand that down for me. The lady even threw in a ton of hooks!!
I think I will really like this because I won't have to dig through drawers to find my things. I do need to organize a bit better but for now it will do.
Lace Christmas Tree
I am so lovin this folder!! A wonderful Cricut MB member sent it to me when I was unable to find it here *okie smiles and knows that person knows who they are*. There really are a lot of ways you can embellish this lovely tree! I made several versions to see what I liked. Of course the one I liked the most was the most work and there won't be many of those made *okie cracks up laughin*.
I used Cat Eye chalk inks to color the ones that are colored. The one on the left has Stickles added to some of the areas. I did cut the tree and then pop dot it for dimension. The one on the right also has been colored with Cat Eye chalk ink. I added some Stampedous holograpic stickers to a few areas for some bling. The middle card is an A6 size. I wanted to mat the tree with more printed paper showing so I went with the larger card. I think the dark colors contrast the tree nicely. I added some holly Stickles to the circles on the tree since it looked a little too plain on there.
 unable to find it here *okie smiles and knows that person knows who they are*. There really are a lot of ways you can embellish this lovely tree! I made several versions to see what I liked. Of course the one I liked the most was the most work and there won't be many of those made *okie cracks up laughin*.
I used Cat Eye chalk inks to color the ones that are colored. The one on the left has Stickles added to some of the areas. I did cut the tree and then pop dot it for dimension. The one on the right also has been colored with Cat Eye chalk ink. I added some Stampedous holograpic stickers to a few areas for some bling. The middle card is an A6 size. I wanted to mat the tree with more printed paper showing so I went with the larger card. I think the dark colors contrast the tree nicely. I added some holly Stickles to the circles on the tree since it looked a little too plain on there.
Thursday, December 10, 2009
Easy Christmas Wreath
This card was so simple to make! I used the Cuttlebug cut and emboss wreath that came out last  year. I was actually showing my friend Karen how it worked and she made me make a card. I only made one but I am going to be making a few more of these!
The stamp is from Stampin Up. The mat is mica cardstock. I added a few stickles to the berries and ribbon on the wreath. The brads are some that I flocked *okie remembers she needs to flock some more since her stash is getting a little low*. I did pop dot the wreath for some dimension.
I think next time I might use the Script Cuttlebug folder on the mat. OH OH OH! And I just thought also...I could use my Stampin Up tag punch and a Christmas sentiment on the tag to "hang" from the bow on the ribbon! *okie thinks she needs to head to her scrap table right now!*
Stay tuned for more cards! LOL
 year. I was actually showing my friend Karen how it worked and she made me make a card. I only made one but I am going to be making a few more of these!
The stamp is from Stampin Up. The mat is mica cardstock. I added a few stickles to the berries and ribbon on the wreath. The brads are some that I flocked *okie remembers she needs to flock some more since her stash is getting a little low*. I did pop dot the wreath for some dimension.
I think next time I might use the Script Cuttlebug folder on the mat. OH OH OH! And I just thought also...I could use my Stampin Up tag punch and a Christmas sentiment on the tag to "hang" from the bow on the ribbon! *okie thinks she needs to head to her scrap table right now!*
Stay tuned for more cards! LOL
Wednesday, December 9, 2009
Merry Christmas Cardinal
My BFF Karen *okie knows she has mentioned Karen several times before* was here for my Christmas party.  After all the guests were gone and we got things settled down around the house she wanted to make her grandmother a nice Christmas card. She said her grandmother loves cardinals and I immediately thought of the one on the Winter Woodland cart. We came up with the MERRY CHRISTMAS CARDINAL A2 card. Karen thinks her grandmother will really love the card. We used Winter Woodland for the cardinal and branch and the Merry Christmas is from Wild Cards. You can change the sentiment to whatever you like. The cut file is set to cut 4 at a time.
I used the snowflakes Cuttlebug folder on the mat and then spritzed with pearl Glimmer Mist. The cardinal is with Mica cardstock, the branch is Prism and the Merry Christmas is with silver DCWV metallic. I also added some frosted stickles on the branch, leaves and top of the pine cone.
 After all the guests were gone and we got things settled down around the house she wanted to make her grandmother a nice Christmas card. She said her grandmother loves cardinals and I immediately thought of the one on the Winter Woodland cart. We came up with the MERRY CHRISTMAS CARDINAL A2 card. Karen thinks her grandmother will really love the card. We used Winter Woodland for the cardinal and branch and the Merry Christmas is from Wild Cards. You can change the sentiment to whatever you like. The cut file is set to cut 4 at a time.
I used the snowflakes Cuttlebug folder on the mat and then spritzed with pearl Glimmer Mist. The cardinal is with Mica cardstock, the branch is Prism and the Merry Christmas is with silver DCWV metallic. I also added some frosted stickles on the branch, leaves and top of the pine cone.
Tuesday, December 1, 2009
Altered Dollar Tree Dome Tins
This size tin holds at least 10 heavy embellished A2 cards. They don't lay completely flat but they will fit *okie grins and nods*. I know some people did get these tins and once again...why cut by hand with what can be cut with the Cricut!
I have the file for the baby bug DOME TIN GEO and for the Expression DOME TIN PS. I don't have a video or picture tutorial for these since I am rushing around getting ready for my Christmas party this weekend *okie feels a sense of panic come over her* and I am running out of time!!
But I do have some pictures. The tins were painted with a cheap flat white spray paint and then I used Cat Eye Chalk inks to do the edges. I used dark brown on some and then olive pastel on others. Of course you can use what ever suits your fancy...just thought I would let ya know what I used. I didn't decorate them very much due to time constraints and needing to get them wrapped.
I used K & Company paper packs for all 4 of the tins. I don't remember the names off hand but I LOVE THEM! Maybe not as much as Basic Grey...but pretty close. All the sentiments on the tins are punch outs from the packs.


Here are some that are a little more bright in color. I took a picture of one of them showing the bottom since I do have cuts for the bottom also. Not sure why I thought it had to be covered since it likely won't even be seen....but the cut is there none the less.

Here you can see how the cards fit in the tins. I hope my guests like them! My cohost this year is my friend Andrea and she picked out cards for the sets. She said she couldn't decided on which cards because she liked them all. She didn't seem upset about not being able to win a prize of these, but then again why would she be when she can go through my card stash anytime she wants! HA HA HA....but seriously.........SHE DOES!
Don't forget to click the pictures if you want to see more detail. I hope you guys can use the files!
I have the file for the baby bug DOME TIN GEO and for the Expression DOME TIN PS. I don't have a video or picture tutorial for these since I am rushing around getting ready for my Christmas party this weekend *okie feels a sense of panic come over her* and I am running out of time!!
But I do have some pictures. The tins were painted with a cheap flat white spray paint and then I used Cat Eye Chalk inks to do the edges. I used dark brown on some and then olive pastel on others. Of course you can use what ever suits your fancy...just thought I would let ya know what I used. I didn't decorate them very much due to time constraints and needing to get them wrapped.
I used K & Company paper packs for all 4 of the tins. I don't remember the names off hand but I LOVE THEM! Maybe not as much as Basic Grey...but pretty close. All the sentiments on the tins are punch outs from the packs.


Here are some that are a little more bright in color. I took a picture of one of them showing the bottom since I do have cuts for the bottom also. Not sure why I thought it had to be covered since it likely won't even be seen....but the cut is there none the less.


Here you can see how the cards fit in the tins. I hope my guests like them!
 My cohost this year is my friend Andrea and she picked out cards for the sets. She said she couldn't decided on which cards because she liked them all. She didn't seem upset about not being able to win a prize of these, but then again why would she be when she can go through my card stash anytime she wants! HA HA HA....but seriously.........SHE DOES!
Don't forget to click the pictures if you want to see more detail. I hope you guys can use the files!
Wednesday, November 18, 2009
Mini Lunchbox Alteration
I am finally getting around to posting the cut files for the Dollar Tree  mini lunch boxes! I have the cut file for LUNCHBOX PS, which is set on the 12x12 mat and THE LUNCHBOX GEO, which is set on the 12x6 mat. The mats are labeled according to the cut. You will easily be able to cover a lunch box with one sheet of double sided paper. I wouldn't advise trying to move the cuts around for the rims or sides since it kept giving me the dreaded red X of death! *okie wishes Design Studio would stop that #@%$!*.
What took me so long to post the cut files is that I wanted to do a video tutorial so you guys can see how easy it is to alter these. I really gotta learn to talk faster or work faster one, not sure which. I keep having to edit like 4-5 minutes out of my videos *okie thinks she will just blame it on the director*. Anyway, I hope you guys can use the cut file! It really does make it easier.
 mini lunch boxes! I have the cut file for LUNCHBOX PS, which is set on the 12x12 mat and THE LUNCHBOX GEO, which is set on the 12x6 mat. The mats are labeled according to the cut. You will easily be able to cover a lunch box with one sheet of double sided paper. I wouldn't advise trying to move the cuts around for the rims or sides since it kept giving me the dreaded red X of death! *okie wishes Design Studio would stop that #@%$!*.
What took me so long to post the cut files is that I wanted to do a video tutorial so you guys can see how easy it is to alter these. I really gotta learn to talk faster or work faster one, not sure which. I keep having to edit like 4-5 minutes out of my videos *okie thinks she will just blame it on the director*. Anyway, I hope you guys can use the cut file! It really does make it easier.
Tuesday, November 17, 2009
WINTER WOODLAND WINNER!!
I told my friend to pick a number between 1-219 and he chose 58! So the person who was the 58th person to post is the winner of the Winter Woodland Cartridge.....and some extra little goodies!!
That person is.......
That person is.......
-
Okie you are too funy!! I love to see all your creations and read your posts!
Thanks for sharing--I would love to own Winter Woodlands.
Monday, November 16, 2009
Mini Lunch box tins...who got some
Did any of you guys get the mini lunch box tins from Dollar Tree? I got a few *okie laughs at saying a few* and started altering last night. I did a cut file for covering the tin that I need to tweak just a bit. If any of you got the tin let me know and I will post the cut file tonight. It includes cuts for the top, bottom, side and lid side. The cuts are there for where the latch is, which is a pain in the hiney when trying to cut by hand.
Sunday, November 15, 2009
Uhh...it's over
*okie peeks around the corner with a puzzled look on her face and scratches her head* What? You guys are still here? Look at the time folks it is 2:15 am Sunday morning. It's over! Go away now there is nothing else to see! *okie shoos away the readers looking* Now go away and let me sleep....*okie starts to walk off, looks over her shoulders* My guest designer spot is over, and now it is Susan and Jeannie's turn. Go now.....go on.....*okie shakes head and sighs deeply*
*okie starts to walk down the hall and looks back* SERIOUSLY FOLKS! GO AWAY NOW!
*okie walks a few more steps and stops suddenly* OOHH MMYY GGOOSSSHHH!! I know why ya'll are still here! *okie starts to grin* It's about the giveaway huh!!
*okie walks back to the screen* Okay here's the dealeo folks. I am giving away a Winter Woodland cartridge. Yep...absolutely free I tell you. Oh yes and if the lucky winner lives over seas, guess what...I will ship international! Also I will be throwing in a few little surprise goodies! All you have to do is comment on THIS POST to be eligible. The drawing will close on Tuesday at noon central time *seems appropriate since it is okie's time*.
Oh and I will not be posting this on the Cricut messageboard. I want my regular readers to have a better shot at winning, plus I want to see who is paying attention *okie cracks up laughin*! Thanks so much to all of you for the wonderful comments this last week on my projects!
Please enter only once. I have to approve comments before they are posted so it may take awhile for your comment to be visible.
Saturday, November 14, 2009
Crafty Gift - My final Christmas With The Cricut project
It's Crafty Gift Saturday and this is my final time posting for Christmas With The Cricut. I have enjoyed being a guest designer with Barb aka Snowmanlover and have loved all the projects she has made this week! Make sure you check out her projects also at Snowmanlovers Paperie. I would like to thank the ladies over at CWTC for believing I was talented enough to be a guest designer for their blog.
For my crafty gift I decided to do an altered tin. Ya'll know I love me some altered tins!! This particular one is a Stampin Up skinny tin *okie wonders if anyone else sees a tin and automatically starts thinking of how they can decorate it*.
You will need to click on the picture to see the details better.
The theme I used was Christmas candy recipes and I decided to put "Oh Sweet Christmas" on the outside of the tin. I made a set of 12 recipe cards that go inside the tin.
I once again used the Basic Grey Eskimo Kisses paper line *okie wonders if anyone noticed the theme all week and then laughs at her silly self*.
To cover the tin I cut the paper slightly larger than t he measurement of the tin. I then went along as close as I could with my Cutterbee scissors and then followed up with my Basic Grey file kit to sand the paper down to the edge. The font for "Oh Sweet Christmas" is Winter Woodland, as are the snowflakes and branch. I added light blue rhinestones and doodled with a SU marker on the snowflakes. For the branch I used Kaiser flat back pearls for the berries. The dots on the title are done with the Signo UM-153 white gel pen. The inked edges are done with Cat Eye Dark Brown Chalk Ink.
I will be using this as a prize at my Christmas party *okie knew she better keep the recipes simple since she figures only 2 of her guests own candy thermometers*. I found some of my favorite candy recipes and printed them on MS word *okie wonders if anyone is interested in doing this project since she saved the recipes in MS Word* and trimmed to 1/8" from the wording. I used Mini Monograms for the card bases and mats. I used Winter Woodland for the decorative cuts. I didn't get to pop dot as much as I generally do since the tin is not quite 1" thick.
I did get to pop dot on the front though and thank goodness *okie wipes hand across brown*, I sure don't want to go through pop dot withdrawl! I heard it ain't pleasant at all!! You can see the detailing a bit better in this picture also. Don't ya'll just love Kaiser Pearls!?! *okie grins nodding head up and down like an idiot*. I think some maroon pearls might have looked better but I since I didn't have maroon I had to go with what I had, which was the opal color.
There are so many things I can think of to do with these cute little tins!
I want to thank all of you for your support and wonderful comment this week. It has been a joy reading each and every one of them! I was nervous about the video but with all the positive comments I got I think I will probably be making more in the future.
******************UPDATE - FILES AVAILABLE*********************************
I didn't include the .cut file or recipe file at first because I wasn't sure anyone would want to make one of these since I did it specifically for my recipes that I printed and cut. But after some of the comments I received I thought I would make the files available along with a few instructions.
CANDY RECIPE TIN - click to download the .cut file. It uses Winter Woodland and Mini Monograms. The first 2 mats are for reference only for placement ideas. Since the recipes measure differently I made each cut for that specific recipe card. Of course feel free to play with it however you wish. All the other mats are labeled according to what they are. The abbreviations are for the recipes themselves and are follows:
1st mat (do not cut)- Christmas Peppermint Candy, Butterscotch Haystacks, Rocky Road Fudge, White Chocolate Party Mix
2nd mat (do not cut) - Eskimo Snowballs, Easy Oreo Truffles, Rum Balls, No-Cook Divinity
3rd mat - cut 1, it's scallop mats for the card base for the following recipes...Ho Ho Snowballs, Peanut Butter Balls, Coconut BonBons, Kahlua Cocoa Balls
Card base - cut 3
Card mat - cut 2 (the scallop mat finishes out the card mats)
All other mats are labeled by color. Of course you don't have to follow the design with the colors or the specific cuts. Just remember not to make your cuts too big.
Also you won't be able to popdot or embellish too heavy since the tin isn't quite an inch thick. I did minimal decoration on several of the cards to keep the overall thickness down.
EASY CHRISTMAS CANDY RECIPES - click to download the recipes. There are 3 sheets for a count of 12 recipes. You will want to trim the recipes 1/8" from the wording. I used a quilting ruler to do mine.
I hope you guys enjoy making this project! I know it sounds like it might be complicated but it really isn't. HAVE FUN!
For my crafty gift I decided to do an altered tin. Ya'll know
 I love me some altered tins!! This particular one is a Stampin Up skinny tin *okie wonders if anyone else sees a tin and automatically starts thinking of how they can decorate it*.
You will need to click on the picture to see the details better.
The theme I used was Christmas candy recipes and I decided to put "Oh Sweet Christmas" on the outside of the tin. I made a set of 12 recipe cards that go inside the tin.
I once again used the Basic Grey Eskimo Kisses paper line *okie wonders if anyone noticed the theme all week and then laughs at her silly self*.
To cover the tin I cut the paper slightly larger than t
 he measurement of the tin. I then went along as close as I could with my Cutterbee scissors and then followed up with my Basic Grey file kit to sand the paper down to the edge. The font for "Oh Sweet Christmas" is Winter Woodland, as are the snowflakes and branch. I added light blue rhinestones and doodled with a SU marker on the snowflakes. For the branch I used Kaiser flat back pearls for the berries. The dots on the title are done with the Signo UM-153 white gel pen. The inked edges are done with Cat Eye Dark Brown Chalk Ink.
I will be using this as a prize at my Christmas party
 *okie knew she better keep the recipes simple since she figures only 2 of her guests own candy thermometers*. I found some of my favorite candy recipes and printed them on MS word *okie wonders if anyone is interested in doing this project since she saved the recipes in MS Word* and trimmed to 1/8" from the wording. I used Mini Monograms for the card bases and mats. I used Winter Woodland for the decorative cuts. I didn't get to pop dot as much as I generally do since the tin is not quite 1" thick.
I did get to pop dot on the front though and thank goodness
 *okie wipes hand across brown*, I sure don't want to go through pop dot withdrawl! I heard it ain't pleasant at all!! You can see the detailing a bit better in this picture also. Don't ya'll just love Kaiser Pearls!?! *okie grins nodding head up and down like an idiot*. I think some maroon pearls might have looked better but I since I didn't have maroon I had to go with what I had, which was the opal color.
There are so many things I can think of to do with these cute little tins!
I want to thank all of you for your support and wonderful comment this week. It has been a joy reading each and every one of them! I was nervous about the video but with all the positive comments I got I think I will probably be making more in the future.
******************UPDATE - FILES AVAILABLE*********************************
I didn't include the .cut file or recipe file at first because I wasn't sure anyone would want to make one of these since I did it specifically for my recipes that I printed and cut. But after some of the comments I received I thought I would make the files available along with a few instructions.
CANDY RECIPE TIN - click to download the .cut file. It uses Winter Woodland and Mini Monograms. The first 2 mats are for reference only for placement ideas. Since the recipes measure differently I made each cut for that specific recipe card. Of course feel free to play with it however you wish. All the other mats are labeled according to what they are. The abbreviations are for the recipes themselves and are follows:
1st mat (do not cut)- Christmas Peppermint Candy, Butterscotch Haystacks, Rocky Road Fudge, White Chocolate Party Mix
2nd mat (do not cut) - Eskimo Snowballs, Easy Oreo Truffles, Rum Balls, No-Cook Divinity
3rd mat - cut 1, it's scallop mats for the card base for the following recipes...Ho Ho Snowballs, Peanut Butter Balls, Coconut BonBons, Kahlua Cocoa Balls
Card base - cut 3
Card mat - cut 2 (the scallop mat finishes out the card mats)
All other mats are labeled by color. Of course you don't have to follow the design with the colors or the specific cuts. Just remember not to make your cuts too big.
Also you won't be able to popdot or embellish too heavy since the tin isn't quite an inch thick. I did minimal decoration on several of the cards to keep the overall thickness down.
EASY CHRISTMAS CANDY RECIPES - click to download the recipes. There are 3 sheets for a count of 12 recipes. You will want to trim the recipes 1/8" from the wording. I used a quilting ruler to do mine.
I hope you guys enjoy making this project! I know it sounds like it might be complicated but it really isn't. HAVE FUN!
Friday, November 13, 2009
Need help!!! downloading files
Evidently there are some download issues with some of my files right now. If you have been able to download please leave a comment and let me know. If you have tried to download but haven't been able to please leave a comment and let me know which file you were trying to download. I will try and get this straightened out this afternoon. Thanks so much!
Fancy Card - Eskimo Kisses
Good day everyone! Today is Fancy Card Friday at Christmas With The Cricut. Barb aka Snowmanlover will be rounding out our week as guest designers tomorrow with the crafty gift. I have really enjoyed being able to post my creations for you guys and I appreciate all the wonderful comments! Make sure you check out Barb's Fancy Card at Snowmanlovers Paperie!
So for my fancy card I decided to make this POCKET CARD ESKIMO KISSES. I have to be honest and give Tammy at CWTC for the idea. I had made a pocket card last fall and posted on my blog and she really loved it and suggested that I make one during my guest designer spot.
The great thing about this card is that the pockets are large enough to put a gift card in also if you so desire. I will be using some repositionable tape to add one to the blank tag.
The .cut file is set to cut 2 cards at once. All elements (ie, sentiments and tags) are adjustable and are easy to copy and paste if you are wanting to cut more than once. However the card base is not adjustable.
Feel free to change the wording or other elements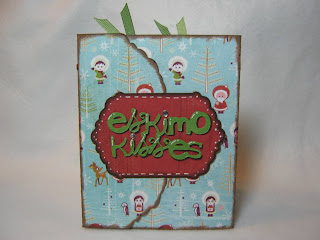 of the card to your own specific needs. I chose the words Eskimo kisses since the Basic Grey paper had Eskimo's on it. I do have the words "& holiday wishes" in the cut file that will fit on a tag but since my blade died on me I opted to use the stamped sentiment of "warm holiday wishes". Here is the front shot and also a close up of the inside where you can see the sentiment better. Remember you can click on the picture if you want to see closer detail *okie always likes to remind others of this feature*.
Step1 - You will want to gather your cuts and ink any edges before you start to assemble. Then assemble the front sentiment and the sentiment block. I chose to use some Basic Grey magnets to help keep the card closed. I applied one in between the sentiment layers and placed the other one on the back side, closed the card, marked where the magnet should be and then placed it between the inside mat and card base *okie things this might need to be a video in the future*. I promise it is not as complicated as it sounds. I have used velcro dots as closures also. It all just depends on what you are wanting to do.
Step 2 - Apply the mats to the card base. I added faux stitching with a Stampin Up marker at this point. You may not want to decorate the mats too much since they will be covered with the pockets and the tags. I thought about using the Cuttlebug but I couldn't bring myself to squish those cute little Eskimo's!
Step 3 - Add ribbon to your pocket cuts before adhering to the mats, this way you can clip the ends easily. I added faux stitching with a Signo UM-153 white pen. I used my ATG gun to adhere the pockets and it has the 1/4" tape. You will want to be careful to stay to the edges so you allow for the tags to be inserted later. Also remember to only do the sides and bottom. If ya do the top...well...the dang tag won't go in!! *okie laughs at self because she almost did this*.
Step 4 - Assemble your tags and decorate as you wish. Again I thought about the cuttlebug but since I am leaving one blank for either adding a gift card or writing a short note I decided against it. I pulled ribbon through the holes at the top and then added brads to keep the ribbon in place.
Step 5 - Add your sentiment to one mat, you can either use the one that is included in the cut file, make your own or do as I did and stamp then emboss! *okie loves embossing powder*.
While the card may seem complicated it really is easy to go together and can be decorated in so many ways!!
So for my fancy card I decided to make this POCKET CARD ESKIMO KISSES.
 I have to be honest and give Tammy at CWTC for the idea. I had made a pocket card last fall and posted on my blog and she really loved it and suggested that I make one during my guest designer spot.
The great thing about this card is that the pockets are large enough to put a gift card in also if you so desire. I will be using some repositionable tape to add one to the blank tag.
The .cut file is set to cut 2 cards at once. All elements (ie, sentiments and tags) are adjustable and are easy to copy and paste if you are wanting to cut more than once. However the card base is not adjustable.
Feel free to change the wording or other elements
 of the card to your own specific needs. I chose the words Eskimo kisses since the Basic Grey paper had Eskimo's on it. I do have the words "& holiday wishes" in the cut file that will fit on a tag but since my blade died on me I opted to use the stamped sentiment of "warm holiday wishes". Here is the front shot and also a close up of the inside where you can see the sentiment better. Remember you can click on the picture if you want to see closer detail *okie always likes to remind others of this feature*.
Step1 - You will want to gather your cuts and ink any edges before you
 start to assemble. Then assemble the front sentiment and the sentiment block. I chose to use some Basic Grey magnets to help keep the card closed. I applied one in between the sentiment layers and placed the other one on the back side, closed the card, marked where the magnet should be and then placed it between the inside mat and card base *okie things this might need to be a video in the future*. I promise it is not as complicated as it sounds. I have used velcro dots as closures also. It all just depends on what you are wanting to do.
Step 2 - Apply the mats to the card base. I added faux stitching with a Stampin Up
 marker at this point. You may not want to decorate the mats too much since they will be covered with the pockets and the tags. I thought about using the Cuttlebug but I couldn't bring myself to squish those cute little Eskimo's!
Step 3 - Add ribbon to your pocket cuts before adhering
 to the mats, this way you can clip the ends easily. I added faux stitching with a Signo UM-153 white pen. I used my ATG gun to adhere the pockets and it has the 1/4" tape. You will want to be careful to stay to the edges so you allow for the tags to be inserted later. Also remember to only do the sides and bottom. If ya do the top...well...the dang tag won't go in!! *okie laughs at self because she almost did this*.
Step 4 - Assemble your tags and decorate as you wish.
 Again I thought about the cuttlebug but since I am leaving one blank for either adding a gift card or writing a short note I decided against it. I pulled ribbon through the holes at the top and then added brads to keep the ribbon in place.
Step 5 - Add your sentiment to one mat, you can either use the one that is
 included in the cut file, make your own or do as I did and stamp then emboss! *okie loves embossing powder*.
While the card may seem complicated it really is easy to go together and can be decorated in so many ways!!
Thursday, November 12, 2009
Daughter update
I just wanted to say thank you so much for all the wonderful comments about the situation with my daughter. My daughter did have everything returned, sans stereo faceplate, today. We also elaborated on our police report date today due to an individual sending text messages that were rather incriminating against some other individuals. The case has been turned over to the detectives at this point.
Again, thank you so much for your concern and support. I truly appreciate it!
Again, thank you so much for your concern and support. I truly appreciate it!
The Magic of Winter Layout
It's layout Thursday at Christmas With the Cricut! Be sure to check out Barb's two page layout at Snowmanlovers Paperie and also Tammy's two page layout at Christmas with the Cricut!
For my THE MAGIC OF WINTER layout I used Winter Woodland and Mini Monograms. I kept thinking of what I could do that would convey Christmas but not to over the top so it can be a general winter use layout also. I finally came up with the design. The use of paper and embellishment is always the key to a good layout.
You can click on the picture to see more detail if you would like.
Patterned paper is Basic Grey Eskimo Kisses. I love Basic Grey and just love their Christmas line this year! As ya’ll know a great layout is one that is layers, layers and layers. I am usually too lazy to do very many layers but I got a little layer happy for this one! The cut file will cut everything you need and does have a placement reference mat so you can use it as a guide if you so wish.
Step 7.
For my THE MAGIC OF WINTER layout
 I used Winter Woodland and Mini Monograms. I kept thinking of what I could do that would convey Christmas but not to over the top so it can be a general winter use layout also. I finally came up with the design. The use of paper and embellishment is always the key to a good layout.
You can click on the picture to see more detail if you would like.
Patterned paper is Basic Grey Eskimo Kisses. I love Basic Grey and just love their Christmas line this year! As ya’ll know a great layout is one that is layers, layers and layers. I am usually too lazy to do very many layers but I got a little layer happy for this one! The cut file will cut everything you need and does have a placement reference mat so you can use it as a guide if you so wish.
 Step 1. Cut paper as follows
-Patterned paper at 5.25 x 12”, pictured is Basic Grey Eskimo Kisses Peppermint Twist
-Plain paper at 1.25 x 12”, pictured is Bazzill Bling off white
-Patterned paper at 2.25 x 12 Basic Grey Eskimo Kisses Snow Cap
Use a border punch on each of the pieces going down the 12” length. I used the Stampin Up scallop border punch and then my deckle blade on my Purple Cows Trimmer. Ink edges if desired. Adhere to the base cardstock as pictured. I used Eskimo Kisses brads on the large sheet of patterned paper.
-Follow mat guides on cut file to cut pieces for the title, branch, bird and photo mats.
Step 2. Ink edges of your branches and leaves and assemble. Once assembled adhere to the branch shadow. I made criss cross marks on the pinecone for more detail.
Step 3. Apply mounting foam (if desired) *okie can’t imagine anyone not liking mounting foam but figures there are one or two odd folks out there* along the branch as shown. Apply branch to layout base.
Step 4.  Assemble bird. I used Stardream Mica for the bird and opted to use a small black brad for his eye. Apply mounting foam to back of bird and place on branch.
Step 5.  Assemble title words. I used an offset shadow and you can see in the picture how to offset. I used a dark brown for the shadow and opal Stardream mica for the top layer.
Step 6.

Take your mat cuts and assemble. I used Stardream bronze and Jupiter for the solids and then Basic Grey Eskimo Kisses Alpine for the patterned paper. Embellish layers as you wish. I did ink the edges and then went back and added faux stitching on the patterned paper.
Step 7.

The adhere your mats to the layout.I used mounting foam on the scallop picture mats but of course you don’t have to pop dot them if you don’t want to.
Step 8. Add your title and embellish layout as you wish! I used Decorative Snow paint for the snowy effect on the title words and branch. Frosted Lace Stickles were added to the scallop picture mats. I added faux stitching on several of the elements. These of course are just suggestions and you can put your own twist on the layout.


Wednesday, November 11, 2009
I AM SO SORRY!
During the commotion of my daughter getting her purse stolen out of her car last night while visiting her boyfriend and then two of her tires being slashed and the faceplate off her stereo being stolen sometime during the night I totally forgot to set the video for the giftbag public. It should be viewable now.
Again my sincerest apologies.
Again my sincerest apologies.
Gift bag and tag
For my gift packaging project for Christmas With The Cricut I decided to go with the gift bags I have been making. I have had several requests for instructions on how to do these and I thought I might annoy you guys with my nasaly man voice again! *okie cracks up laughin*
The HOLLY GIFT BAG AND TAG is so simple to make. The cut file is set to cut for 2 at a time. Of course I used Winter Woodland and Mini Monograms for the project. Part of the fun of the gift bags is knowing you can embellish as little or as much as you want. You can click on the picture for a bigger more detailed view.
Supplies needed to make your own gift bag like the one shown are -
Brown lunch bag
patterned paper
solid cardstock or paper
ribbon
embellishments
graduated punches (ex. circle, oval or square)
Here is a close up of the holly border and the tag. I used Basic Grey Eskimo Kisses for the patterned paper. The holly border is with Coredinations White Wash. I also made my own Cuttlebug folder for it, as you will be able to see in the video.
And if you are bored you can watch the video on how to make your very own gift bag!
The HOLLY GIFT BAG AND TAG is so simple to make. The cut file is set to cut
 for 2 at a time. Of course I used Winter Woodland and Mini Monograms for the project. Part of the fun of the gift bags is knowing you can embellish as little or as much as you want. You can click on the picture for a bigger more detailed view.
Supplies needed to make your own gift bag like the one shown are -
Brown lunch bag
patterned paper
solid cardstock or paper
ribbon
embellishments
graduated punches (ex. circle, oval or square)
Here is a close up of the holly border and the tag. I
 used Basic Grey Eskimo Kisses for the patterned paper. The holly border is with Coredinations White Wash. I also made my own Cuttlebug folder for it, as you will be able to see in the video.
And if you are bored you can watch the video on how to make your very own gift bag!
Subscribe to:
Posts (Atom)