Wednesday, December 31, 2008

Motivation Challenge 12/30

For this challenge I went with a Basic Grey sketch from pagemaps.com. I didn't use any Basic Grey paper though! WEIRD HUH!! HA HA HA

Here is the sketch I posted for the challenge. I really liked the idea of framing the middle photo in a circle and that is why I chose it. I did add some other elements to my LO which will be explained with the pictures.


Here is the main LO. I decided to use pictures from my oldest Goddaughters gradutation for this one. LAYOUT INFO -
- Title is George
- Basic shapes are George and welded
- Patterned paper is DCWV Black and White Paper Print Stack
- Plain paper is Prism Cranapple Red *if okie remembers correctly*

- Flourishes are Prima, I cut the flourish apart to get more bang for my buck *yeah yeah yeah okie is a cheap azz*
- Eyelets are Making Memories
- Bling, clear is a tube of bling I got at Wal-Mart in the wedding se
ction, cheap way to get some bling I tell ya!
- Ribbon is from either England or Maylasia, my friend Theresa-Marie sent a bunch of beautiful ribbon to me to use on cards, I told her it was going on LO's that will last forever!
- Journaling is done with a Zig Pen, black .05 in size. I used a Bloom's ruler to keep the writing straight.
- Inking is with Cat Eye pigment ink, white and black


Here are some close up shots of the page.
I took this picture so you can see the dimension that is on the page. I know it is sometimes hard to tell how much layering is done with a flat front shot.


I cut a chipboard circle to match the pattern paper and then pop dotted, well didn't use actual pop dots but some cheap foam from the bargain store here in town. I was able to get packages that had two rolls in them for $1.29 and I can cut the foam to what ever size I need!! I LOVE THIS STUFF!!


I cut a silhouette circle from George out of chipboard and then with black paper. I inked the edges in white and them attached the bling with Super Glue........YES I KNOW IT ISN'T ACID FREE! But it isn't touching the picture so I should be okay. I thought this was a cheap way to make a bling circle since I didn't have one handy. This is that bling I was talking about, it comes in a tube that holds hundreds of little bling and you can glue it on however you want. I have been using this same tube for quite some time. I think it was like $3.97 or so for the tube. I have also used Glossy Dimensions in the past to adhere it to objects.

Hope you like it! And if ya don't....well.....don't tell me, it might hurt my feelings! HA HA HA

Tuesday, December 30, 2008

Look what Lucy found!!

Lucy was barking madly at the patio door and I knew exactly what she was barking at! We have been having a problem with possums being in the attic. Well guess this one was on it's way to the attic, via the trellis. Lucy has done this before and I went and looked, taking a flashlight and looked between the house and the cabinet on the patio and saw the possum. This time I decided to see if I could get a picture.


Here it looks look it is lookin right at me.....and I think it was!! You can click on the picture to see him closer.....IF YOU DARE! HA HA HA

Sunday, December 28, 2008

Motivation Challenge 12/28

Okay this will be the last one for a few days, gotta give folks time to get the challenges done. The sketch was from pagemaps once again.

I really like the page maps since I am scrap challenged. I remember when I first started scrapping I thought pictures had to be lined up straight. Of course I laugh at some of the first LO's I ever did. I can honestly say my ability has evolved.


Here is my LO for this sketch. You can click the picture if you want to see more detail. That is a baby squirrel in the pictures. My daughter found him and he was sick. He didn't make it, even after a trip to the vet.

LAYOUT INFO -
- Title is Cuttin Up
- Squirrel is Animal Kingdom
- Patterned paper is Imaginisce Loves Me collection, Weak in the Knees double sided, one side is the stripes and flower is the other
- Plain paper is Bazzill

- Stampin Up marker for hand doodling swirl and dots on the title letters
- Flowers are Prima's
- Brads are Spare parts
- Wire for flower stems are from a telephone line
- Border Punch is a Martha Stewart
- Tim Holz Walnut ink for the edges of the mats and photos

A lot of the photos I have from years ago have been over exposed. My daughter would accidentally open the camera. I was able to scan the original and adjust the pictures so they weren't red, while they aren't the best I was at least able to scrap this page that brings me memories of how compassionate my daughter can be.

Motivation Challenge 12/27

Since people seemed to enjoy the first challenge I posted another one today. The sketch is from pagemaps again *okie just loves page maps!*. I liked the spacing of this sketch but it seems I didn't have as much space when I did mine. Partly because I choose to use Storybook for the title and was afraid to try and cut it small to fit in the space.


Overall I am pleased with the LO. Although in the picture it is hard to read the title. It says Shiane and Grandma.

LAYOUT INFO -
- Title and journal box is with Storybook
- Paper is all Basic Grey Eva collection.
The top ban is Versailles, the middle is Noble and the base is Rouge,
- I used Versailles to mat the pictures and Noble to mat the journal box
- Journal box is Vellum, not sure what color, but a shade of green
- Black Zig Pen for hand doodling on the journal box
- Flowers are Prima's
- Large Brad is a K & Company Pearl brad
- Kaiser pearls for the small flower centers
- Ribbon is velvet ribbon
- Black cat eye ink for the edges of the mats and photos

You can click on the picture if you want to see more details.

I am liking these challenges since it is making me get some LO's done!!

Friday, December 26, 2008

Motivation Challenge...

I have to be honest. I haven't done actual scrapbooking in awhile. I have done cards and altered items galore but not any layouts. Oh sure I have the pictures, I have the supplies but just not the motivation to get in there and roll up my sleeves and get it done!!

Well that is over! Back not long after I joined the Cricut Messageboard there was a member that would post challenges for us to do. I didn't always get to participate in the challenges but it did motivate me to get in there and get to work on some layouts. I always enjoyed seeing what everyone did with the challenge. The member has been gone for sometime now and I missed those challenges. So, last night I posted a challenge on the board.

I chose this layout sketch from page maps as the challenge and the deadline is for Saturday December 27th at noon. I know it was short notice but isn't that what motivation is about? LOL I told them to just use the sketch as a basic idea, but the elements could be different. I like more than one picture on a layout most of the time. Maybe I am just too cheap to waste a bunch of paper and supplies on scrapping the same event on like 4 or 5 pages, who knows *okie sure doesn't know*.

I hope people will enjoy the challenges and participate. I know we sure use to have some fun with the challenges and it did feel good to know people liked what you did. Also I am hoping it will encourage others to post their work for all to see!


I was able to complete the challenge and it felt good to actually do a layout again!! I had some pictures from August when school first started when I was able to snap some pictures of my daugther doing her homework.

Here is the info on the layout:
-Patterned paper is from DCWV Teen Prints
-Ribbon is grosgrain
-Large pink brads are some I embossed (the brads are from WM in the office supply section)
-Small orange brads are Spare Parts
-Book is from Locker Talk, I did the cover with a white gel pen
-Title font is from Wild Card
-Study Diva is a stamp, embossed with bronze powder, I think!
-Journaling has a rub-on that looks like notebook paper, hard to see in this picture. I used an SU marker to do the writing, but it didn't take on the rub on, will try a zig next time.
-I inked edges of the papers and paper elements.

I will be posting the challenges on my blog as they occur so if any of my readers would like to take the challenge they can. There is no prize other than the self satisfaction that ya got something done! LOL

Thursday, December 25, 2008

The spirit of giving at Christmas

I wanted to share this with you guys on this Christmas day.

When my DD turned 8 years old she had gotten birthday money from relatives, she had a total of about $40. We went to Wal-Mart so she could spend her birthday money. I had decided we would go to McDonalds to get a bite to eat first. There was an Angel Tree in front of the McDonalds there in Walmart.

My DD asked what it was and I explained to her that it was for children whose parents couldn't afford to buy them Christmas gifts. I told her let's go eat and she continued to look at the names on the tree.

She grabbed my hand and said "Mom look, this little girl only wants some clothes and a barbie doll". I think she thought it impossible that a child would want mostly clothes.

I looked and noticed the only toy on there was a Barbie, I think the child's age was about 5.

My DD looked up at me and said "Moma would it be okay if I spent my birthday money on this angel?"

I couldn't speak. I was fighting tears, as I am now typing this. My DD looked at me and said "I won't Moma if you are gonna be upset". I told her "hang on a minute" as I continued to fight back the tears. I knew I would just bust out crying if I said much more. After I composed myself I told her "baby if you want to spend your birthday money on this little angel then I will match you dollar for dollar".

We went to eat and my daughter kept looking over the list of items from the angel she had pulled off the tree. After we got done she was so excited to go and buy for this little girl. I did as I promised and matched dollar for dollar, plus another $20 because DD thought the little girl needed somethings to go with her barbie doll that she picked out for the little girl. My DD even said "you don't have to buy me anymore gifts Mom, just spend it on her. Santa will bring me stuff anyway".

We got the shopping done and took it to Customer Service where my DD informed the lady to "make sure it is wrapped pretty". My DD spent every last dime of her birthday money that day on someone else.

I can honestly say that on that day I had never been more proud of my child and still am to this day for her unselfish act of giving up her birthday money to make sure some little girl got her Christmas wishes.

Tuesday, December 23, 2008

Do your cards ever....

Evolve when you are putting them together? I had two really cool stamps given to me by a MB member some time ago and I have always loved them but never could decide how to make a card with them, until tonight. I stamped about 13 images I think. Figured if I messed up I would have plenty more to work with! HA HA HA

Here is the first one. I used my Purple Cow trimmer and the deckle blade to cut out the stamped image and then just attached to a dark color red cardstock. The swirl is from JOTS.......it is the steam from the cup. I looked through other carts but I think the others all were too flourishy *okie wonders if that is a word, and decides it is probably not but uses it anyway*. I did add ink to the flourish to make it have a distressed look. I used some foam mount to pop the image off the card. Of course after I got it together I thought "you idiot! Why didn't ya use the cuttlebug on the card mat!"

And so out came the cuttlebug! I used the Distressed Stripes and liked it but it tore the paper. I was able to salvage the piece enough to use. I then went diggin in my folders and thought I should use a different one on the next one so it didn't tear.


Forest Branches.....yep, it worked. I think I still like the look of the Distressed Stripes better, but at least the branches didn't tear the paper!! I also added maroon eyelets instead of the brassy brads. I think I like the brads better though. I also attached the mat of the stamped image to the card and then used foam mount on the stamped image. I do like it better this way.

1 year ago today...

It was my birthday. My DD and I went to Wal-Mart before heading out to spending the Christmas Holiday with my BFF Andrea and her 3 girls. My DD and I went back to the craft section so I could admire the Cricut. During the black Friday sale it had been $119 but when my friends pitched in to get it, well the lady back in crafts told her "It is $189 now". So instead they put the money on a gift card. I told my DD "I should scan this just for the heck of it". Well when we scanned it.......the price was $119!! My DD being the wonderful DD that she can be said "MOM! GET IT YOU KNOW YOU HAVE BEEN WANTING IT FOREVER!" So with her encouragement I got it!!

I didn't open it immediately as I was a bit intimidated. I waited until returning home from Andrea's before opening the box. I sat there looking at it, knowing it could do amazing things but kept wondering if I could make it do those amazing things. Once I got it out of the box I found the registration card and quickly registered the Cricut. That is when I found the messageboard and joined immediately. I drooled over the projects I saw that people posted. I noticed people posting to each other like they were old friends and thought "oh I will never be able to talk to all those people like I know them...it would just be impossible". I can't even tell you how fast that changed! LOL

Papercrafting impacted my life tremedously. I had been in a bit of a depression for over a year and suddenly my world seemed to open up again. I was cutting and designing with Design Studio on a daily basis *and okie still does on most days*.

But I have to say the best part of owning a Cricut has been making the wonderful friendships during the last year that I have been blessed with. I have been lucky enough to meet a few of those friends in person, only to strengthen the friendship that started on the messageboard.

So to all of you, here on my birthday and my Cricut's birthday I want to say...

THANK YOU! THANK YOU FOR THE WONDERFUL CONVERSATIONS, PROJECTS AND MOSTLY OFFERING YOURSELF TO BE MY FRIEND!! THANK YOU FOR THE MOST WONDERFUL BIRTHDAY PRESENT THAT COULD LAST THE WHOLE YEAR LONG!

Saturday, December 20, 2008

OH NO!! ANOTHER ADDICTION!!

I have really been getting into punches. I don't have a lot of them but what I do have....well they are starting to get a work out! My friend Scrappinbee brought me a few punches when she came to visit *okie knows Bee is totally addicted to punches and thinks Bee has some sorta evil plan to get okie totally addicted as well*.

I got to lookin at the Daisy punch and thought hhmm.....that could be a poinsetta. The punch is from the Whale of a Punch series 2, by EK Success. I did two of the red and one of the green. I was just playin around so didn't take a lot of time making them but I think these will be nice for NEXT year's Christmas cards!

Friday, December 19, 2008

The holly note card...

Is from the Christmas solutions cartridge.

I really like the cut but there was one problem. I did have to hand cut an extra holly leaf otherwise it would have looked funny. The hand cut one is the one on the bottom left hand corner of the sentiment. I used some red stickles on the berries and then used Glistening Snow Writer on the berries and leaves to add accent. The sentiment is computer generated. I did like the new hide contour feature on DS because it allowed me to get rid of cuts I didn't want, such has getting rid of the note card when I was cutting the holly leaves and vice versa.

Thursday, December 18, 2008

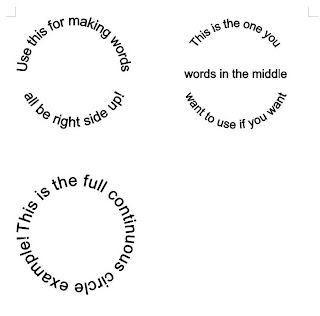
Making circle text

I have had questions on how to do the word cirles in Microsoft word so I thought I would post CIRCLE TEXT ART EXAMPLES that you can download and edit to your desire. DCDOLL showed me how to do the circle text at first, at least I think it was her.

Anyway there are three examples on this file, as show in the picture. Once you have one done that you like you can copy and paste it so you can print more than one.

I just used Arial for the font so it would open easy since it is a standard MS word font. You can adjust the font style, size and color to your liking. It might take some time playing with it to see what you want to use but at least you can always save the files for later use.

There are other shapes to use but for now I just thought I would do the circle examples.

I think these are great to use with circle punches. I just love circle sentiments!!

*****UPDATE 12/24*****
I was asked how to change the color of the text and thought I would post the contents of the email I send the lady that inquired. These should help if you are wanting to play around and not sure how.


To edit the color of the words
1. click on the circle text, a box that says WORD ART will pop up
2. click on the paint bucket and another box will pop up
3. If you want the words to be all one color then look at the LINE options and choose your color in there
4. if you want an outline color then click on the FILL color and choose your color. This will leave the outline to be a different color.

You can also do textures or patterns, all those options are in with the color editing box.

To edit font -
1. double click on the text box and a box will pop up.
2. edit your words there
3. Choose the font while the box is up and then click okay.

To resize - drag a corner of the box out or in to the size you are wanting. Just watch your ruler and you can see the size. I usually print out one to make sure it is the size I am wanting and then go back and edit if I need to.......and I need to a lot some days! HA HA HA

To change shape of text -
1. bring up the WORD ART tool bar
2. Click on the ABC button, it is next to the PAINT BUCKET button
3. Find the shape you want and click ok


I am not always the best in writing instructions but hope these help!

Wednesday, December 17, 2008

Seasons Greetings

To one and all!! I finished a card with the Santa face from the Christmas solutions Cricut cartridge I did earlier this week. Like I said, these will have to wait until next Christmas for sure!!

I used red card stock for the base. The Season's Greetings is with metallic gold card stock. I used vellum that had flecks of gold, silver and copper in it. I wanted something fancier for the mat but I didn't want to distract from the Santa which is the focus. The overall card measures about 5.25 x 6.75 inches....I think......heck I can't remember, but that is pretty close.

I did add some foam to the back of Santa to make him stand out from the wreath a little.

You can click on the picture to make it bigger to see more detail. Hope you guys like it!!

Snowshoes was requested by...

BarbP of the Cricut MB, she replied when I said I couldn't remember who had requested the file. It was one of the first files I had made. She has kindly agreed that I could post pictures of the SNOWSHOES used on a LO she did. WOOT WOOT!! Thanks so much Barb!! I love the colors in the LO she used!!

Tuesday, December 16, 2008

OOHHH I SO LOVE SANTA!!

When I saw the Santa face on the Christmas solutions cartridge I knew I would have to the cart! I am a Santa Claus collector, seriously!! I do have tin Santa's and also Santa's that are like porcelain face with clothes.......I JUST LOVE THEM!!

Oh yes.....anyway....I decided I wanted to use the face to make some cards, but I think they will have to wait until next year to send these out since they are quite a bit of work and right now I have so little time *okie always has so little time*. The wreath is from the same cartridge. I was able to cut 6 at a time and I also was able to use the new "hide contour" feature that was included in the latest Design Studio update and save some paper that way. I will have to use him on a 5x7 card since I cut him a little big.

This is one you definately need to click the picture and make it bigger to see all th detail.

I saw this font....

On the messageboard and just had to try it out on something. Well of course I had to make a few more Christmas cards using it, a few....8 to be exact. HA HA HA The font is Santa's Sleigh and it is SSOO AWESOME!! I did the wording on Microsoft Word and cut it with my 1.75" circle punch. The image in the middle is a Studio G. The scallop circle is from Mini Monograms cut at 2.5". The lacy border is the double arch punch. I did add a few stickles to the card to, they will look better when they are dry.

You can click the picture to make it bigger if you want to see better details.

Sunday, December 14, 2008

Got tags??

Christmas is quickly approaching and if you need to make some quick tags I have this cut file for ya! I had made this CHRISTMAS BREAD TAG for a swap that I had joined and thought I would share the cut file. The file will cut 4 at a time. Actually I did have it set to cut all the ornaments but deleted 16, I doubt anyone wants to make 20! LOL The bread tag is with Fabulous Finds cartridge and the ornament is with Joys of the Season cartridge. The overall size is roughly 2.5 inches wide by 5.25 inches tall.

The mats are all labeled for easy reference. The top mat is for reference only. There is a rectangle on the mat and I did that so I could size the object I wanted to put in the cut out, which in this case was a Christmas bulb. I did leave it on the mat in case someone wants to use something else in the space and it would be easy to size the object that way. I used Prism card stock for the solid colors The back solid mat is with the olive green and the red is the shadow cut. The top cut is the printed paper. I used a silver gel pen to jazz it up a bit and I also inked the edges *okie does love her ink!* The bulb was cut with pearlescent vellum and the swirl and cap are with silver card stock. I also added a touch of bling at the bottom of the ornament.

I like the bread tag as a Christmas tag because you can easily slide it on the ribbon of the package.

Saturday, December 13, 2008

Warmest Wishes

This Holiday Season....That is what this card says, but for bloggin purposes I will call it SNOWFLAKE WARMEST WISHES. I think it is kinda funny to put a snowflake and then give warm wishes. HHMM...this might be a good card for my northern friends and family!

You can click on the pictures if you want to see them bigger.

The file is set to cut 6 at a time. As most of you know I hate making just one card at a time and like to make as many as possible.

The mat and ban are with George. Wild Card was used for the sentiment on the front and then I did the sentiment on the inside myself, and it is adjustable. For the snowflake the Christmas solutions cartridge was used. In the file I do have the card mats and ban included but it might be easier to cut them yourself, it would save paper and that is what I did. I am all about saving paper! HA HA HA I cut the mat at 4 x 5.25 inches and the ban is 4.25 x 1.75 inches. The card and mat are with regular card stock. I went with silver paper to shadow the snowflake and Mica paper for the snowflake and blue ban. I totally love Mica paper!!

I did try some pink bling on one of the cards and liked it but didn't want to use all my pink bling on the cards. I have tons of the clear bling that I bought in a tube at Wal-Mart in the wedding section. I actually used superglue to keep the bling on the card. So far it is holding well. Yeah I know.....it probably isn't acid free but figure people won't keep these forever anyway.

I tried the snowflake cuttlebug folder at first but thought it made the card to busy so I went with Swiss Dots on the others. I used D'vine Swirls for the ban. I used a silver gel pen to jazz up the words a bit. Brads and eyelets are on the bans.

I think this would be cute to use the sentiment with a mug also but I was too tired to try it tonight.

I'MMMM BBAACCKKK!!!

I guess you guys can tell that I have been in a creative mood today!! I haven't been able to make any new cut files recently due to getting ready for my Christmas party but now that is over I was lookin forward to playing around with Design Studio again!! WOOT WOOT!!

Anywho, thanks for the comments about the files I have been posting! Ya'll know I like sharing my creations and am always glad when people can use them!!

Bye bye Miss American Pie.....

DROVE MY CHEVY TO THE LEVY AND THE LEVY WAS DRY.....oh sorry... I know I can't sing worth a darn but I sure love trying!! *okie notices people covering their ears* OKAY!! I am done singing, you can uncover your ears now!! SHEESH!!

Oh yes the reason for the song. I made an PIE ADJUSTABLE cut file. The file has a whole pie and a pie slice on it.


The pie is on one mat, but again you can paste to other mats if you like. The screenshot was taken with things unwelded to show a better picture.

When adjusting the image follow these instructions:

1. Adjust the pie to the size you are wanting.

2. Move your pie crust rim on top of the pie and use the double arrow handle to fit it over the pie and then slide it out.

3. Then do the same for the pie pan.

These are the cuts you end up with on the whole pie cut file. As you see the whole pie is there, the pie crust rim and the pie pan.


Here is the pie slice. I forgot to take a screenshot of the individual pieces *okie wonders if anyone will think she is just to lazy to go back and take the screenshot.....because she is* , and I think they are on two mats, and the mats are labeled. Again the screenshot was taken with pieces unwelded to show color, but they are welded on the file. I double checked!!

To adjust just follow these instructions.

1. Adjust the pie crust, which is the base to the size you are wanting.

2. Move your pie filling on top of the pie crust and use the double arrow handle to fit it over the pie. As you can see the filling goes all the way to the end so use that as a guide also. Then slide the filling piece out and paste on another mat or on the mat you are on and cut your pieces accordingly for the cricut to cut.

If you are wanting a meringue pie I think you could just cut the crust a second time on the slice in an off white and cut it accordingly with your scissors. And for the whole pie just cut the base in an off white and then do your crust and pie plate in the colors you are wanting.

Grape Cluster

I read on the Cricut MB how there is a shortage of food type items and thought I would make a couple of .cut files. This one is GRAPE CLUSTER and is fully adjustable but there is a little trick to adjusting. It is made with George. This first screenshot I made so the colors would look better and you could get an idea of the overall effect.


When adjusting the image follow these instructions:

1. Adjust the whole cluster to the size you are wanting.

2. Move your random grapes on top of it and use the double arrow handle to fit them over the clustered grapes and then slide them out.

3. Then do the same for the stem.

It might take some practice but it will work. I have them all on one mat but you can copy and paste to other mats if you wish. If you want to use one mat just cut your paper pieces accordingly using the grid lines as guides for size and placement.

About the Holly Border card.......

I have had a few questions about the HOLLY BORDER card. And thought I would give more clear instructions for this. It seems this one is a favorite of my readers.....and a favorite of mine also!!

Anyway I took some screen shots and will give explanation why and how I did the mats the way I did.


Here is a screenshot of the full card. Now to avoid cutting the whole mat in your base color you can do the following. Use a piece of cardstock at 6 inches to about 9 inches. Lay it on the mat where the card will cut, using your grid lines on your mat as your guide. Now cut a piece of cardstock for the Holly leaves at 6 inches and 2 inches wide. This way the items cut at the same time.


If you are wanting to cut the mats only then cut 2 pieces of cardstock at 6x5 inches and place them on the mat as shown, using your gridlines on your mat as your guide. Then cut a piece of cardstock for the holly at 6 inches by 2 inches, again using gridlines as a guide. The whole mat will cut at once and it will save time.

Hope this clears up any questions. I sometimes get so excited about posting things that I forget to give clear instructions. NO OKIE DIDN'T MAKE A MISTAKE...she was just trying to test your Cricut knowledge. *that is okie's story and she is stickin to it!*

Happy HOLLY Days wordbook

I was playing around with DS tonight and thought I would play with a HAPPY HOLLY DAYS wordbook. I used George for the base shape and Storybook for the lettering. I haven't cut this but I did check it several times to make sure everything is welded. I did do some tweaking after the screenshot was taken. I filled in the areas on the happy and days since it is kinda curly and thought it would be easier to cut. I have mats for the letters to be cut in different paper to be adhered to the base. I might try to cut this this weekend, depends on what else I need to get done. Anyway thought I would post it in case someone wanted to use it.

****NONE GEORGE USERS READ BELOW****

In case you do not have George, and I know there are some people who don't, I made a wordbook HAPPY HOLLY DAYS PS version. So for this version you will need Plantin Schoolbook and Storybook.

Friday, December 12, 2008

Wordbook...LOVE

I had made this book sometime ago and never cut it. With the next holiday being Valentine's Day I thought I would post this cut file for the LOVE WORDBOOK for those who would like a quick cut file for the heart o' heart holiday. The base letters and inner letters have a mat also if you would like to cut those. The book is 4 inches tall by about 6 inches long...well 7 1/4 if you count to the end of the E. It is all done with George.


****UPDATE*********

I decided to do a quick LOVE STORYBOOK WORDBOOK version. I think this one will be nice nice nice!! There is a mat to do the shadow letters if you want them in a different color than your base of the pages and also there is a mat for the regular letters.

Got teeth?

I had made a tooth file some time ago and then I decided to make a TOOTH LARGE file. This file will cut two at a time. The tooth fairy should leave at least 5 bucks for these beauties! HA HA HA

I might just have to dig around in my .cut files and see what other goodies I have that I can post on my blog!!

What's cookin good lookin??

HA HA HA HA *okie knows by now that she only cracks herself up, but continues to do so because she likes to laugh*. I made a CROCKPOT at the request of a Cricut messageboard member. She was wanting it for a recipe swap she was in. Since enough time has passed and the swap is certainly over I thought I would post the file on my blog for download. There are a couple of mats to this one and they are all labeled.

Hey you snowbunnies!!

I had forgotten about this file I had made last winter. It was one of the first .cut files I had made. I can't remember who asked me to make it for them since it was almost a year ago but thought I would post the file for download. The file is SNOWSHOES and are designed with the old fashion kind in mind. The shoe comes out to be about 4 1/2 inches long and about 1 1/2" wide. You will need to clip the "mesh" after attaching it to the frame. Also you will have to cut the mesh twice, I was too lazy to copy and paste all the x's again but both of the frames will cut at the same time.

Thursday, December 11, 2008

More Christmas cards

The company is all gone and it sure is quiet around here!! We all had a great time at the party...well before and after even!! All the work was definitely worth it!

I made a few cards tonight and thought I would get them posted. These are ones that I used some stickers I bought at Wall's Bargain Center here in town. I used circle punches to cut the circle in the top of the card, the sticker is attached to the inside. I did heat emboss on two of them. One of them is a rub on and the other....well I just doodled all over the front.


Do you remeber the Square 3 cards I made at Halloween? Well this is a version of that card. I got a set of Stampin Up Christmas stamps, circa 2005 for a really good price last weekend. There were 8 little stamps in the set. I used the Stampin Up ticket punch on the corners. I used a 1 1/4" square punch to punch out the images after I stamped them. The mats are done with the Cricut Stamped cartridge. The words Merry Christmas and Seasons Greetings came from the Wild Card cartridge. A very dear friend of mine gave me Wild Cards and Storybook as a Christmas present and I was so excited I thought I needed to try them out. I haven't tried Storybook yet.....but I will soon!!

Friday, December 5, 2008

Guests have arrived!

Well at least the airport guests! HA HA HA The party is tomorrow night and still have tons of things to do to get ready, but today is a day for shopping....at least for a few hours. We are having a great time so far!!

Thought I would post a picture of us that was taken at Wal-Mart last night. I asked some lady who was lookin at bread to take a picture of us.
This is me, Scrappinbee, ScrapperDelighted and my BFF Karen that I talk about frequently. As you see we had to make a trip to Sonic before Wal-Mart LOL.

Tuesday, December 2, 2008

ON THE COUNT DOWN!!

Well it is Monday night and I still have so much to do and such little time to do it in!! I got my friend Karen's flight booked for Wednesday, she will be landing in the afternoon and my friend Carmen will be landing that evening. My other friend Carmen (yes another one) will be flying in on Thursday afternoon.

My DD and I have been working hard on getting things done but I still have boxes of decorations everywhere and things to throw away. I have vacuuming to do, stove to clean, laundry to do, windows to wash, prizes to wrap.....heck prizes to finish!! My party is at 7pm on Saturday and I think I will be still getting ready at 7:15!! WHEW!! I gotta stop waiting until the last minute to do things.

Actually I had great plans for Saturday...but alas, my body did not cooperate. I got a nasty little stomach bug and was down for the count, a WHOLE DAY WASTED!! The guest room is ready.....so far that is the only thing! HA HA HA My DD and her boyfriend got the lights up on the house and the tree decorated. I have my Santa collection out and floral arrangements in their spots. I am living the dining room to my friend Karen, she did it last year and did such a good job I figured she could do it again!

I so love having my annual Christmas party and it is always a lot of fun. I will be having a bigger crowd this year I do believe....I am still not sure who all is coming but so far the count is somewhere between 12-14. I generally keep it to around 10, but what the heck!! LOL

Maybe after the party is over and things have settled down I can get back to creating again. But right now.....I am off to finish dusting my room!!