Monday, October 31, 2011

Have A Wicked Halloween

I had made 12 of these cards to take to the card swap at the Swarm I was suppose to go to and since I was unable to attend for several reasons I now have these cards sitting at my house and wondering what to do with them! Actually I will probably put them back and give them to the ladies at the next swarm since they were nice enough to send me the cards they made! Renee of Paper Renee has been hosting the Swarms recently and she does a fantastic job. I am hoping Linda, aka LGuild, and I can go up some weekend soon just for a nice little lunch and shopping date with Renee.

Supplies Used:
CTMH Wicked Stamp set
Stampin Up Crackle background stamp
Stampin Up Inks
Stampin Up Markers
Glimmer Mist - Mimosa
Cardstock - various
Little Yellow Bicycle patterned paper
3/8" Striped Ribbon
1/8" eyelets
Cat Eye Chalk Ink
Signo UM 153 white gel pen


The Close To My Heart stamps are really high quality and I love the crisp images I get from them. I know there are a lot of acrylic stamps out there in the big world of crafting and I have tried quite a few but to be honest, I don't think any of them have stamped as well as the CTMH brand. I do think they can be a little pricey but then I think about not getting a good image and like the old saying goes "ya get what you pay for". Needless to say I am sure my CTMH stamp family will be growing!


I played around with how I wanted to stamp the image before making a final choice. It just seemed to stark for me on some white or off white paper. Deciding on a nice background stamp I then stamped the image of the witch on top of that. While I liked the effect it seemed to need a little something. I sprayed with Glimmer mist and it seemed to be just what I was looking for. I am not sure how well the shimmer shows up in the picture but in person it looks really nice.

I wish you all a Wonderfully Wicked Halloween!!

Sunday, October 30, 2011

Stollen not stolen - layout

I find that I scrap some odd things sometimes and while I think this is an odd thing to scrap it is something I want to always remember. My friend Larry, who lives in L.A., had a family tradition of having Stollen at Christmas. He told me this story a few years back and we talked about how nice it is to remember traditions and what good memories they can bring. Larry told me he was always so excited to have Stollen because "then I knew it was Christmas". Well now Larry has a loaf of Stollen sent to me every year from Dinkle's Bakery in Chicago and I am always so excited because now I think "It's Christmas!".

Last year Shiane was at home when the Stollen arrived in the mail and she wanted to know what it was. I reminded her about Larry sending me "Stollen bread" and she had an odd look on her face and asked "why does he steal it" so I had to explain to her "it's Stollen, not stolen".

Supplies Used:
Quarter Note cart
Cheerful Seasons cart
Fabulous Finds cart
From My Kitchen Cart
Patterned paper - Pink Paislee Santa's Workshop
Various Cardstock
Doodlebug Glitter
Doodlebug Flock
Cat Eye Chalk Ink
Signo UM 153 white gel pen
Star Brads


I am really happy with how the font on Quarter Note welds together. The tails on the lettering are generous enough to allow the word to flow well without making them to squished together like you have on some of the cursive fonts. I ran the white layer of the words upside down in my Xyron and then sprinkled with white Doodlebug glitter. You might need to click the picture to see the glittering and how well it turned out. On the little date tag I used a bread tag cut from Fabulous Finds. I added the star brads to attach to the picture because I thought they coordinated well with the stars on the patterned paper.


The holly leaves are from Cheerful Seasons, I am so lovin this cartridge! Again I would like to thank the mysterious "Cricut Circle Friend" who was so generous in sending this to me! The layering on the images is great. I always love a little flourish and on the holly it is fabulous. The little berries are cut out of Mica Stardream and I just added white dots with the gel pen where there were little circles cut.


The loaf of bread is a From My Kitchen cut. I had to hand cut the bottom a little to make it rounded and look more how Stollen looks. For the powdered sugar effect I cut a piece of cardstock to cover the area I didn't want flocked and then laid it on the loaf and ran the cut through my Xyron. I then removed the piece of scrap cardstock and sprinkled the cut with white Doodlebug Flock. It didn't turn out as sugary as looking as I wanted but I still think the effect works.

This is the last of the layouts from the kits I had prepared and I guess now I will have to find something else to work on...hhmm, what to do what to do *okie thinks and realizes she better get to crackin on getting stuff ready for her Annual Girlfriend Christmas party*. I think I will be having plenty to do for the next month!

Saturday, October 29, 2011

CRICUT CRUISE INFORMATION!!

I have posted the CRICUT CRUISE information on the Cruising With The Cricut website. Please feel free to pop over there for the information that is available at this time.

Brrrr - Snow layout

I love scrapping pictures of snow. I guess it is because we don't get as much snow as other states so it really is nice to see when it comes *okie thinks it is nice to see it go as well*. I really went out on the bling on this one but I think it gave the layout a nice "crystal snow" look.


Supplies used
Cheerful Seasons cart
Winter Woodland cart
Seasonal Cake Art cart
Imaginisce hot fix pearls
Hot fix Gems
My Minds Eye patterned paper
Prism cardstock
Mica Stardream cardstock
Martha Steward snowflake punches
Janome Sew Mini
Cat Eye Chalk Ink

I forgot to take a picture of the second page of the layout so you only get to see the first page close up. The title "Brrr" was done with Winter Woodland cartridge. The snowflake under the top picture is from Cheerful Seasons and was put together and then cut in half. The bordering snowflakes were done with the Seasonal Cake Art cartridge.


I used the Janome Sew Mini to sew a line for the blue paper on to the lighter background paper. I think this paper is really totally awesome for a snow layout!!


This shows the snowflake a little better. it was pretty easy to cut. I was worried about the intricacy but it didn't seem to be a problem.


I am not sure how happy I am with the snow border and I think it is because of the size of it. It doesn't really look like snowflakes to me and I am not sure what it looks like. But since it is on the layout all glued, nailed, polished and taped down it won't be going anywhere *okie thinks she might have went a little overboard on that description*.


 On the close up of the title you can see where I added some of the hot fix rhinestomes to the letters. It really made a difference on making it stand out a little more. I think adding the blue snowflake on the B also made the title look a little better and not so stark.

Friday, October 28, 2011

Pirate Life For Me - layout

When I had my eye infection I was asked to take a picture of myself with my nice little eye patch and post it on Facebook. Well of course it was going to end up being a layout! *okie is beginning to think she scraps some of the most stupid stuff*  I am sure my friend Linda will get a kick out of this one since she wanted me to make a layout kit to take to the Swarm.

Supplies Used:
Paperdoll Dress Up Cricut Cartridge
Life's A Beach Cricut Cartridge
BlackLetter Cricut Cartridge
Coredinations Cardstock
Cloud print paper
Cuttlebug Distressed Strips Embossing folder
Stampin Up Marker
Signo UM 153 white gel pen
Mica Stardream Cardstock
Creek Bank Liquid Walnut Ink
Creative Imaginations skull brad


I actually had to use the Gypsy on this one because I was wanting to use Blackletter cartridge for the title because it just looked piratey *okie thinks she sure is making up a lot of words lately*. I used the Liquid Walnut ink on the bottom of the letters to give the lettering an aged look. Click the picture if you would like to see closer detail of the effect the ink gives.

On the cloud paper I tore across and then burned the edge.


I used Cat Eye Chalk ink in Popcorn on the waves to make them look like they had white caps. The "sand" was crumpled and then sanded.

I blacked out some of the pieces to make the trunk have a wood base and then "metal" top layer. The lock was colored with a silver gel pen.

I also had to do some work in Design Studio to get the ship to have a wooden look base and then the white sails. I did have to hand cut the eye patch and then just used a black marker for the "string".


You guys know I am never very happy with the things I do but I really like how this layout turned out. I just wish it would have had a better "picture subject"!

Thursday, October 27, 2011

Enjoy the Ride - Another Lucy layout!

This layout is one of those "so silly ya just gotta scrap it" type layouts. Lucy loves to go "bye-bye" and this time we were heading to my sisters so we could drop Lucy to stay for a week while we went on the Cricut Cruise. I was snapping pictures and then Lucy moved and it looked like she was driving so of course I had to scrap the pictures then!

Supplies Used:
Cricut Graphically Speaking cartridge
Mica Stardream cardstock
Prism cardstock
Patterned paper unknown
Stampin Up Photo Corner Punch
Stampin Up marker
Cat Eye Chalk Ink


For the car I added some sliver for the grill area and some white cardstock for the headlights. I thought it looked better that way. I pop dotted the red layer onto the black layer to give it some dimension. 

I think Graphically Speaking is an really awesome cartridge and it has some great cuts on it. It came out about 2 years ago and everyone went crazy about it but I am not sure it gets the props it deserves!

Wednesday, October 26, 2011

ECU 2011 - Graduation layout


I generally don't care for papers that have the specific background images and you have to scrap around them. But this time I made an exception, for one I couldn't think of a way to cut it up and use it and for two...well it just seemed to work out okay for this layout. It isn't anything elaborate but it still works for me.
Supplies Used: 
Cricut Varsity cartridge
Cricut Carasoul cartridge
DCWV patterned paper
Various cardstock
Creative Imagination brads
Spareparts Brads


The Varsity cartridge is great for school type layouts and projects. I am thinking I need to use it to cut some material and make myself a sweatshirt of my Alma Mater but let's face it...it wont happen. And why wont' it happen?? BECAUSE I AM TOO LAZY! *okie is hoping her readers really are starting to understand how truly lazy okie is*.
 
I used Design Studio to hide contour on the stripes for the black layer. Since Carousel is a lite there aren't many options for layering and DS comes in handy for such things. Yes I know I can do it on the Gypsy but come on guys!! Ya'll know I don't like using that thing!

Tuesday, October 25, 2011

GERTIE - Vintage Layout of My Grandma


My cousin Lisa had photocopied some pictures of our grandparents to share with us and I have had this picture for sometime and knew I wanted to scrap it. I did scan the one she gave me and then printed on photo paper. I kept trying to think of how I wanted to scrap the picture because I wanted it to be something special, after all my grandma was very special *okie knows everyone always thinks they have the best grandma in the world but okie knows hers was really the best*. I didn't get to see my grandma much growing up as she lived in West Virginia and our trips there were few and far between. My cousins and I talk about how grandma had a way of always making all her grand kids feel they were all loved just the same even if she didn't always get to see them. Anyway I knew I would need the "just right" items to really make this special picture be something fabulous. I always kept an eye out for something but never was able to find what I felt I needed.

My friend Carmen, aka ScrapperDelighted, called me all excited this summer about a deal Websters Pages was having. You could get a box of different items for $25. She ordered 3, one for me, one for her and one for another friend. When I went to Houston to see her I got to open my box and I knew immediately I was going to use the product on some older photos I had and especially this picture of my Grandma.

Supplies Used:
Cricut Storybook Cartridge
Websters Pages paper and elements
Cardstock is various
Stampin Up Crackle background stamp
Stampin Up Mesh background stamp
Liquid Pearls Platinum
Printed butterfly image
Want2Scrap Pearl Swirl
Signo UM 153 white gel pen
Stampin Up marker
Cat Eye Chalk Ink


I printed two pictures at 4x6 of my grandma and then trimmed one smaller than the other. I added some chipboard behind the top layer to give it some strength so it would hold up and then pop dotted and placed it over the bottom image. I did this because the picture quality was not very good and I didn't want the picture to get lost in the elements of the page.


The Monarch butterflies were printed from my computer. I found an image I liked on the internet printed it 3 times from my photo program. I layered two of the images, which you probably really can't tell in the picture, and used brads to keep the images together and used small squares of mounting foam between the wings. The pearls were placed as to make it look like that butterfly was in flight.


GERTIE was cut using Storybook. I used some Mica Stardream Cardstock in copper and brown. I need colors that were going to stand out since there were so many colors in the papers I thought the darker colors would work better. I added the Liquid Pearls after placing the letters on the layout.


I have to say this really goes beyond what I am usually comfortable doing since it is a really heavily embellished and busy layout but I do like how it turned out!

Monday, October 24, 2011

Friend to Friend Sunflower Card

I do have a good reason for not posting this card before now. I actually sent this to a few friends *okie hears the gasps of of her readers at the words that okie actually sent a card to someone*. I know! I know! I am as shocked as you are! Anyway, my friends did like the card so at least I know it was a good one!

I had stamped and colored the images with my ProMarkers sometime ago in Stamp Club and recently found them in my scrapbook tote.

I left the inside of the card blank so I could write whatever I wanted. My friend Carmen said she was surprised to get the card from me but she was more surprised because the image and sentiment were not straight on the card. I told her I was stepping out of my comfort zone on this one and put them on there catty wampus *okie wonders if caddy wampus is really a word and thinks she will Google it later on*.

Sunday, October 23, 2011

BAD BLOGGER OKIE! But here's a card

Yep I have been a bad blogger. I haven't posted since Wednesday and there really isn't a good excuse *okie isn't sure she really does excuses much anyway*, I just haven't felt like taking pictures, editing, writing, and posting.

I made this card I think last weekend, or it might have been before that. I can't really remember. My friend Nancy asked if I had a card for a boy who was into remote control cars. Of course she asks this and I tell  her "uh, no, don't have many boy cards" and then I ask when she needs it. And like most responses I get she said "oh tomorrow". I told her if I had time I would see what I could make. I was able to make one for her but it wasn't a very good one in my opinion *okie so hates working under pressure*.

When she came to get the card she said it was perfect. However I am not sure I believe her since she hasn't contacted me since then and I have no idea of the boy liked the card or thought it was the most stupid card he ever got in his life.

Either way I figured I would post the card for you guys to see.

I used Groovy Times for the car and Batman for the words. I also used the Cuttlebug Diamond Plate embossing folder for the bottom strip on the card mat. Like I said it is a pretty simple card but at least it was a car like what was requested. Oh and on the inside I printed "Hope you have a Winner of a birthday" and added some clipart checkered flags.

I didn't go to the Swarm this past weekend, had a pretty stressful week with work and personal life situations. I did however, work on the layouts this weekend and got them all done anyway and will be posting them throughout the week. I really like one or two of them.

Wednesday, October 19, 2011

Finished up my layout kits!

I finished up another layout kit for a total of 5 one page layout kits and 1 two page layout kits. I think that will be enough to keep me busy at the swarm for sure! My friend Angela is suppose to be here tomorrow and I hope we can get some crafting done while she is here but I am thinking we will be doing a whole lot of talking LOL. My layouts vary from snow to pirates to graduation to...well I don't even remember right now! HA HA HA

It seems odd to have craft stuff kinda done but no pictures to post! I can't really post the pictures of the layouts until I get the done but will be sure to post them. I still haven't taken pictures of the two cards I made last week. I tell ya once I get on a roll of creating I don't like to stop and do such menial tasks as taking and editing pictures. I am excited about a few of the layouts as I think they are going to turn out cute but the odd thing is, ya don't know until it is all put together and done.

I am also excited to hear about more information on the next Cricut Cruise which is suppose to be released next week! My friend Wendi that lives here in the same town is going to be going on the cruise as well and we are going to see about finding a room for 3 people so she, Karen and I can all be in the same cabin. Wendi is a cute little thing and I told her that if she looks good in her bikini that Karen and I will be tossing her azz overboard HA HA HA *okie hopes everyone knows that okie is only kidding...or is she*.

Will try to post about the adventures Angela and I have while she is here!! This should be fun!! I think some of her family and friends are concerned about her coming to stay with me since we have never met in person. I assured her that I am safe and that she won't be the first to come and stay at my house with never meeting me before!!

Monday, October 17, 2011

OOPPSS! Been busy with layout kits!

I tell ya since I have been working so much I am lucky I even remember who I am these days! I have gotten a few cards made and will have to get pictures of them and get them posted. But what I have been spending most of my time on is layout kits!

I will be going to a Swarm next Saturday in Norman and in order to get anything done I have to make layout kits. This way I have all my elements ready and I just have to embellish, doodle, brad, faux stitch, ink, glitter, etc etc etc and put it all together and have something accomplished for my time while scrapping with friends! I was able to get 1 two page layout kit and 4 one page layout kits ready to take with me. I have some others designed in DS and if I have time this week I might cut out a few more. I am actually thinking this might be the best way for me to scrapbook from now on as well. That way when I don't feel like designing and cutting I will have something to complete *okie thinks deeply for a moment and wonders if she really is that ambitious*.

I have a friend coming next week as well! My friend Angela from Texas, who is also a Cricut lover *and okie thinks "expert" since Angela knows how to use the buttons on the Cricut*, is coming to spend  a few days with me and will also be attending the swarm! She is excited about getting to meet some of the other Cricut folks that she has talked to on the MB and Facebook. I am sure we will have a blast. I don't think we will have any problems finding common ground or things to talk about since when we do talk on the phone it is rarely less than a 3 hour conversation!

Oh in case you are wondering about how I do my layout kits I thought I would repost the video I did before showing how I do mine.

Thursday, October 13, 2011

Unmounting Stamps

I have had a few requests to post how I unmount my stamps so I thought I would repost the information today.

This was original aired *okie laughs at sounding like she is on tv* in October last year.

_________________________________________________________

I decided this weekend I would get the rest of my stamps unmounted and put in the Stampin Up Stamp Cases I ordered from Stampin Up. I didn't decide this until Friday night, and I didn't finish until Saturday night! WHEW talk about a job! But it was totally worth it. I got 10 sets of Stampin Up stamps to fit in 3 DVD cases.

Now I knew if I posted about doing this you guys would be hollering "hey okie we need pictures!" so in my foresight I took pictures! Okay everyone say "YYEEAHHH OKIEEEEE!"....I can't hear you! *okie puts one hand behind her ear and waves up with her other arm to get the people cheering*. That was much better!!

I got the static cling foam on eBay from a seller named 941nmb and I got the product quickly. The seller did combine shipping. I ordered 7 sheets and I now only have 1/2 sheet left.

1. In order to save on foam I laid out a sheet of foam and then arranged my stamps to maximize usage of the product *okie thinks she sounded very professional just then*. Okay, let's break it down, ya'll know I am cheap and I am gonna find the best way I can to get the most out of anything! HA HA HA


2. Here you can see where I stamped the images with Stazon ink. I used Stazon so it would be permanent and not rub off. I left the stamps on the foam as I was stamping so I could get them positioned where they were originally. I did sometimes have to move a stamp or two so I could get an image stamped.


3. I unmounted my stamps by peeling them off the blocks and foam. Usually the foam stayed on the block and I was just able to peel the stamp off the foam. If you have problems you can stick the stamp in the microwave for a few seconds to loosen up the adhesive. Luckily I didn't have any problems and mine come off pretty easy. Some of the older ones took a little bit more elbow grease but it wasn't bad.


4. I lined up the image on the foam by holding it up to the light. I actually had the stamped side toward the light and the stamp facing me. I thought about trying to find my little light table thing I have but I was too lazy to go look for it. The good thing about the foam is that it takes a few hours for it to become permanent so if you don't get it straight the first time *okie thinks...or the first four times* don't worry, you can just pull the stamp up and reposition.
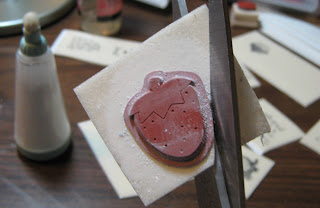


5. After trimming the foam on a few I noticed my scissors were getting sticky and I go the Undu out and cleaned them off. I decided to use the little device shown in the picture to get rid of the sticky and it made it a lot easier to trim the stamp. I can't remember the name of the thing, but it has talcum powder in it.


6. Next I trimmed right next to the stamped image. The foam cuts very easily. I was using big scissors at first but then went to using my Cutterbee's because I could get in the corners a lot easier on some of the stamps.


7. TADA! *okie throws her hands in the air like she just did the most fabulous magic trick* And this is what you end up with after you get the stamp stamped on the foam, unmounted from the block, positioned on the foam and then trimmed! A nice little stamp that takes up about 1/4 of the room you were using before!


8. Now you can see why I unmounted my stamps! What you see in the picture is actually space saving proof. All 10 sets of the stamps fit in 3 Stampin Up Stamp Cases! A few of the sets were smaller ones but at least half were the large sets.


Well now you guys see why I didn't post this weekend! Oh I know you are thinking "okay so what did you do all day today!" I worked on my Naughty Princess card set that will start tomorrow!

Wednesday, October 12, 2011

Thanks for being You - Stampin Up

I am not sure how I got stuck on green while doing cards over the weekend, it was not intended but it did somehow happen! I like this Best Blossoms stamp set and I know I will be using it again soon, there are a few other flowers in the set as well. I got the map for this card from PageMaps. I really liked how it looked in the sketch and thought I would try it. I do like how it turned out but it sure was a lot of cutting, mat after mat after mat after mat!!

Supplies Used -
Stampin Up - Best Blossoms stamp set
Stampin Up - ink, markers, punch
Scenic Route Lynden paper collection
Imaginisce hot fix pearls
Scrappers Floss
Cat Eye Chalk Ink


I used my Stampin Up markers to color the flower stamp and then cut it out with scissors. I then layered it onto of two circles and pop dotted it.

I really can't remember the name of the punch I used for the sentiment but it is a Stampin Up one and I believe it is retired. I used perfect layers to get the bottom layer along the straight edges and then used scissors to cut the curve.

If you guys haven't tried the Imaginisce hot fix pearls ya really gotta try them! I really like these things and wish they were in more colors.

I forgot to tell ya that this card and yesterday's cards are actually A6 size cards. I do like to do a little larger cards than A2 every now and then because you can get more decoration on them.

Tuesday, October 11, 2011

Wild About You - Stampin Up

I had gotten this animal print paper at Tuesday Morning really cheap and thought about this stamp set and how I wish I had it. When I saw the stamps on Saturday I knew I had to get them, especially at the price of $5!

Supplies Used:
Stampin Up - Wild About You stamp set
Stampin Up - ink, markers
Stampin Up - ticket punch
Pebbles Inc - Zoo Fun paper
Janome Sew Mini
Cat Eye Chalk Ink
Brads


While I am not crazy about how the card turned out I do think it would be good for a kid. I just never make many kid cards because I don't know many kids...well I know a lot of kids, but not small kids.

I am also not sure how I feel about the stitching on the card but what's done is done and I can't undo it...well I could but I won't.

I think what throws me off is the solidness of the color of the elephant and bird. I know that is how it is suppose to be but it just really throws me that it's just...well SOLID. I tried using markers and adding shading but I decided I didn't want to put that much effort into it *okie begins to wonder if she is getting lazy in her old age*.

Since there are a few more animals in the stamp set you will probably see this paper again.


Monday, October 10, 2011

Thanks So Much - Stampin Up

This card was made from the stamp set Pocket Silhouettes that I got on Saturday. I think I paid $3 for the set.

Supplies Used -
Stampin Up - Pocket Sillohuettes stamp set
Stampin Up - black marker
Stampin Up - Word Window Punch
Stampin Up - Modern Label Punch
Basic Grey Eva collection
Fiskars Apron border punch
Cat Eye Chalk Ink
Memento Ink pad


I didn't do inking on the edges of most of the paper which was very difficult to refrain from but I wanted to see if I could make a card where I didn't ink much and it still look okay. I think it does indeed look okay *okie doesn't want to admit she was just too lazy to ink everything*.


I haven't used my Stampin Up products lately so it was nice to break them out once again. The Word Window and Modern Label punches are two of my favorites! They work so great for small sentiments and make them stand out more. I remember when I first heard about Stampin Up and thought about how expensive it was and I would never order from them...and now a few years later I have a hoard of cardstock, all the ink pads and markers, too many of their punches to count and just last night made an order from the clearance rack for the photo corner punch, large star punch, some of the star brads and the corduroy buttons they had! I really do have to admit the quality is fantastic and worth the price.

Sunday, October 9, 2011

Craft Show wasn't much of a show!

I was expecting something more than what I saw. There was people selling Tupperware, make-up, fried pies, dip mixes, several photography booths but not much for crafts. There were some booths with braided embroidery thread bracelets, some crocheted top towels, gift baskets and that is about all. Luckily the redeeming thing about the craft show was the reason my friend Linda and I went in the first place....STAMPS!

I got these sets of Stampin Up stamps and didn't pay more than $5 a set but most were $3 a set. I was able to get them unmounted and put in DVD cases last night. I also got some A6 size envelopes, 25 for 80 cents, so that wasn't bad. 

I also splurged and got a few fried pies and they are delicious!! I also picked up two packs of Salsa mix but haven't made any yet. That will require me going to the grocery store...*okie cringes at the thought of going to the grocery store*.

We did go to lunch at Applebee's and I tried the Asiago Peppercorn Steak and it was pretty darn good! After that I came home to take a little nap that somehow lasted like 2 hours! Now I need to get busy on some card designs for these fabulous new stamp sets I got!

Saturday, October 8, 2011

Craft Show today!

My friend Linda, aka LGuild, and her sister are coming to town today for a craft show. We aren't selling or showing anything *okie figures she and Linda have enough stuff to open a store if so desired* but are going to see what is there. The lady who runs stamp club is going to have a bunch of stamps for sale and that is really the main reason we are going. I know she had a lot of unmounted rubber stamps before and I never looked at them because I didn't know how to mount them, but now...well, let's just say I can do it in my sleep! HA HA HA

I haven't gotten anything new made in the last few days but have been working on a DT project that I am hoping to get done this weekend *okie figures she better cross her fingers and legs*. Once done I will have to hide it because it is going to be a Christmas gift for my daughter *okie knows it's a good thing her daughter doesn't read her blog*. I am kinda excited about this project because it is something I have never tried before and I am hoping it will turn out okay.

I will be sure to post some pictures if I get anything at the craft show! Oh who am I kiddin! I doubt there is anyway I will come out of there empty handed!

Thursday, October 6, 2011

I got a surprise!

After a very long day at work yesterday I got home to find a package in my mail box. On the front of the envelope it said RAK! and in the "from" space it said "CRICUT CIRCLE FRIEND". I knew by the feel of the envelope that it was a cartridge *okie thinks that shows she has gotten way too many carts through the US Postal service if she can put one finger on an envelope and know it is a cartridge*! I came in and opened the envelope and in there was the....

CREATIVE MEMORIES CHEERFUL SEASONS!!

I have been eyeing this cartridge for over  a year now and POOF there it was laying right in front of me! Now how someone knew I wanted this I have no idea and all I can say is...

I'M NOT WORTHY!!

and THANK YOU VERY VERY VERY VERY MUCH CIRCLE FRIEND!!

I can't wait to play with this cartridge and I am hoping it rains all weekend so I can hole up in my craft room and get busy!!

Wednesday, October 5, 2011

I was spotlighted on Crafts Unleashed!

Consumer Crafts is the website I order my Coredinations cardstock from and of course rave about because they have such fantastic prices and then on top of that they have great shipping offers pretty often. With that who wouldn't like them?

I received an email from them a few weeks a back asking if they could post some of the cards I had made using the Coredinations Tim Holtz Kraft-Core Nostalgia Collection. I told them they could use anything they wanted! Well today I got another email and they spotlighted all 4 of the cards I made using that collection on their blog Crafts Unleashed in the Fan Spotlight!

Most of you guys know I am usually not happy with much of anything I make *okie knows she is her own worst critic* but for a company to be so pleased with what I have done just really does make me think "Gee, maybe I can do some good work every now and then!". I think something like this happening does give us some validation that our crafting is worthy of our time and efforts.

Tuesday, October 4, 2011

swim like a FISH layout - DT project

As I announced recently, Joy of Obsessed with Scrapbooking, asked me to be on her Design Team. This is my first project for her DT and we were asked to use the Creative Memories Traveler cartridge. When I received this cartridge I immediately fell in love with it and knew what my first project would be! My friend Chelle had brought her two nieces and her baby girl over to swim this summer. Makaylah had never been in the pool so I was a bit concerned about how she would like it. I did not need to worry! That baby girl got in that floatie and immediately started kicking her legs like she was an ol pro at being in the water!


Supplies Used:
- Cricut Expression
- Creative Memories Cricut Traveler Cartridge
- Patterned paper - Bo Bunny
- Various cardstock
- Heat set gems and pearls
-Decorative Accents aka Skittles
-Viva Decor Pearl Pen
- Glistening Snow Writer
- Mounting foam
- Cat Eye Chalk Ink


Design Studio was used to weld the shadow layer together for the title. I cut it in green and then cut the top layer in yellow "bling" cardstock. I added a few 3mm heat set gems to a few of the letters to make the title stand out a little more.

I so love the font on the Traveler cartridge! It reminds me a bit of magic marker and is a good chunky font, which is hard to find sometimes.


For the sun I cut the shadow layer twice, the middle orange layer once and then the top yellow layer once. I then pop dotted between then shadow layers and then again with the middle orange and top yellow layers. The gems are 3mm heat set gems.

You might need to click the picture and make it bigger to see more detail. Nothing ever looks as good in a picture as it does in person!


The curl wave was cut out of 3 different shades of cardstock, using the darkest blue for the shadow layer, light blue for the base layer and medium blue for the top swirly layer. I did ink along the light blue layer a little for added dimension. I added some Glistening Snow Writer thinking I could make it look a little like seafoam. That didn't work out quite like I wanted it to but I still like the look it gave the wave. I also liked the wave popped up and over part of the picture. It really made the wave stand out more. I think as crafters were are sometimes afraid to cover up part of a picture but we really need to get over that since it can really make an element stand out!

I did double shadow layer cuts on the two fish and pop dotted in between them. I added some 2mm heat set gems to the yellow and pink fish along the top and bottom fins and then dotted with the Viva Decor Pearl Pen for the eye. For the larger Purple and Orange fish I added a heat set pearl for the eye and then dotted along the fins with the Viva Decor Pearl Pen. My daughter actually suggested using the Decorative Accents, aka Skittles, as bubbles coming out of the fishes mouths.

If you would like to order the Creative Memories Traveler Cartridge you can order it from Joy at her CREATIVE MEMORIES WEBSITE.

Sunday, October 2, 2011

For A Special - Card

This is yet another card using the Art Philosophy bundle! I know you guys are sssoooo surprised! This is another sentiment stamp that can have several purposes, or maybe recipients is a better word. I am really liking this option because it allows me to make multiples of a card but have it for different reasons. I actually designed this card with a friend in mind. His mother has not been feeling well and I thought he should give her a card *okie can be so bossy with her friends sometimes*. He was actually much appreciative and plans on giving it to her today.
 

Supplies Used:
-Cricut Expression
-Cricut CTMH Art Philosophy cart
-CTMH Frames, Tags, Borders stamp set
-Daisy D's patterned paper
-Various Cardstock
-Stampin Up Ink; marker; Crackle background stamp
-Brads
-Cat Eye Chalk Ink

*okie looks at her list and still wonders if it is a sin to use Stampin Up products with Close To My Heart products but thinks God will understand*


For the vase I used a crackle background stamp in a darker shade of blue than the cardstock. I really like the effect it gave to the vase and made it have a realistic look. If you click the picture you can see more detail.

For a little extra dimension I shaded one side of the vase a little heavier than the other. 

I know you can't really tell in the picture but, I had cut two and layered one on top of the other using some mounting foam.


The flowers and stems were cut as one piece and I couldn't find a layer for the flowers to cut separately. I didn't like the idea of the flowers and stems being the same color so I used some of the Bridal Confetti flowers from Michaels. I double layered them and added a brad for the center. I think it made a really nice looking daisy and it was just the right size for the cuts I had made.

If you will look at the green brad for just a moment *okie waits for her readers to focus on the green brad*, it was not quite the color I needed it to be. It was just a little too bright and my other green brads were a little too, well GREEN! I tamped the brad an my Olive Pastel Cat Eye Ink pad and then waited a bit and then wiped it across a paper towel. It toned down the brightness and made it just the right color I was wanting *okie thinks probably not just the right but it is pretty darn close*.

Not sure I will get any crafting done today so I might not have anything crafty to post tomorrow. I am feeling a lot better today than I have in quite sometime. I think my bronchitis is gone and my eye infection is doing so much better. I am not having to wear the eye patch at this time but still have not graduated back to my glasses. What eye patch you ask?? HHmmm, maybe that will be a post for tomorrow!

Saturday, October 1, 2011

Happy World Card Making Day!

This is one holiday that upsets me! I think it is always on a Saturday so we will never get the day off with pay for this fantastic holiday. I began to wonder where this all started and I was able to find the following information on the World Card Making Day website *okie thinks...who knew there was a website*...

World Card Making Day began in 2006 as National Card Making Day. Founded by Paper Crafts magazine to bring card makers together at the beginning of the busiest card-making season of the year, it was first held on October 7, 2006. The initial celebration involved the Paper Crafts magazine audience only; however, due to the positive response it received and the worldwide popularity of card making, the holiday became known as World Card Making Day from then on.

Celebrating its sixth year in 2011, World Card Making Day is celebrated annually on the first Saturday in October. It's a day for the card-making community -- hobbyists, retailers, and manufacturers -- to unite and celebrate the connection and creativity that is the heart of card making. Join us in the fun on October 1, for World Card Making Day 2011!
 
 And by the way, they are having a contest and giving away a chit load of awesome prizes!! If would like to see how to enter just go to World Card Making Day Contest.

I know a lot of folks think I started making cards after I got my Cricut and after some time of making layouts. However this is not true. I first remember making cards years ago.  I had returned to college to finish my bachelors degree when my daughter was a baby. During this time I was on state assistance and had no money for such luxuries as Christmas cards. I had, however, saved my favorite Christmas cards over the last few years and would use them to decorate a shelf in my house. Since I had those cards I bought some cardstock and cut those up and made new cards out of them so I could hand out some Christmas cards. After that I would make a card every now and then for someone special or a very special occasion. Years later, but before my Cricut, I had a few "Card Party" events at my house with my girlfriends. Generally this was at Valentine's day and I would have supplies for them to make Valentine cards for those they loved, or sometimes just liked and I think in one or two cases just tolerated. Now, as you guys know, I am an avid card maker *okie thinks...but not a card sender*.
 
This card was one of my first ever I posted to my blog, back from March of 2008. I remember thinking that I had done a nice job on it but now as I look at it I think it just doesn't look "finished" LOL.

I had gotten a set of My Favorite Things stamps at my LSS and was trying the "magic colored pencil" technique. I remember thinking how cool it was to use that method to color images but thought it took way too long! I most definitely prefer my ProMarkers these days and can color an image in about 1/20th of the time!
 

To be honest I am not really even sure of the purpose of this post *okie thinks her little homemade cough remedy still might be effecting her brain this morning* but you do now have the history of World Card Making Day and the history of how I got started making cards. So with that my dear friends....

GO GET YOUR CRAFT ON AND MAKE SOME CARDS!!

Celebrate with a present CARD

Yep today is another day of Close to My Heart Art Philosophy bundle project! *okie thinks she should just become a rep as much as she has talked about CTMH lately*. My card stash has some how gone down over the last few months. Probably because I didn't make anything for 3 months and quite a few of my cards were taken by my friend Carmen aka ScrapperDelighted when she stopped by to pick up her dog I was dog sitting. Then some found their way as gift sets to other people, and then there were the ones I donated to Monique Griffith to auction off at her Crop for the Cure. Needless to say this bundle is coming in handy for me to replenish my stash of cards I never send out anyway! *okie cracks up laughing*.
 
Supplies Used:
Cricut Expression
Cricut Art Philosophy cartridge
CTMH Celebration stamp set
Karen Foster patterned paper
Various Cardstock
Stampin Up Ink and marker
Gold Ink pad
Brads
Cat Eye Chalk Ink


I liked the swirly of the stamp for the present and thought the gold would go with the paper nicely, which it does but is hard to see in the picture. I cut the bow twice and then pop dotted the top layer to the layer that was adhered to the present. Oh on the mat that says "Celebrate" I used DS to size the same image slightly larger for the shadow since this feature was not available *okie so loves her Design Studio and still swears it does a lot that the Gypsy can't do*.

If you are wanting to order the Art Philosphy bundle you can contact Melanie at her CLOSE TO MY HEART WEBSITE.