Showing posts with label Square Card. Show all posts

Saturday, February 16, 2013

Valetine's Card and Mailbox

My daughter seems to think I never make her cards or anything else so I wanted to make sure this Valentine's day she had something made by me *okie swears she makes that kid stuff and the kid just doesn't remember*.

I had plans for a grand card that had great elements on the front and on the inside and that all went to chit when the glue made the papers wrinkle and into the trash it went and I had to hurry up and come up with something else. Even though I used some scrap pieces to do the card and mailbox, to tell ya the truth, I think this one came out better anyway!


The mailbox is one from Target that were available a few years ago. I had my friend Carmen pick me some up and send to me. I haven't used many of them...yes it is the dreaded "but if I use it I won't have it anymore" disease!

I did ink the white metal a bit to help take down the starkness of the white. I could have used a pink or red mailbox but neither color looked good with the papers.


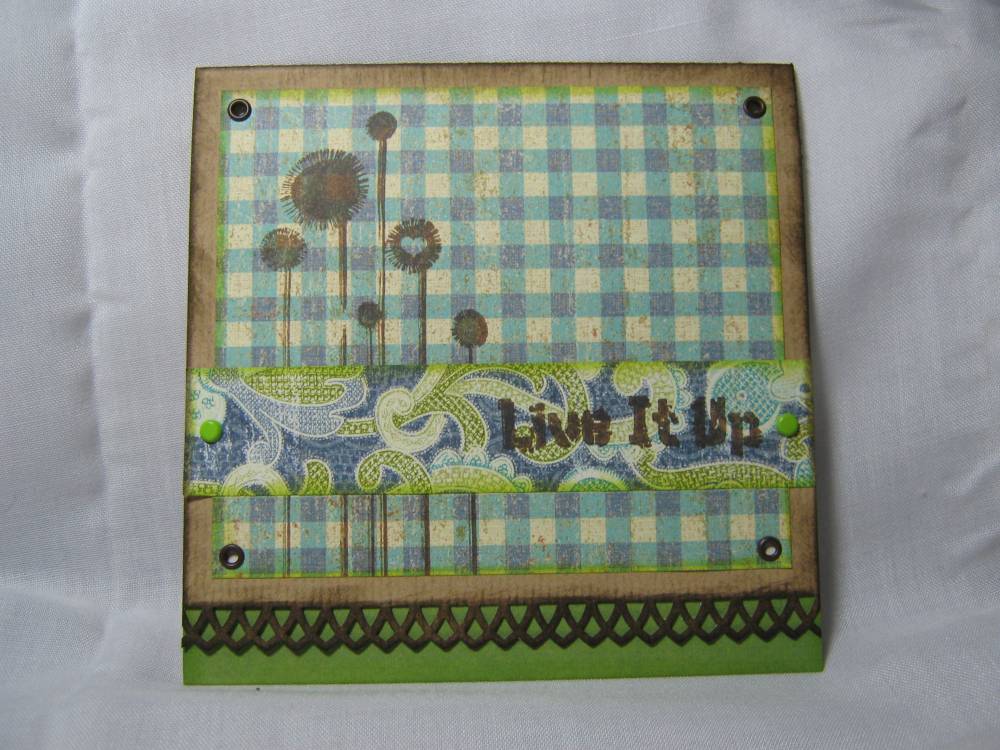
I absolutely love, Love, LOVE making square cards but dont make them often because they can't be mailed without extra postage. I also want to make really embellished cards but yet again I don't because they can't be mailed without a degree of difficulty. This was my perfect chance to make a nicely embellished square card!


I don't generally break out the pretty Prima flowers and nice pearl brads for cards but this time I made an exception. I added mounting foam between the bottom layer and the middle layer and also under the bottom layer, I really wanted dimension didn't I? I also foamed the layers on the tag. The stamp was one I have had for a long time and I have no idea who made it, maybe Sugarloaf.


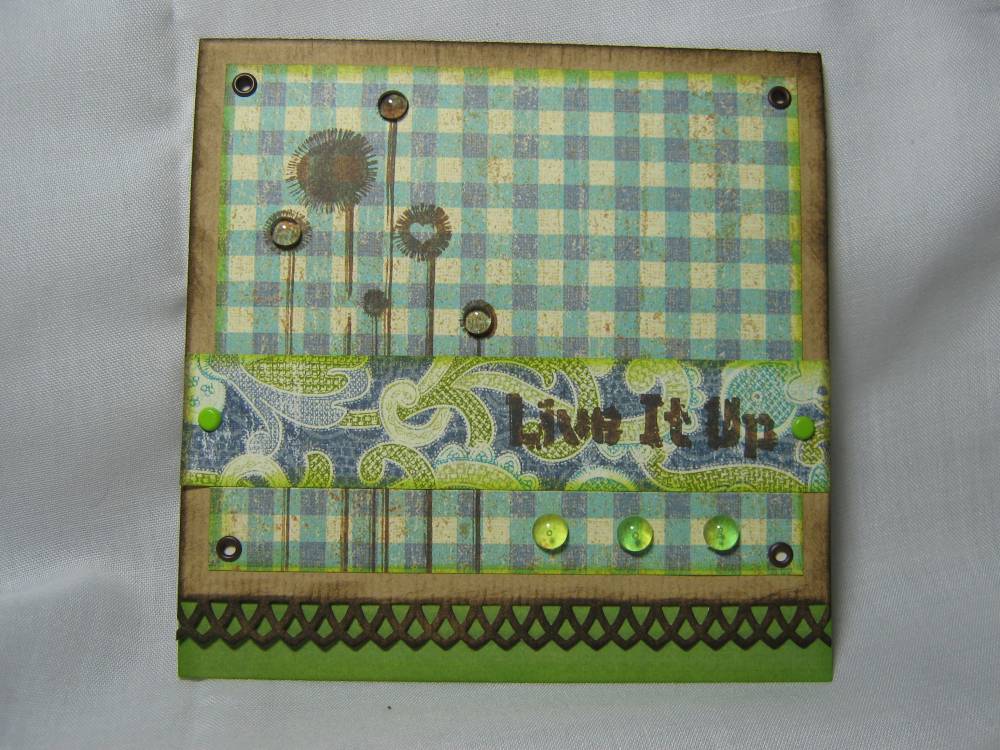
You can see a little of how dimensional the card is in this picture. I used a stick pin to attach the bow to the tag, just pushing the end down into the foam. Stick pins are another thing I like to use but rarely do because it makes a card too thick to mail, heck makes them hard to even fit in a regular envelope!

My daughter was thrilled with her card and mailbox. I guess maybe she has been a sweetheart lately since Chuck and I both went to great lengths to make sure she had handmade cards this year!

Monday, June 14, 2010

Cuttleblug Challenge - A Wedding Affaire

We have a special treat for everyone at the Cuttlebug Challenge this week! All the designers kicked into overtime creativity mode for our Wedding Affaire week! I, myself, can't wait to see the other projects for the rest of the week! Make sure you check Cuttlebug Challenge everyday this week for elegant wedding projects!

I chose to make a wedding invitation and was instructed to make "the most elegant" wedding invitation I could create and to do so I knew I would need to use Design Studio, but then again I always have to use Design Studio!! *okie still thinks DS is required for her Cricut to even turn on*

The .cut file for the WEDDING INVITATION is set to cut two at a time and does require the Cricut Expressions. All mats are labeled for easy identification and while this might look like a complicated card it truly isn't. If you are making one and intend to mail the card will require a gusset envelope and extra postage. I do have a .cut file for the GUSSET ENVELOPE that you can download to use with this card. You will need to cut the 6" one since the card is a 5.5 x 5.5 card.


Supplies Used:

Cricut Expressions
Cricut Design Studio
Cricut Cartridge Give A Hoot
Cricut Cartridge Heritage
Cricut Cartridge Storybook
Cricut Cartridge George
Cuttlebug
Cuttlebug Swiss Dots folder
Teresa Collins Mr. & Mrs. patterned paper
Core'dinations Gemstone cardstock
Core'dinations Vintage cardstock
Zip Dry Glue
Kaiser Pearls and Rhinestones
Prima Flowers
Cat Eye Chalk Ink Charcoal
Pearlescent Vellum
Vellum Tape
Dimensional Foam
Microsoft Word using Charis and Champignon fonts

This picture shows how Design Studio can really add to your creativity. After creating my card base I was able to go fill in areas to keep the corner attached but still leaving open space to see the inside of the invitation. This gave the corner a lacy frilly look but with the layers it is quite durable.


I did a lot of layering of layering for elegant dimension, as you can see in this picture. The opal swirls are double cut. One cut goes directly on top of the onyx shadow and then I pop dotted the other opal layer on top. The pearls, used in graduated sizes, added to the end of the swirls made a fabulous look of elegance. The inking on the inside of the card and the name plate on the front helped make the edges stand out but also gave a soft look.


I was pleasantly surprised to find such elegant butterflies on the Give A Hoot cartridge and they worked wonderfully for the invitation. A little run through the Cuttlebug using the Swiss Dots folder and a light sanding shows off the Core'dinations Vintage paper well. The edges were also lightly sanded. The antennae are flower stamens and I used small pearls for the body of the butterfly.


The Teresa Collins Mr. & Mrs. paper is double sided and I decided to use that as my invitation base and wanted to show the lovely stripes so I went with a pearlescent vellum to print the invitation on. It softened the stripes while allowing the beauty of the paper to show and yet you can still clearly read the wording.

Thursday, June 3, 2010

Sweet Treats Thursday - Cuttlebug Challenge BEACH THEME


Happy Sweet Treats Thursday bloggies!! This week's theme at Cuttlebug Challenge is Beach and how befitting since it is hotter than hades here in Oklahoma. My fellow designers for the Cuttlebug Challenge Blog have created sunny projects to share with you also, so make sure you check out their projects for some bright inspiration. Also don't forget to sign up for this week's giveaway TBA!

My friend Karen and I brainstormed about what kind of neat beach projects to do. We soon found out that our brains are not so stormy *okie sighs deeply*. When all was said and done I think Karen and I both decided we did like the card and candle holder that we came up with.

The BYOB PARTY INVITATION is a 5.5 square card. The cut file is set to cut two at a time. Karen and I decided BYOB was bring your own bikini but Karen quickly pointed out that it could be a variety of beach theme words for the inside of the invitation.


Supplies used:
Cricut cartridges - Doodlecharms, Everyday Paper Dolls,
Pattern Paper - Bo Bunny
Carstock - Prism
Diamond Stickles
Stampin Up markers- Creamy Carmel, Old Olive
Cat Eye Chalk ink
Signo UM-153 gel pen
Spare parts brads

I cut the umbrella with four different colors and then cut them apart and pieced them together. For the printed paper on the chair I cut off what would be the metal supports and then adhered on top of the chair base. The towel and wooden sign was done in the same manner.

Be sure to click on the pictures if you would like to see more detail.

The candle holder was a snap to make. I used some tiny shells in the bottom to add some more beach theme to the candle holder. I just used a tealight candle in the holder. These would be great to make for each guest as a party favor if you are having a beach theme party.

Supplies used:
Cricut cartridges - Mickey Font, Don Juan, Stretch Your Imagination
Armour Etching cream
vinyl
paintbrush


Be sure to check back tomorrow for the video tutorial on how to make one of your very own!

Thursday, May 20, 2010

Sweet Treats Thursday - Fathers Day


Happy Sweet Treats Thursday bloggies!! This week's theme at Cuttlebug Challenge is Father's Day and it is just around the corner so ya better get crackin on those cards and gifts! My fellow designers for the Cuttlebug Challenge Blog have created fantastic projects to share with you also, so make sure you check out their projects for creative inspiration. Also don't forget to sign up for this week's giveaway!

For this week's theme of Father's Day I tried to think of something that my father would have enjoyed. He did love to go fishing and one of my fondest vacation memories is of us going to Lake Eufaula here in Oklahoma and him setting out lines at night and checking them in the morning. So with that memory I chose to do a fishing theme for the Father's Day project.

I have seen the sentiment "fishing you" used before and I thought it was quite clever so when I picked out the paper for this project I knew I wanted to use that sentiment and I think it works quite well. The cut file for FISHING YOU is set to cut 2 at a time.

The card is a 5.5 x 5.5 square. *okie thinks she might get tired of square cards soon...but isn't sure how soon is soon since she is still so diggin making them*

Supplies used:
Cricut cartridges - Just Because Cards, Wild Card, Base Camp
Momenta paper - fish pattern
American Crafts - stripe paper
Stampin Up Marker - Chocolate Chip
Signo UM 153 silver gel pen
Janome Sew-Mini Sewing machine


Here is a close up of the card so you can see more detail. Of course I had to pop dot *okie wonders if she will tire of pop dots and then decides she will never tire of squares or pop dots*. I had to dot around part of the letters so they would stand out more. I love using the dark on dark but sometimes it does make it hard to read so just a little doodling usually does the trick to make the letters stand out more.


For the giftcard box I used Tags, Bags Boxes and More. I cut a fish from the patterned paper and layered it over another one I cut and pop dotted. I used a small spinner as an embellishment. I did remove the hook to avoid injury and if you try using something with a fish hook as an embellishment I highly suggest removing the hook *okie is not a lawyer, nor does she play one on tv, but she also doesn't want to be held liable for a horrendous accident happening while crafting with fishing lures*.


Here is a close up of the gift box. You can see a little better about how I cut the fish twice and then pop dotted one on top of the other. You can also see how I attached the spinner to the box. Sometimes I am amazed how handy brads can be! I inked the edges of the box with chalk ink and added faux stitching around the acetate window. The acetate is actually some I had cut from a Cricut cartridge box *okie is so all about recycling in the craft room*.


I hope everyone has a fabulous Father's day with that special man in your life!

Thursday, May 6, 2010

Sweet Treats Thursday - Mother's Day


Happy Sweet Treats Thursday bloggies!! This week's theme at Cuttlebug Challenge is Mother's Day, featuring the Cricut markers. My fellow designers for the Cuttlebug Challenge Blog have created lovely projects to share with you also, so make sure you check out their projects for some divine inspiration. Also don't forget to sign up for this week's giveaway of the Cricut Cartridge Once Upon A Princess!!

I was so excited and to be honest felt a little trepidation when I started trying to figure out something to create with the markers. To be honest *and everyone knows okie is an honest injun* I haven't used them much.

Since I haven't had to find a gift for Mother's Day in quite a few years I thought I would make something for myself with my mom as the subject. So for my project I chose to do a collage frame and a square card.

For collage frame and I used a picture of my mother when she was about 18 years old. I used Storybook for the lettering and the swirls. The Cricut markers were used to draw on the caramel colored cardstock and then did an overlay with the Cricut cuts. I think it added just the right subtle touch to the cuts.

Papers used are:
Stampin Up Cardstock
K & Company patterned paper
Stardream Mica

The flowers are Prima's with Kaiser Pearls for the centers.

I cut the MOM out of acetate with the shadow effect from Storybook and then cut two M's out with the regular cut and adhered on top of the acetate. Using Zip Dry Glue I adhered small buttons to frame the picture, following the theme of the paper used for the letters.

If you click the picture you can see how the acetate is pop dotted over where I used the Cricut marker outlined everything on the cardstock.


The "love" is a K & Company sticker and the "is" is a brad but I am not sure of the brand, could be K & Company also *okie knew this day would come and hates having old timers disease*. I added some dots to the swirls with pink Liquid Pearls.

I did add a piece of cardstock to the back of the "love" sticker and then pop dotted it *okie so loves dimension*. The brad is pop dotted as well.


The card is a 5.5 x 5.5 square. I used the following carts: Lyrical Letters and Wild Card for the sentiment, Heritage for the corners and Indie Art for the rose. The sentiment is done completely with a Cricut Marker. Also for the corners I used the hide contour feature so I could get the blackout effect with the maroon color.

I typed out "a mothers love" and then repeated the pattern in a staggered rows to make the background sentiment for the front of the card.


Here is a close up of the card so you can see the dimension and layers of the corners and the rose.

Saturday, March 20, 2010

3 Sunflower Birthday Card

I can't seem to get enough of the Sweet Treats cartridge! I was poking around the cartridge in Design Studio and came across a flower that looked like a sunflower. I remembered I had some sunflower paper left and decided to use it to make a birthday card. Of course it was going to be a simple fast card.......yeah right! *okie often fools herself into thinking things will be fast and simple* I decided to sew, then my sewing machine started messing up. I spent over an hour looking for the manual so I could oil the machine, and never did find it! I oiled it as best as I could remember so I could at least finish the card. I had planned on sewing the ribbon on but that didn't happen *okie sighs and rolls eyes*.

The 3 SUNFLOWER BIRTHDAY card is made with the Sweet Treats cartridge. The cut file is set to cut 4 cards at a time. The card I made is a 5.5" x 5.5" square. I bet you guys haven't noticed I have been into doing square cards lately! HA HA HA *okie just totally cracks herself up*

I used Prism and Bazzill cardstock and the printed paper is by Pinecone Press. The flowers are done with the Cuttlebug folders Swiss Dots on the petals and D'Vine Swirls on the centers.

The center flower and sentiment are pop dotted. I looped 3/8" grosgrain ribbon for the leaves and also used it for the stems.

Until next time...have a SWEET TREAT DAY! *okie falls out her chair laughin at her own corniness*

Friday, March 19, 2010

You're so TWEET!!

I got the Serenade cartridge when I got my red E but hadn't used it yet. I kept wanting to but just not sure what I wanted to do. I decided to make a simple card so I could at least say I used it! So...I made the YOU'RE SO TWEET card. My card is a 5.5 x 5.5" square and is set to cut 4. It doesn't cut the mat or the base, just the elements.

Supplies used:
*Cricut carts - Serenade for all cuts on upper card; Old West, Cuttin Up and Animal Kingdom for the sentiment.
*Bazzill Cardstock
*Prism Carstock
*My Minds Eye patterned paper
*Flatback Pearls
*Zip Dry Glue
*Grosgrain Ribbon
*Cat Eye Chalk Inks
*Diamond Stickles
*Stampin Up markers

Don't forget you can click the picture to see more detail.

Thursday, March 18, 2010

More Stamp Club Challenge cards!!

I have been able to get four more cards done for the Stamp Club Challenge *<---- okie points to the link in case someone has missed what is going on with these cards* and I still have enough stuff to do some more, but I think I am running out of ideas at this point!

On these first two cards I used the sentiments from my Stampin Up stamp set Whimsical words. I really adore this set, it has great sentiments! The cards are 5.5 x 5.5", and of course will require extra postage but that is okay since they will probably go in my card box to never be seen again! I can't remember what the patterned paper is but it is some I got probably two years ago because I loved the colors but just hadn't used it yet. The sentiment blocks are what are from the Stamp Club challenge papers.


I used some Just Rite stamps for the card on the left and Stampin Up's Just Jawin for the one on the right. Again the big blocks are what is from the Stamp Club papers. I think I am going to like my Just Rite stamps! I know I can do things in Microsoft word for circles but I can't do the borders and that is what I really like.

Don't forget you can click the pictures to make them bigger if you wish!

Friday, March 12, 2010

Stamp Club Challenge - Card #5

And now I present card number 5 of the Stamp Club Challenge! *okie does a Vanna White arm and hand motion in front of the card* For this lovely gem the papers for the challenge are the circle and the black stripe in the middle. Candy wrapper foil was once again used. I stamped the image on acetate and then pop dotted it on top of the foil. The stamp is from a hostess set I got at my Stampin Up party *okie thinks she is getting good use out of her hostess set*. I guess I need to practice stamping with this one since I have some parts of the image that didn't stamp.

The scallop border is the Stampin Up Scallop Border punch. The brads are some that I glittered myself with doodlebug glitter. Oh yes, the lined patterned paper from the DCWV Black and White stack.

On the close up photo you can see where the mounting foam is placed. I did cut it into small pieces so I could hide it behind the stamped image. In order to get the image to fit in the circle I laid my acetate down on top of the circle and then used a black permanent marker to draw on the inside line. I then cut on the inside of the marked circle. The foil was applied to some plain cardstock and then I laid the acetate on top of it and cut around so it would be the same size.

Okie dokie Pinocchio's *in no way is okie calling her bloggies liars she just thinks Pinocchio rhymes with okie dokie and says it a lot* this is all until I get back to my table and pull out the paper and get creative again!

Saturday, January 23, 2010

I "Cherrish" you & me

When Linda and I went to the Swarm we found the cutest stamp there that had cherries on it and said "Cherrish"...OF COURSE WE HAD TO BUY IT! I still don't know why I am cherry crazy but they are just too stinking cute!

Anyway I started this card last night and didn't get to finish since I went to the movies. I went to see Legion and it was really good! But back to the card...I did get to finish it today.

The stamp is a Snag Em stamp and was only $1. The cherry paper is October Afternoon and the polka dot is Bo Bunny. I used a paper piercer to make the stitching look. I have tried the paper piercer before and I kept poking all the way through but I finally got it right! I used a Martha Stewart border punch for the lacy look. The squiggle on the polka dot paper is a Cuttlebug border folder.

The font is Don Juan. The scallop oval is with Alphalicous, but I had to tweak it to fit the stamp.

The ribbon is banana grosgrain and matches better in real life than it does in the picture. I also put the ribbon through the button.

Here is a close up where you can see that I pop dotted the words and scallop oval. I added Frosted Lace Stickles to the words and also used a Stampin Up marker to add stitching on the lettering also. I did use the Signo white gel pen for the zig zag stitching look on the cherry paper.

I guess in my world...life really is a bowl of cherries! HA HA HA

Wednesday, March 18, 2009

Happy Birthday using Tinkerbell

I finally finished one of the cards. I had a terrible time trying to decide on colors to use but that might have been because LOST was on and I can't seem to do things well when that show is on the tv!

Pink is the favorite color of the little girl whom the card is for so I tried to use it the most but didn't want it to be all pink. I found a sheet of paper I liked that had pink but some other colors that I could tie in.

I used Jasmine for the photo corners and Celebrations for the present. On the present I ran the "bow" through the xyron upside down and then added doodlebug glitter. I think it turned out nice. The scallop circle is a punch as are the circles. The sentiment is computer generated.


I used mounting foam to pop Tink, the present and the photo corners off the card. I think the little girl will like it. If not....well then she can just give it back!! HA HA HA

Tuesday, March 10, 2009

Happy Birthday...a man card

I think this card would make a good card for a man for a birthday. I used some paper and 5.5 x 5.5 card blanks that my friend Carmen P. sent me. It was really hard not to add bling since I love bling!! I used rectangle nesties to put the sentiment on. I even decorated the inside which is something I don't usually do very often. The black cardstock on the inside is just some cheap stuff I got at Wal-Mart. This was a simple card really. I did use the argyle cuttlebug folder on the argyle strip and inked the edges...yes I am addicted to inking!!

Wednesday, January 28, 2009

CARD CHALLENGE 1-28-09

I found some sketches of PageMaps that I really liked and used them for this week's card challenge. One reason I chose them is because they are square. I love doing square cards, not sure why, just do. I however do not like paying extra postage to mail them! *okie laughs at self because she rarely mails out cards anyway...she just keeps making them and putting them in the card box*.

Since being iced in I have been able to get my cards done. I did do 6 of each.

I don't think we can ever have enough birthday cards! For the first sketch I chose to do a cupcake card. Cupcakes are somehow a bit addictive to me but oddly enough.....I don't like eating them. I would much rather have pie..MMM PIIIEEE *okie closes her eyes and licks her lips imagining a nice coconut cream pie...opens her eyes and blinks* oh yes back to the card.

I got the cupcake from Doodlecharms and the Celebrate from Celebrations. The ribbon is lemongrass grosgrain. I did use Diamond stickles on the edge of the frosting and the dots on the lettering. It looks brown on the lettering because I used Chocolate Chip Stampin Up marker to make the dots and then added the stickles. For the flame I used red, orange and yellow stickles. On the candle I added Glossy Dimesions to give it waxy look.

The paper on the frosting of the cupcake is from DCWV Glitter Spring stack *okie is still quite impressed with herself for using some of her pretty paper*. Here are two close up shots of the card.


For the second card I wanted something that could be used for any occasion. I can easily add Happy Birthday, Congratulations, etc to the inside when I need to. I know the colors might look odd and believe me I would have never thought about using these colors together but I SSOO TOTALLYYYY CHEATED!! Someone had posted a website on the Cricut Messageboard that helps with colors. The website is Scraptitude and I highly recommend it if you are color challenged like me! They have color combinations for Close to My Heart and Stampin Up. If you click on the link you can choose which company you want to find colors for.

I used Plantin Schoolbook for everything but the tag, it came from Tags, Bags, Boxes and More. I added the strip of brown at the bottom on my own.

The sentiment is from my hostess set I got from Stampin Up and and the dots along the top of the card are also a SU stamp. I did use my Stamp-ma-jig to line them up correctly. I JUST LOVE LOVE LOVE THE STAMP-MA-JIG!! The little swirl at the bottom of the tag and the flourish at the top of the tag are stamps are from See D's Connetion Collection.

Here are a couple of close up shots.

Sunday, October 19, 2008

I love square cards!

I made two square cards last night. I used a K & Co. paper pad that I got from Scraparazzi. I did use the Arch Lattice Border punch on the Live It Up.....soooo lovin that punch!! The stamping is from the Fancy Pants Fresh Mod 12x12 set. Also the Live It Up was the one I was working on when my eyelet setter died. Guess the setter won't be living it up any longer *tear runs down okies cheek*


When I looked at the cards again this morning I thought they looked kinda plain. So I decided to jazz them up a bit. I went to my faithful skittles and added some of those. I think it gave them just the right touch. I just think it is amazing how just adding a little embellishment can really make a card so much better!