Showing posts with label Tutorial. Show all posts

Monday, April 8, 2019

We R Memory Keepers Envelope Punch Board A6 Envies

The original directions call for a square of 8 7/8 x 8 7/8 paper which means you can't use a standard size piece of paper and gives you a lot of waste of some good paper. I did a little playing around and figured out how to make an A6 (card size 4.5 x 6.25) out of a 8.5 x 8.5 inch square!


Step 1.
Align left edge of your 8.5 x 8.5" square at 5, punch and score


Step 2.
Rotate paper counter clockwise and align first score line with score guide


Step 3.
Repeat step 2 and 3 and then your paper should look like this picture. You can use the corner rounder at the back of the board to round your corners at this point. I usually only round the corner of the top flap since the others won't be seen.


Step 4.
I like to "tuck" the bottom flap to make it go straight across because I just think it gives the envelope a neater look. You can see a faint line where I make a slight score mark so I know where to fold the little flap down.


Step 5.
Just use your favorite method to glue or tape your envelope together and there ya have your finished A6 envelope out of an 8.5 x 8.5" sheet of paper!


Wednesday, April 4, 2018

How I Choose Colors - My Creative Ink Website

I use a lot of paper collections so I don't have to stress about choosing the right color combinations but there is a website I use frequently when using random papers that I have acquired and I've been using the site for a few years now.

I have quite a bit of Stampin Up products so I do have a good reference base for when I want to use a different line of cardstock, such as Bazzill, Coordinations or what other cardstocks that are over on my shelves but I have found it is very handy to use for all cardstocks. 

The My Creative Ink is a bit of a Godsend as far as I am concerned. I generally pick one or two colors from the patterned paper I am using and then find something similar in the list, hit the "search" button and POOF! I have some suggestions of other colors to use. In this example I chose Pumpkin Pie and Pacific Point and you can see below there are a number of color combinations that were generated. 

So if you are having problems with choosing colors you might check them out! I try to donate a few times a year hoping it will help keep the website going because I sure don't want it to go away!

Tuesday, March 27, 2018

Lolliop Happy Birthday Card and How To Glue Small Pieces

This week for one of my Facebook groups I am posting  a birthday card it's a recreation from a card I did a few years ago. If you are a member of the group you know where to find the SVG file for download. 


Supplies Used:

Make the Cut (for designing)
Cricut Design Space (for cutting)
Paper Studio Quatrefoil folder
Various Cardstock
Transparency Overlay Sheet
Teflon Mat (read below for information)

Back in 2014 I posted a card from the Stampin Up Sweets for the Sweet stamp set and I really liked that card. Even though I still have the stamp set I wanted to recreate that card and cut it with the Cricut Maker so I could test how the Maker cuts Transparency Overlay sheets. It is something I never cut with the Explore machines. I was pleasantly surprised how well the transparency cut! 

The only issue with cutting this card was the mint paper and that was not the fault of the Cricut Maker but the cardstock. The cardstock fine sheen layer to it and it separated in a few places on the lettering when I was taking it off the mat but a dot of glue fixed any of those problems. The letters are a little less than a 1/16" thin and the Cricut Maker cut them beautifully!


Here is a close up of the lollipops and you can see the Cricut Maker cut those beautifully as well as the transparency overlay material that I used for the lollipop "packaging". The Art Glitter Glue is simply wonderful and I have started using it as my #1 go to glue. The big bottle is much cheaper in the long run and you can always pour some in a smaller bottle for easy handling. It doesn't seem to warp paper like many glues do and it doesn't leave a shiny film if you over glue. To glue the transparency on I added a small dot of glue on the lollipop stick right below the circle and then added a small dot at the top of the circle on a raised part of cardstock. On the pink candies I used Diamond Stickles on the swirl top layer and on the purple I used Starry Night Stickles on the pinwheel top layer. Oh I also added a couple of squirts of Glimmer Mist Pearl to the circle layer and the sentiment. I think the pearl is my favorite of all the Glimmer Mists and I tend to use it more than anything else, especially when shaping flowers. 


**TIP OF THE DAY - GLUING SMALL PIECES TUTORIAL**


Now let's talk about gluing small pieces! There are so many fantastic things I would like to do but then I think "UGH!! I don't want to get glue everywhere!" and I will avoid a project or cut but while I was making this card I tried something *okie wonders if she might have tried this years ago but then forgot about it* for the small cuts. Instead of turning the cut upside down and applying glue I put a little Art Glitter Glue on a teflon sheet and then used my Tweezerbee's to dip the piece into the glue and let me tell you...GAME CHANGER!! I didn't have to worry about excess glue all over my cut and wiping off glue after I put my cut down.


I searched Amazon and found a 5 pack of 16" x 24" Teflon Sheets for $9.99. If you pick these up in a craft store you can pay that much for just one sheet. These are also larger than the sheets they sell for "heat press teflon sheets" and work wonderfully for that purpose as well. I know because I actually have this same pack that I found at a bargain store. The piece I used for making this card was what was left over from cutting a sheet down to use with my heat press. I keep this little piece in a drawer so it is handy for me to pull out when I need a non stick surface.

Saturday, March 10, 2018

Tim Holtz Stamping Platform Grid - OMG!!

If you are a stamper and don't have a stamping tool I highly recommend the Tim Holtz Stamp Platform! We had to anxiously await for the release because of the whole copyright lawsuit thing but it was worth the wait! 

One of the things I wish it did have was a grid at the bottom so it would be easier to place my papers when I am stamping. Since I make 6 of each card I have to constantly try and line up my little stamping papers but I fixed that chit! First I thought about printing a grid on some cardstock but then remembered I had some laser printer transparency sheets *okie figures you can use something in an inkjet printer but is too lazy to do the research on that since she has hers made* and thought I would try and print a grid on that. 

I did a quick search for printable grid paper and there were a number of sites that came up and I just chose one, not sure which one now though. I downloaded the 1/4" grid and printed two sheets. I cut one down to 8.5" x 8.5", using the grid lines as a guide and then the other I cut to 8.5" wide and 7 rows down to finish out the grid for the platform. 

I used my double sided ATG tape and applied it to the edges, which I think you can see in the picture if you click on it and make it bigger, and then lined up the lines with the 1/4" marks as best I could. They are not exact but close enough. Once I had the large piece in place I put my magnets on and then started at the top by taking the paper backing off the tape and pressing down and worked my way around. 

For the bottom piece I cut right below one of the printed lines so it would line up with where I cut right above a printed line and I did this so I wouldn't have a double printed line on the grid. I then did the tape the same way as I did on the big piece and POOF - OMG! I now have a nice gridded stamp platform! Oh and one last note, I put the printed side down so I could wipe off any ink that might get on the transparency when I am stamping. 

I'll be trying this out a little later today when I make some cards but right now I am about to go meet my friend Linda for lunch at a Mexican restaurant here in town. Hopefully it works as good as I am hoping!

Saturday, May 20, 2017

Envelope Glue!

First off let me say I know good and well that you can buy a lickable glue product to use when making your own envelopes. I also know good and well that you can use double sided tape *okie has used that method herself* as a way to close an envelope but I wanted to make my own glue dammit!! The reason I say these things is because when I shared on Facebook about making envelope glue I had people telling me I should do this or that and I didn't want to do this or that, I wanted to do what I wanted to do! 

I also was told that due to the ingredients of the envelope glue was going to attract ants and then someone said that it would probably attract roaches but I am here to say that I have not seen one ant or one roach in my stash of envelopes. Oh yeah then someone mentioned "it's not vegan friendly". By this time I wanted to slap some people upside the head. I couldn't reach through the computer and do such a thing so I just called Carmen and yelled at her for a little while and I felt all better. Oh and Carmen yelled with me about the nonsense so it worked out great *okie thinks everyone needs to have at least one friend to whom one can vent and they will vent with you*

Okay now that is off my chest I shall share with you about this awesome idea!

LICKABLE ENVELOPE GLUE
Ingredients:
3 Tablespoons white vinegar
1 Envelope unflavored gelatin
1 Teaspoon vanilla extract
1 Teaspoon sugar

Use a small container that has a lid, I used one of the 4 oz Rubbermaid containers I had in my kitchen cabinet, and put the white vinegar in the container. Place the container into a microwave and heat long enough for the vinegar to start to boil. I believe I did mine like 45 seconds or so but it will depend on your microwave. Remove from the microwave and add the gelatin and stir until dissolved. Add the vanilla and sugar and stir well to mix. 


When done you should end up with a mixture that resembles something like this and it is ready to use!


I have had mine stored in my fridge now for a few weeks and am still able to pull it out and use it without any problems. But make sure you keep it in the fridge when not in use. It will set up but just pop it back in the microwave for about 30 seconds and it will be thin enough to use again.

I'm not sure how many envelopes one recipe will do but I can say I think I did over 300 envelopes with the one batch I made and I still have quite a bit left.


You will want to use a cheap stiff paint brush, don't waste a good paint brush on this, and then just apply to the top flaps of all the envelopes you made with yesterday's tutorial.  


Be sure the flaps don't touch anything while wet because they will stick. Drying time will depend on how thick you put the glue on and mine dried within about 30 minutes or less. Once dry you can fold the flap down and store. When you are ready to use the envelope just lick like a regular envelope and close. Oh and you won't even taste the vinegar so don't worry about giving away your handmade cards and envelopes and people being disgusted by the taste. It actually taste better than most envelopes I have licked.

Thursday, May 18, 2017

Making an A2 Envelope with the We R Memory Keepers Envelope Board

***REVISED*** After this was posted in a Facebook group a lady named Bev told me an easier way and I tried it and POOF! Yep a lot easier and faster so the instructions have been revised and post has been updated. Shout out to Bev for sharing her instructions!!

I had another card scheduled to post for today but I decided to share how this information instead. I had posted about making envelopes on Facebook and several people asked me to make a blog post with instructions and I'm just now getting around to doing posting it so to those who asked I apologize for the delay!

I'm not quite sure when I got my We R Memory Keeps Envelope Punch Board but until recently I hadn't really used it but a few times. One of the reasons is that it doesn't make a true A2 size envelope and according to postal codes the size it makes will cost extra postage. I determined that by using my handy dandy Mailing Template that I got from the post office years ago. I have used it for square envies and loved it for that purpose.

When Carmen was visiting we decided to sit down and figure out if we could actually make a true A2 envelope and I knew there had to be some way to do it! After a few failed attempts we finally figured it out and got the measurements down. Now it might seem like a lot to do in order to get a true A2 envelope but once you get in the swing of things it goes fast and if you are using 20lb paper like I did then you can actually score, punch and clip 3 at a time and I thought the paper actually scored and punched better when doing 2-3 sheets at a time. Generally I like to use 24lb paper but I got a steal of a deal on some reams of blue and ivory Hammerhill copy paper, $1 a ream!! The ivory was actually long enough that I could get 2 envelopes out of one sheet and the blue was long enough that I was able to make an A2 envelope and 3x3 envelope. I can't remember how many envelopes I made in a week while just watching TV but it was around 400.

INSTRUCTIONS:

Start out with cutting your paper at 8", NOT the 8 1/8" as printed on the envelope board and make your first score as at 3 1/2" and punch, or you can punch first and then score, just which ever you prefer. Then just continue to turn, punch and score as normal. 


After you have your paper scored and punched you will have a piece of paper that looks like this. The flap that is punched will be the flap of the envelope and you will use the back side of the board to round the corner.


This step is a personal preference since I don't like the tip of the bottom flap going above the line of my side flaps. Fold in the sides and the top flap, and using your trimmer line up the top of the envelope and trim at 6 3/4"" which will give you a nice straight edge where your sides and bottom flap meet. I usually trim 4-6 at once to save time.


Unfold the top flap straight and keep sides folded in. You can use tape, glue or whatever is your preference for making the envelope stay closed.

I used my Fineline Glue Applicator bottle to glue my envelope together and you can tell in the picture where I left a little area in the middle of the bottom flap without glue and the reason is that if you do put glue there then you are going to glue the bottom flap to the front of the envelope *okie isn't sure that just made sense*...Um...just don't glue in the middle, do like the picture shows. 


Now all you have to do is fold the bottom flap up and POOF! Your envelope is done! A lot of people use Score Tape or other types of things to put on the flap so the envelope can be sealed but I went a different route and made envelope glue! I found a recipe on the internet and it works great. If you think you are interested in making your own envelope glue just come back for tomorrow's post!


Saturday, February 27, 2016

Making Your Own Pop Dots

One of the things I love to use when papercrafting is Pop Dots but I don't actually use Pop Dots because they are a bit expensive in my opinion when used in volume that I use them. They are especially expensive if you have to buy several different packages in order to get the size you want and my solution is to make my own then cut to the size I want. To make it even better I can layer it to get different heights.


I started to panic last night while finishing up decorating my last box and I thought I was getting low on my own Pop Dots. Fortunately when I went to the closet in the craftroom and checked my box I was quite relieved to find that I still have a "few" rolls of mounting foam. I stocked up a few years ago when Wall's Bargain Center had quite a few packages for $1 each and I think there were like 3 or 4 rolls to a package. I shared my find with my friends Linda and Carmen. 


So what do you need to make your own Pop Dots? Mounting Foam and something to stick it to, yep that's it! What I have found that works great is the left over sheeting from contact paper. I have tried several things over the years but this works the best because it releases the mounting foam the best. I use to just cut pieces off the rolls but my scissors would get gummed up pretty fast and after going through a few pairs I would have to clean them with some Undu because they wouldn't even open anymore. 


Since I store my mounting foam strips in a pencil case I cut a piece of contact paper the length of the pencil case to make things easier. I then lay out strips of the foam covering the piece of contact paper backing making sure to leave a little gap between the strips so I can cut them apart when I'm done. 


My pencil case will hold two rolls of mounting foam strips and this should last me awhile. The case fits nicely in one of my craft table drawers and is handy to get to. I love being able to cut the size I need without getting my scissors all gummed up. After spending about 20 minutes doing this last night I'm all ready for when I need Pop Dots!

Tuesday, July 1, 2014

Cutting Large Vinyl Projects - Tutorial

For so long I thought I was limited to cutting the largest vinyl projects to a 12x24 cutting mat and there have been some things I would have liked to cut larger but never thought outside the box, which is odd for me since I think my brain tends to live outside the box most of the time. But I have now learned that I can cut things much larger and this is gonna be an EPIC change in things I do with vinyl!

A few weeks my friend Dave and his 12 year old son Tayden came over to visit and Tayden was a bit mesmerized by my craftroom. Tayden had a lot of questions and was rather intrigued about things I could cut. He asked if I could cut him a Ghostrider for his bedroom wall. I told him if he could find me a decent picture that I might be able to cut it for him. He sat on the computer looking at pictures for quite sometime and finally found one he liked. I looked at it nervously and told him "I can't promise I can get a clean trace and cut it but I'll try my best".

After several traces, cleaning up images, figuring out how to cut it bigger and then putting it to the test this was the end result.

The image is approximately 30" x 22", so almost 3 times as large as the largest vinyl project I have cut! When I thought about cutting this I knew I should probably document how I did it in case there were questions and I decided to go ahead and do a tutorial.


The tutorial is for Make The Cut only since I do not know how other programs work. Please don't ask me how to make it work in other programs because I will likely cuss you out *okie gets ready to give the evil eye to anyone who asks*. You have been warned!

WORD OF CAUTION: Continue to save your project throughout the process. I would have for people to go through all this and then lose the project because they didn't save periodically.

First make your image as large as you can to work with while still seeing the full image on the screen. 

Make two lines that are longer than the image and place them where you need them. Since I don't know how big of an image you want to cut I can't tell you specifics. Now copy both and paste on another mat, you will need this for line placement in a few steps down.


Next do a "boolean" join and choose the option "B-A Difference" and hit apply. This will split the image into sections.


With the image selected, in other words the box should be around the image, click the "break" function as to break up all the image.

Now you should have all the grey boxes around the pieces of the image.


Now take your mouse and box all of the middle image together and click "Join". The two outer parts of the image should still have all the little grey boxes around them.


Since my middle section was taller I was able to draw a box around the outer pieces without it effecting the section I just made. You may need to do each side individually depending on your project. Once you have the outer sides selected then click on "delete".


All that should be left on your mat at this point is the image that was in the middle that was "joined".


Copy your middle image and paste it to a NEW LAYER on the mat that you copy and pasted earlier. You should see something like this. I keep my layers in different colors so I can see them more easily.


Break your lines you have joined so you can move them independently and line the OUTER edge of the line to edge of the middle image. 


Next, "HIDE" your middle image. Select the long lines and join those lines. Then select both images that are showing on the mat and use the "BOOLEAN JOIN" function as explained in previous step.


Do an image "Break" and get rid of the middle section. You can join the outer sections individually before or after you delete the middle image.


Now you should be able to faintly see the middle image from the hidden layer and you should have two outer images. If you haven't joined those individually then do so now.


Make the hidden layer visible so you can see if your images are lined up correctly. If not then you screwed up somewhere or I didn't explain it right but I'm going with the you screwed up theory. And that is mainly for my friend Carmen because she tends to try and blame me when she is not listening and following what I am trying to tell her what to do.


Next zoom out so you have plenty of white space on your screen and the image and mat look small.


Select all images and rotate 90 degrees. 


Now resize your image to how big you want. I chose to go almost 24 inches on this one. Since I was using a Cricut cutting mat I had to be mindful of the margins since they don't fit perfectly in my Pazzles machine.


You will now want to add each section to a "NEW LAYER" so you will be able to "HIDE" the layers you are not cutting at the time. See the "LAYERS" menu for example if needed.


Now this is just a little tip and not necessary for all images - My image had a lot of "nodes" so I chose to break each image and then join parts of each one and then adding to new layers as I went so when I got ready to cut my machine didn't freak out due to there being so many "nodes". If you do this just make sure you know exactly which main image you are cutting and don't cut the wrong one. If this frightens you then just copy and paste each image to a new mat and do it that way so it isn't as confusing.

Now you are ready for cutting. Right before cutting you may want to say a little prayer or have some wine to calm the nerves.

After cutting and weeding the images then you need to decide if you are going to just keep them separate or join them together for application. If you are doing this for someone to apply later then you might want to join the image before adding the transfer tape.
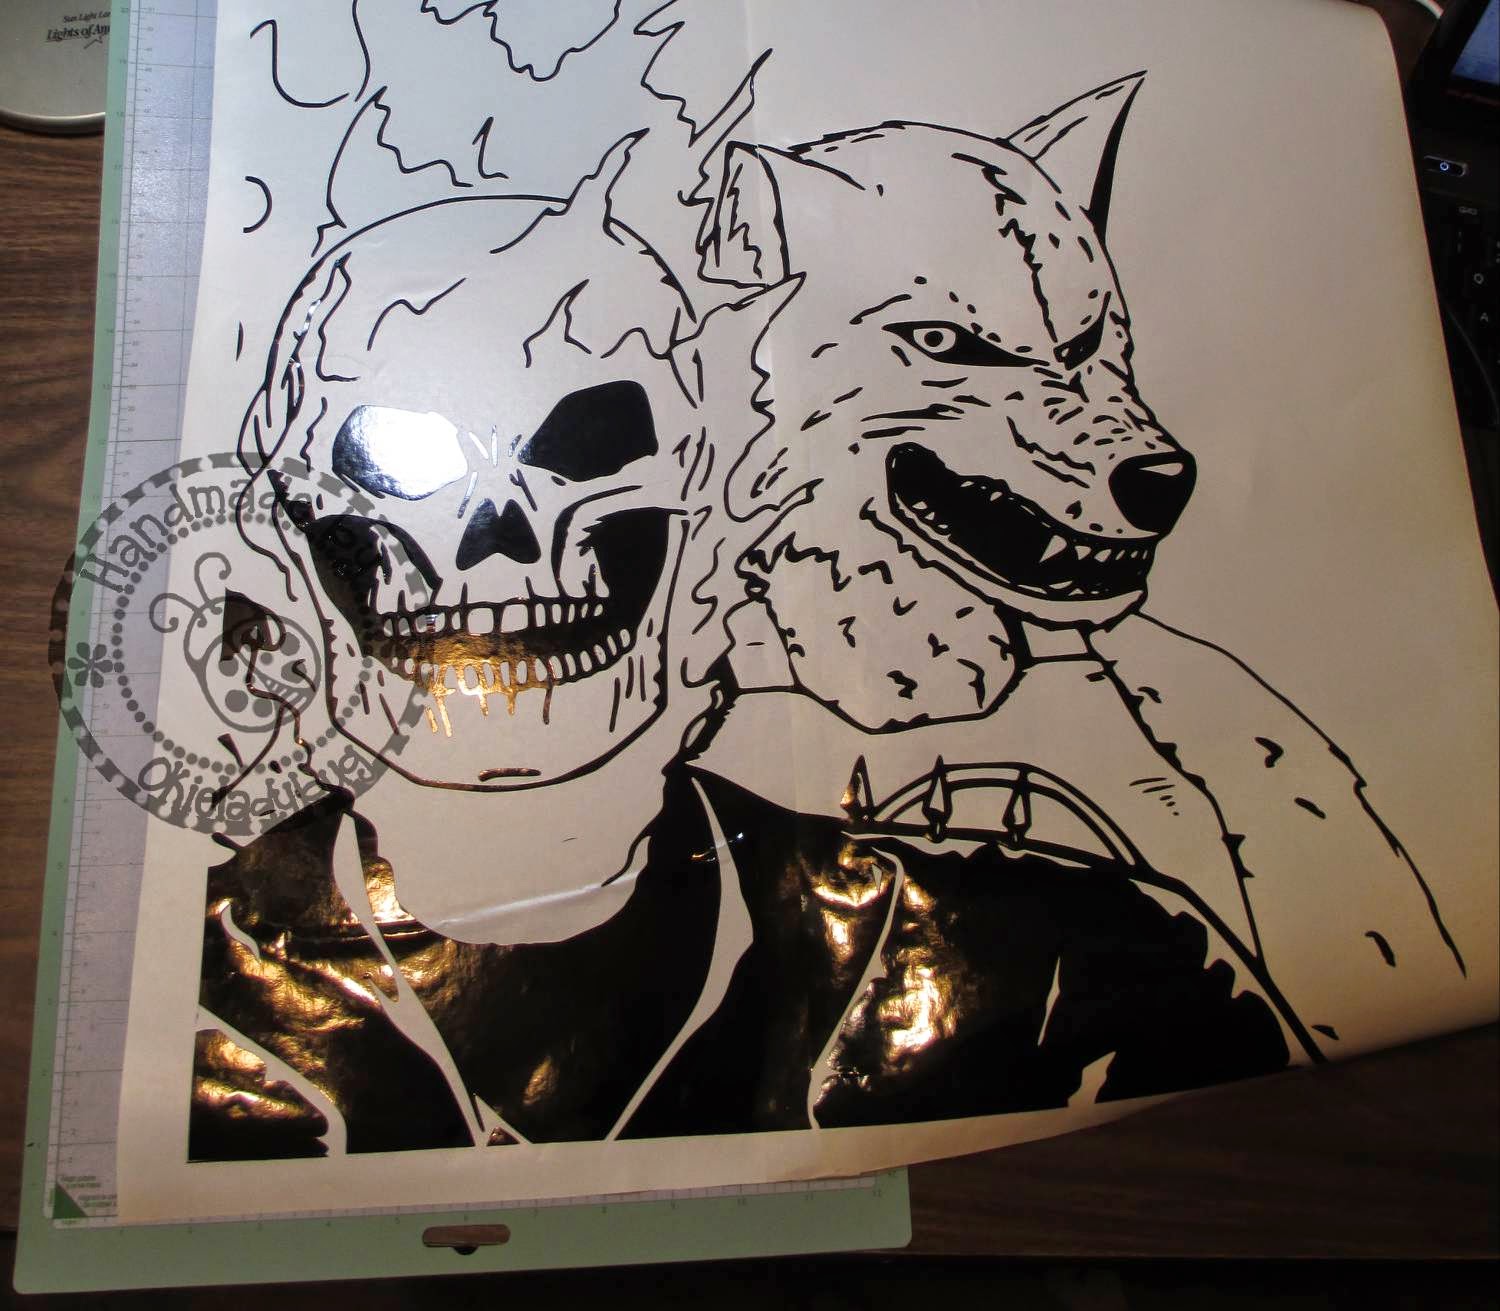
I did join this image and to join I cut along the inner edges of the two outside images with scissors. On the back of the middle image I put tape and let it overhang the edge so when I laid the outside image down it would be taped together. 

I did find it easier to keep the middle image on the cutting mat to join the long sheets together so I didn't have it moving around.


Here is a close up so you can see how the image matches up. Now it might not be absolutely perfect but it should be close enough.

Now just add your transfer tape and you are ready to go! 

I certainly hope you guys enjoyed this tutorial and that someone uses it because it was a real pain the ass to take all the pictures, edit them, watermark them, upload them and then write all the steps out! *okie falls out chair laughing*

Saturday, October 19, 2013

Layering Vinyl for Wall Quotes

I have been doing a lot of Wall Quotes the last few days and a few of them I have done two colors and I had to figure out how to get the colors on one backer sheet, not even sure if that makes sense but hopefully it will in the pictures!

I first cut and weeded my black design. Notice the 4 triangles in the design. I added those for tick marks so I would know where to place my maroon layer.


Here is the maroon layer, the tick marks show up a little better in this picture. I cut the design right above the "enjoying" because my transfer tape isn't wide enough to pick up the whole design. Also because I didn't want to waste black vinyl by having a few extra inches at the top where there wouldn't be any design. Crap...I think I just confused all of us. I gotta stop writing blog posts when I can barely keep my eyes open! Maybe it will all make sense at the end! HA HA


I circled the triangles and put "remove after application" so the receiver would know it's not part of the design.


The transfer tape for the top half of the design was cut wide enough to cover the top maroon design but also be able to unroll over the top part of the black design. I pulled the backing off of the lettering and then taped the backing to the backside of the main design. Once the backing was taped together I lined up the triangles and placed the maroon back in position.


Here is the full design layered and with the transfer tape and hopefully it all made sense. Basically what you need to know is that you need to have some type of registration marks if you want your design to be lined up how you have intended. Of course you can be brave and just wing it!

I think this might be the most idiotic and stupidest sounding tutorial I have ever tried to do...I need a nap!


Sunday, June 23, 2013

Joining Shapes to Letters - MTC Tutorial

I was skimming through the Make The Cut forum the other night and came across a post where a woman was having some problems with joining a shape to a letter. I of course thought it was a quick fix but it wasn't! I tried to boolean join *okie still really wonders what in the heck that means* and all the options for it didn't produce the desired effect. After trying several other things it finally dawned on me what to do...I know this might seem time consuming and complicated but it really does go fast and I am including pictures since I have a hard time explaining things.

Step 1 - Choose your letter and image, set objects to desired size and position. In this case I used the letter M and a baseball.


Step 2 - Click on the baseball (or object of your choice) and do a "break". After the images is broken then select the inside of the image, or guts if you will *okie cracks up laughing*. Now hit "copy" and then delete. If you are unable to get all the pieces then just do a "copy" and "paste in place" to a new mat until you have all the pieces removed.


Step 3- You should be left with the letter and what is now the base layer of the image.


Step 4- Weld the two objects together.


Step 5 - Now do a "paste in place" with the parts you deleted and weld together and POOF! You have your image and letter as one image. 


I am really not sure how Make The Cut works since I am fairly new to the program, all I know is that all the welding and joining options wouldn't work for me. The lady who was needing the help was able to quickly join her shape and letters with the instructions I gave her. Another lady gave some instructions about a "import to a raster image" which I have no idea what that even is but it might work more easily if you know what it is and how to do it. For me this method worked fine and really did go quickly!