Showing posts with label MTC Tutorial. Show all posts

Thursday, May 14, 2015

Using Make The Cut with the Cricut Explore


I have said it many times and I will say it again...I FREAKIN LOVE MAKE THE CUT!! If ya didn't hear me I can yell it a little louder *okie cups her hand behind her ear and hears someone in the back say they didn't hear her*. Okay this is for you in the back I FREAKIN LOVE MAKE THE CUT!!!

Now with that said and out of the way I shall continue. I believe we all know how much I have enjoyed reviewing the Cricut Explore and how well I think this machine cuts but I absolutely abhor the software and how it has to be connected to the internet to use. BUT, with the magic abilities of Make The Cut I can make my design safely without an internet connection, export as an SVG file and then upload into Cricut Design Space for cutting. This takes out a lot of worry about if I'm going to lose connection or if their server is going to have problems and crap out on me for whatever reason while I am designing. I also don't like the glitchy movement I get a lot of the time with the CDS program. I like nice smooth movement when I'm designing, I can tolerate it during cutting since that is all I am using the program to do. 

I apologize for the poor picture quality and I hope it is clear enough to get my point across. I got a new computer a few months ago and it runs Windows 8 *which okie hates* and I'm still not use to all the new crap...half the time I can't even find what I need on this damn thing. 

First off I get my design all on one mat in MTC. I always add a 12x12 base layer to my design I am going to import into CDS and I will explain that in a later step. 

  • Make sure all the layers are unlocked and visible. There is a little "eye" and "lock" icon in the bottom right hand corner where you can hide/unhide and lock/unlock all layers at once or you can do each independently next to the small mat preview seen on the right hand column on the screen. 
  • Select all your layers by either clicking "edit" and then "select all" or drawing a box around all the images with your mouse.
  ____________________________________________________
  • Export your design by clicking file, export, Sel to SVG file
  • Name and save your file
 ____________________________________________________
  • Open Cricut Design Space
  • Click on Upload Image
  • Click Upload Vector
  • Find your file
  • Click Open
 ____________________________________________________
  • Make sure correct file is checked
  • Click on Insert Image
 ____________________________________________________
  • Click the Edit tab
  • Resize image to 12x12 to maintain original design ratio
_____________________________________________________
 
I hope I explained that well enough, I'm not so good at explaining things to others and most of the time it's just easier for me to do things and then send it to them than trying to explain how to do it. I really wanted people to see how easy it is to use the most awesome program in the world, Make The Cut, with the superior cutting machine, the Cricut Explore.

Wednesday, July 2, 2014

There Is An Easier Way To Do Large Vinyl Projects!

So after thinking I was a smarty pants about figuring out how to make larger vinyl projects I was informed that Make The Cut has a "Tiler" function that does the same thing for you and it is much simpler! Bryan from MTC was kind enough to share some links with me and I found this video to be most beneficial and I thought I would share it with you guys.

MAKE THE CUT TILER FUNCTION

I am terrible about not reading instructions for things and I guess if I had taken time to read the manual I would have found this out long ago. Oh well I still say I was a bit genius to figure out the method I did anyway HA HA HA.

Tuesday, July 1, 2014

Cutting Large Vinyl Projects - Tutorial

For so long I thought I was limited to cutting the largest vinyl projects to a 12x24 cutting mat and there have been some things I would have liked to cut larger but never thought outside the box, which is odd for me since I think my brain tends to live outside the box most of the time. But I have now learned that I can cut things much larger and this is gonna be an EPIC change in things I do with vinyl!

A few weeks my friend Dave and his 12 year old son Tayden came over to visit and Tayden was a bit mesmerized by my craftroom. Tayden had a lot of questions and was rather intrigued about things I could cut. He asked if I could cut him a Ghostrider for his bedroom wall. I told him if he could find me a decent picture that I might be able to cut it for him. He sat on the computer looking at pictures for quite sometime and finally found one he liked. I looked at it nervously and told him "I can't promise I can get a clean trace and cut it but I'll try my best".

After several traces, cleaning up images, figuring out how to cut it bigger and then putting it to the test this was the end result.

The image is approximately 30" x 22", so almost 3 times as large as the largest vinyl project I have cut! When I thought about cutting this I knew I should probably document how I did it in case there were questions and I decided to go ahead and do a tutorial.


The tutorial is for Make The Cut only since I do not know how other programs work. Please don't ask me how to make it work in other programs because I will likely cuss you out *okie gets ready to give the evil eye to anyone who asks*. You have been warned!

WORD OF CAUTION: Continue to save your project throughout the process. I would have for people to go through all this and then lose the project because they didn't save periodically.

First make your image as large as you can to work with while still seeing the full image on the screen. 

Make two lines that are longer than the image and place them where you need them. Since I don't know how big of an image you want to cut I can't tell you specifics. Now copy both and paste on another mat, you will need this for line placement in a few steps down.


Next do a "boolean" join and choose the option "B-A Difference" and hit apply. This will split the image into sections.


With the image selected, in other words the box should be around the image, click the "break" function as to break up all the image.

Now you should have all the grey boxes around the pieces of the image.


Now take your mouse and box all of the middle image together and click "Join". The two outer parts of the image should still have all the little grey boxes around them.


Since my middle section was taller I was able to draw a box around the outer pieces without it effecting the section I just made. You may need to do each side individually depending on your project. Once you have the outer sides selected then click on "delete".


All that should be left on your mat at this point is the image that was in the middle that was "joined".


Copy your middle image and paste it to a NEW LAYER on the mat that you copy and pasted earlier. You should see something like this. I keep my layers in different colors so I can see them more easily.


Break your lines you have joined so you can move them independently and line the OUTER edge of the line to edge of the middle image. 


Next, "HIDE" your middle image. Select the long lines and join those lines. Then select both images that are showing on the mat and use the "BOOLEAN JOIN" function as explained in previous step.


Do an image "Break" and get rid of the middle section. You can join the outer sections individually before or after you delete the middle image.


Now you should be able to faintly see the middle image from the hidden layer and you should have two outer images. If you haven't joined those individually then do so now.


Make the hidden layer visible so you can see if your images are lined up correctly. If not then you screwed up somewhere or I didn't explain it right but I'm going with the you screwed up theory. And that is mainly for my friend Carmen because she tends to try and blame me when she is not listening and following what I am trying to tell her what to do.


Next zoom out so you have plenty of white space on your screen and the image and mat look small.


Select all images and rotate 90 degrees. 


Now resize your image to how big you want. I chose to go almost 24 inches on this one. Since I was using a Cricut cutting mat I had to be mindful of the margins since they don't fit perfectly in my Pazzles machine.


You will now want to add each section to a "NEW LAYER" so you will be able to "HIDE" the layers you are not cutting at the time. See the "LAYERS" menu for example if needed.


Now this is just a little tip and not necessary for all images - My image had a lot of "nodes" so I chose to break each image and then join parts of each one and then adding to new layers as I went so when I got ready to cut my machine didn't freak out due to there being so many "nodes". If you do this just make sure you know exactly which main image you are cutting and don't cut the wrong one. If this frightens you then just copy and paste each image to a new mat and do it that way so it isn't as confusing.

Now you are ready for cutting. Right before cutting you may want to say a little prayer or have some wine to calm the nerves.

After cutting and weeding the images then you need to decide if you are going to just keep them separate or join them together for application. If you are doing this for someone to apply later then you might want to join the image before adding the transfer tape.
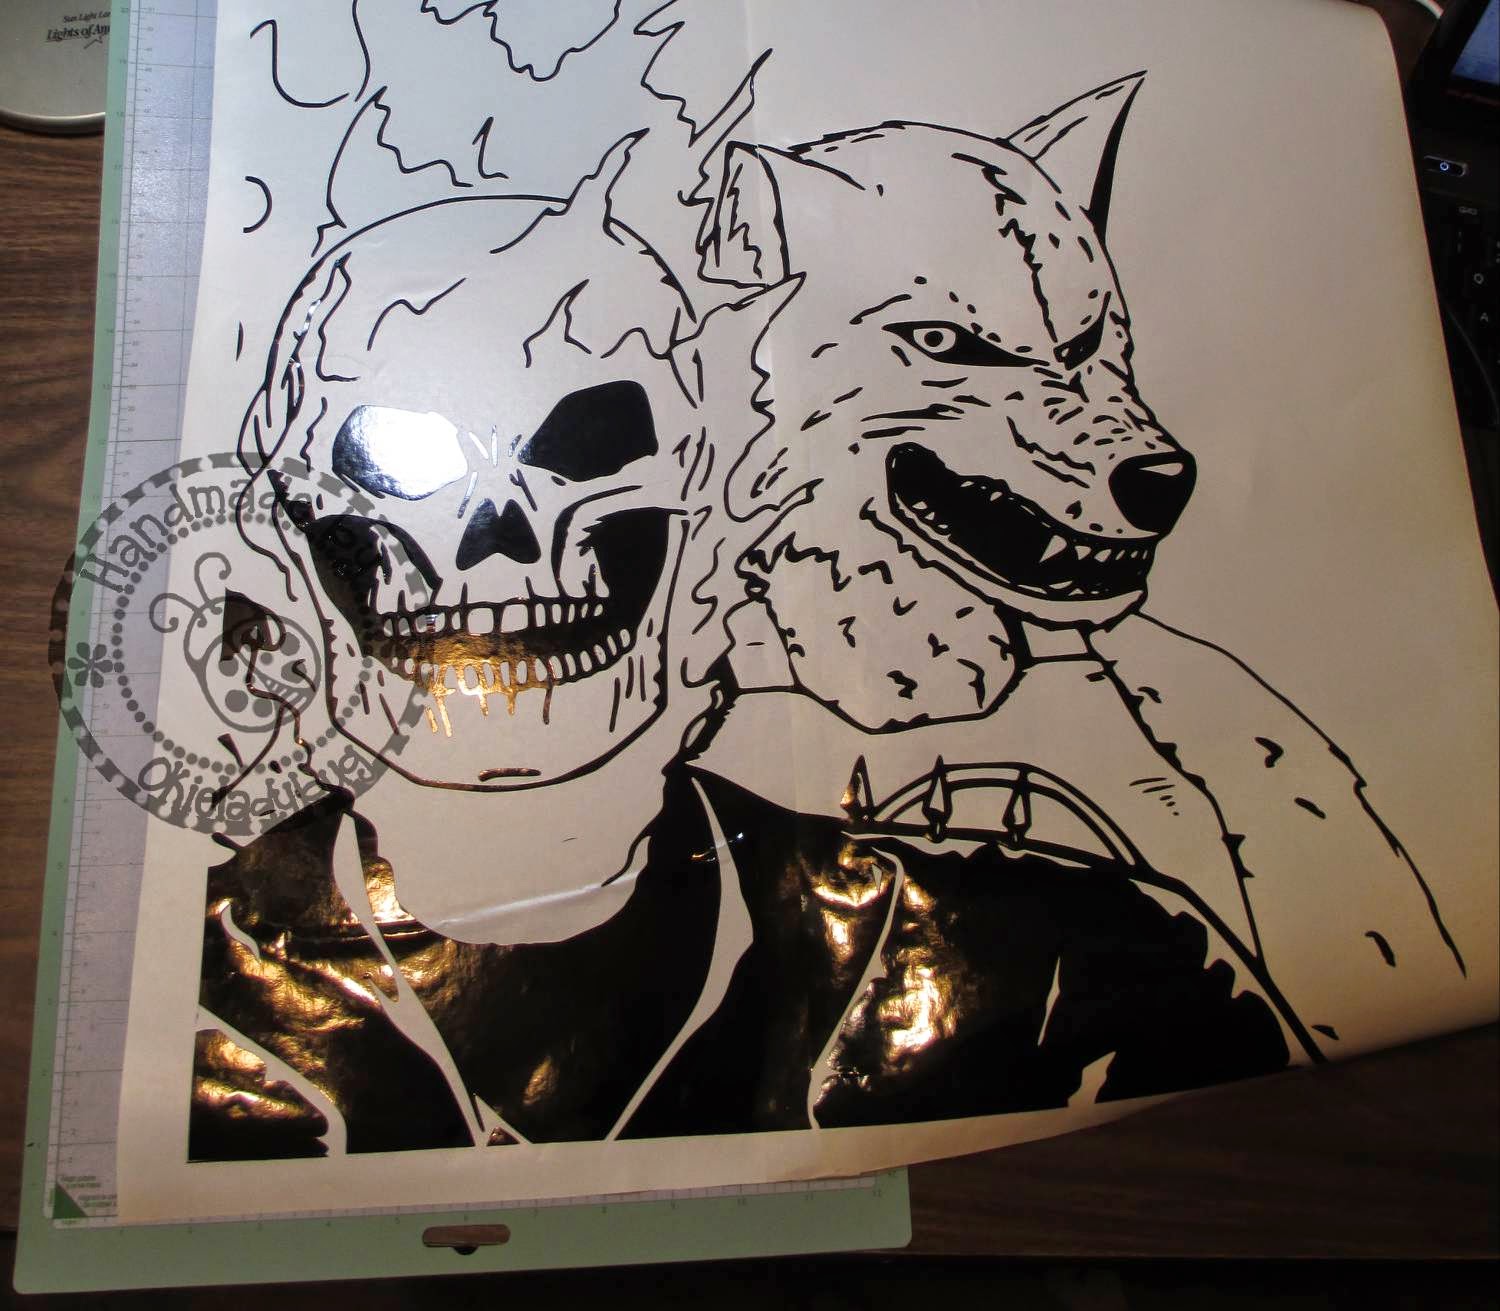
I did join this image and to join I cut along the inner edges of the two outside images with scissors. On the back of the middle image I put tape and let it overhang the edge so when I laid the outside image down it would be taped together. 

I did find it easier to keep the middle image on the cutting mat to join the long sheets together so I didn't have it moving around.


Here is a close up so you can see how the image matches up. Now it might not be absolutely perfect but it should be close enough.

Now just add your transfer tape and you are ready to go! 

I certainly hope you guys enjoyed this tutorial and that someone uses it because it was a real pain the ass to take all the pictures, edit them, watermark them, upload them and then write all the steps out! *okie falls out chair laughing*

Friday, July 12, 2013

What Do You Mean I Can't Do That?

That is pretty much what I was saying after finding out the wonderful Samantha Script font couldn't be used in Make The Cut. Well, the font could be used which included the regular letters but it was all the gorgeous swirly, flourishy letters that I wanted to have possession of! After some research it was found that I would need a program like Adobe Illustrator to open the "glyphs", which are all the cool letters and such!

I found a free version, and very old version, of Adobe Illustrator and thought "this will be a piece of cake". I even watched a video tutorial that Jin of Under A Cherry Tree did showing how to convert what you wanted out of AI into an SVG. Only one problem, my version was different and didn't work quite the same way. My friend Pam who is techie, you might know her from The Bug Bytes, tried to give me instructions but yet again my version didn't have the options where she was telling me to go. I finally was just playing around and gave up on doing the SVG and decided to do the whole capture thing with the snipping tool and import the letters into MTC that way when I started clicking on a few things and POOF I found the tools I needed to make the outline and export as an SVG. You talk about excited!

When got all the capital letters opened in AI I looked like I had a jumbled mess but I wanted to see if I could export to SVG format and if the letters were overlapping if they would be single once imported into MTC. 

This is what it looked like when I finally got it in MTC - a bit of a jumbled mess. I then had to figure out how I wanted to "organize" all the letters.


I finally decided to just leave all the letter's together and then put different ones on different mats. Some of the letters had a ton of versions while others only had a few. I forget how many mats I ended up with in the file but here is how they looked after I got them moved around and enlarged. Now I can quickly go in and see which fancy letter I want to use! So with a matter of copy and paste I will be able to use the letters to make words I might want.


The font file also included something called "swashes" I think it was and this picture are the words in that feature. There are some flourishes that go with it as well but I am too lazy to do a capture and post it. If you check the link at the top of the post for the file you can see all the features this font has to offer. 


Now the odd thing is I have no idea if I will ever even use any of these letters. They are a big thin and swirly to use on cards or scrapbook pages but they would probably work great with vinyl projects. I guess I wouldn't give up because I do not like to hear "you can't do that" *okie sits with a smug smile on her face and thinks 'I was not defeated'*

Wednesday, July 10, 2013

How to have Two Versions of Make The Cut

As most of you know I use Make The Cut software now, and have since last fall. I can't even begin to say how much I LOVE LOVE LOVE this program! I know many are wishing they were able to get the program to work with their Cricuts and those who haven't have gone on to other machines such as the Cameo, Zing, Pazzles (which I use) and other machines. One of the issues I ran into was that my older version of MTC that worked with my Cricut didn't have all the cool features of the updated version of Make The Cut. I couldn't upgrade my version because I would lose my plugin that made my Cricut work.

I finally decided to ask on the MTC forum if it was possible to upgrade somehow and while you can't upgrade the version you currently run and still be able to cut with your Cricut, you can install a newer version and have both versions running. What this does is give you all the cool features of the newer version and you can design in that, save your file and then open the file in the older version. I know it sounds like a lot of work to do that but honestly it isn't.

I've had a few questions recently about how to have both versions and I keep giving the link to this awesome video that will walk you through it. I thought others out there might not know about how to do this and I would share the link so you can update to a newer version while still having your version that works with the Cricut.

INSTALLING MULTIPLE COPIES OF MAKE THE CUT

Hope this helps!

Sunday, June 23, 2013

Joining Shapes to Letters - MTC Tutorial

I was skimming through the Make The Cut forum the other night and came across a post where a woman was having some problems with joining a shape to a letter. I of course thought it was a quick fix but it wasn't! I tried to boolean join *okie still really wonders what in the heck that means* and all the options for it didn't produce the desired effect. After trying several other things it finally dawned on me what to do...I know this might seem time consuming and complicated but it really does go fast and I am including pictures since I have a hard time explaining things.

Step 1 - Choose your letter and image, set objects to desired size and position. In this case I used the letter M and a baseball.


Step 2 - Click on the baseball (or object of your choice) and do a "break". After the images is broken then select the inside of the image, or guts if you will *okie cracks up laughing*. Now hit "copy" and then delete. If you are unable to get all the pieces then just do a "copy" and "paste in place" to a new mat until you have all the pieces removed.


Step 3- You should be left with the letter and what is now the base layer of the image.


Step 4- Weld the two objects together.


Step 5 - Now do a "paste in place" with the parts you deleted and weld together and POOF! You have your image and letter as one image. 


I am really not sure how Make The Cut works since I am fairly new to the program, all I know is that all the welding and joining options wouldn't work for me. The lady who was needing the help was able to quickly join her shape and letters with the instructions I gave her. Another lady gave some instructions about a "import to a raster image" which I have no idea what that even is but it might work more easily if you know what it is and how to do it. For me this method worked fine and really did go quickly!