Sunday, October 10, 2010

Oh what a wonderful day yesterday!

I met my BFF Andrea and youngest God Daughter Amber the parade. I got there a little late and guess what...as soon as Andrea saw me she says "YOU JUST MISSED THEM!" So off the street I went running! Now picture in your mind a 200 plus pound woman running down the sidewalk on main street with camera in hand! Okay maybe you didn't want to picture it....*okie laughs because she knows that image will be burned into everyone's brains now*.

But by golly I got my pictures! I plan on using the pictures I took yesterday for layout kits to take to the Swarm with me in two weeks.

Here are pictures at the parade. I think they did a great job on their float! My oldest God Daughter Ashley is in the picture of the float, she is in the little Greek Tiki hut waving. My daughter is in the picture of people walking next to the truck. She is the one waving at me.


After the parade we went to the Chi-O lounge to watch the girls do their skit for the alumni. They did a great job! We got some pictures outside before the skit started.

It was great to get to spend that time with my family and we all had a good time yesterday.Here are some of the pictures we took.


But now after such a crazy, busy, full few days I am definitely ready to get back to crafting! LOL

Saturday, October 9, 2010

Gel Pen Winners!!

I bet ya'll figured I would forget didn't ya! Did ya think I would forget?? HUH HUH HUH? *okie cracks up laughin* Well I didn't forget! I will be contacting the following people today for their mail information so I can send it to Cri- Kits.

I certainly hope you guys like the pens as much as I do! My friend Linda, aka LGuild, was playing with them a little when she was here this week. She was comparing them to another pen and she said "Oh the Cri-Kits are definitely better!" She agreed they didn't skip and were easy to get in and out of the pen holder.

Thank you for someone suggesting about posting pictures of of my daughter in the parade today. I guess I should ask you guys do you want me to post something everyday even if it isn't scrap related? I mean I can do that easily. But that doesn't mean I am going to slow down on crafting. I just get busy with Nana Donna on the message board or I might be dreamin about being a Scrappin KY Momma where I can enjoy the green rolling hills of home! But about pictures, I really do need to take some! I am going to a swarm in two weeks and need to get some layout kits ready!

I will be finishing up the princess cards this weekend. We still have Ariel, Snow White and Cinderella to showcase. I am so glad most of you are enjoying the cards. I thought they were rather funny.

Oh yeah still waiting for the winners? Well I already posted who won. Their names are in the post somewhere and it ain't Linda! LOL

Friday, October 8, 2010

Another day with nothing to post....

I had planned on getting Ariel done today and posted but my plans changed. I know a lot of you have heard me talk about my dear neighbor friend Naomi. She called this morning and needed some help. She wasn't looking too good but said she thought she would be okay. I tried to get her to go to the hospital two days ago because I was worried about her breathing. When I came home this afternoon to check on her she was having a terrible time breathing. Her physical therapist was there and told me that Naomi had decided she needed to go to the hospital. Evidently she decided that in the nick of time because the doctor said we could have lost her had she even waited a few more hours.

I am not sure I will have anything to post tomorrow either as my daughter is in the Homecoming parade and I am going to the hospital to be with Naomi for awhile.

Hopefully I will have something to post soon.

Thursday, October 7, 2010

Sorry guys

I didn't get something posted today. I spent some quality time with my daughter last night and was tired when I got home. I am not sure I will have a princess card tomorrow as tonight is Stamp Club. Linda, aka LGuild, is here and we have gotten some errands done like always before we got to Stamp Club. I would write more but she is sitting behind me yammering about specs and holiday mini's and how glitter from glitter pens rub off easily. Ya know between me and you guys, I ignore her most of the time and just do the "uh huh" "yep" "oh yeah" when she is talking. But ya'll don't tell her I said that! Well we gotta get the stuff in the car and head out to Stamp Club!

See ya'll soon!

Wednesday, October 6, 2010

OH BELLE! A gal after my own heart!

You guys almost didn't get a card today! I was having a bit of a problem with a headache last night and then realized I hadn't taken my medication for the day! *okie would give herself a V-8 smack on the forehead but doesn't want her headache to come back*.


Today's card is a little bit more tame in innuendo's.......I think *okie tries to analyze but just shrugs and gives up*. Of course since it is Belle it wouldn't be right without mentioning the beast!

This card also measures 4.25 x 6.25 inches. The background paper is Stampin Up as is the base card. The corners are with Prism and they were done with the Heritage cartridge. The scroll for the sentiment on the front was with Heritage also.


I used Storybook font in MS word to generate the sentiment on the front and inside the card. I again used Word Art. I also used the PRINT ON CARDSTOCK SHAPE method to get the sentiment on the scroll. I didn't do very much embellishing because I was running out of time, and I thought the scroll corners made a nice touch. I again used the Color Values Chart from Stefani Williams so I could match the sentiment color closely with the cardstock I used.


For the mat of the card I crumpled and then smoothed it out a little before applying to the card base. I curled the edges up a little also and since the paper was double sided it gives a nice little effect of the pink paper on the back side.

Oh and I did use Cat Eye chalk ink on the edges *okie figures everyone knows that but thinks she should mention it just the same*.

Tomorrow I will be featuring........OH COME ON!! Did ya really think I was gonna tell ya?? HA HA HA

Pin It

Tuesday, October 5, 2010

Oh that naughty Jasmine!

IF YOU ARE EASILY OFFENDED PLEASE LEAVE NOW.....


For today's naughty princess I am featuring Jasmine. Who knew she could be such a lamp polisher?

I had more difficulty coming up with a little naughty saying for Princess Jasmine and after I got them done I thought of some others that would have probably been better. Oh well there are always future cards to be made!! *okie thinks she should have written down the others she thought of since she will likely forget them.*

She does look rather innocent doesn't she?


The card measures 4.25 x 6.25 inches. The background paper is Sassafrass Lass. The frame behind Jasmine is from French Manor. I thought it gave a lattice look that you might see in a palace. I used Stardream Mica to cut it and then some Prism cardstock for the dark purple.

I just cut a piece of gold cardstock to put behind the lattice frame with my paper trimmer and clipped the corners so they wouldn't stick out. I looked at it without the gold but it was too busy and the lattice got lost in the background paper pattern.

For the inside of the card I used the same gold metallic cardstock as the lamp and used an EK Success photo corner punch.

The sentiment on the front of the card was generated in Microsoft Word using Word Art. I used a 1 3/8" and 1 1/2" circle punch and the Scallop Circle is a Stampin Up punch. The lamp is cut from Dreams Come True and I don't know if I would have been able to set it that small without Design Studio. I used some shiny metallic cardstock to cut the lamp. I think it gave it a nice look.

I was able to match the coloring on the sentiment with the Lovely Lilac Stampin Up cardstock I used with the base by using the Color Value Chart that Stefanie Williams of Stationary With Style came up with. You might want to check back later for a neat little giveaway I will be doing from Stefanie!

I honestly don't know which princess will be featured tomorrow. I guess I better put my thinking cap on ASAP!

Pin It

Monday, October 4, 2010

Would you like your own set of Cri-Kits??


I got quite a good response from my posts using the Cri-kits! And now guess what. I am doing a giveaway! Two winners will win a set of Cri-Kit pens from www.cri-kits.com. All you need to do is leave a comment on this post in order to be eligible to win. Also please make sure you leave some type of contact information or come back and check to see if you won. If you win I will contact you for mailing information to forward to Cri-Kits so they can send you your prize.

Make sure you leave a comment on this post before Friday, October 8th midnight for your chance to win. I will announce a winner on Saturday, October 9th.


And here is a special offer from Cri-Kits...
If you place an order from www.cri-kits.com you will get a set of swirl pens and three extra Halloween (orange, black and white) pens for FREE! All you need to do is click this LINK that will take you to their page and automatically put them in your cart, then just go shop and when you check out POOF the free pens are yours upon your payment of your order. Cri-Kits says not to worry if you don't see the free pens in your cart. They will definitely ship them with your order.

Naughty Princess....Sleeping Beauty (PG 13)

It's Time! It's Time! IT'S TIME FOR THE NAUGHTY PRINCESS SERIES!!

If you are easily offended please leave now. If you don't like foul language, LEAVE NOW! If you don't like sexual innuendo's.....GET OUT OF HERE! Now if those things don't bother you...then stick around and keep coming back over the next few days!

When I made the place cards a few weeks ago I cut extra of the princess's. Ya'll know I don't believe in making one of something so I just cut 4 of each. When I was getting them laid out in Design Stuido I figured I would just make some cards but then I decided to make some "naughty" cards with them *okie hopes Walt isn't turning over in his grave right now*.

To start off the series I used Sleeping Beauty. I got the sentiment from my key chain. A few years ago my cousin Teresa got me this key chain and I thought it was hilarious and when piecing Sleeping Beauty together the idea popped into my head to use it as a sentiment.

Can you believe I decorated the inside of my card! I never do that but decided to live on the edge this time *okie can be such a risk taker and adrenaline junkie sometimes*. I do think it made it look nice.


I did have to make the card a bit bigger than an A2 since the princess was cut rather large. The card measure's 4.25 x 6.25 inches. I can't remember if it is called an A9 or what, but I did have envies that they fit in. The background paper is Stampin Up. I used an EK Success photo corner punch to frame the bottom green paper. The sentiment was done on the computer with the Storybook font. I used Word Art to get the "Damn Right" curved. The frame for the sentiment is from Heritage. I used Stardream Mica for the frame.


Here you can see the "Bling" a little better. These are some of the hot fix gems I got off eBay. I use them like crazy and I am so glad I have quite or I would be ordering more already! I am liking my I-Rock even though I had to tape the battery compartment door shut and the end wobbles. It heats up and cools down rather quickly so I think it makes it a little safer to use than my Hot Marks tool.


You can see the sentiment better in this picture. I used a Color Value chart to get the colors to match my Stampin Up paper, quite a handy device. Once I hear from the person I got it from I will give you the information if it is still available. I matched Mellow Moss and dang it I can't remember which pink! I went over part of the sentiment with a Sakura Gelly Roll Stardust pen. I love those things! I only use the clear since I use them over a color. I added some white dots on the photo corners and some 2mm hot fix gems in the swirl.

Come back tomorrow as I will be featuring Princess Jasmine!! Oh that naughty naughty girl!

Pin It

Sunday, October 3, 2010

Gypsy file for the Tri-Shutter

Someone on the Cricut MB asked about a Gypsy file for the Tri Shutter card so I thought I would go in and quickly convert the file and make it a TRI-SHUTTER GYPSY file. This is set for the Expression using Plantin Schoolbook. There are mats for cutting only one of the card and then mats if you want to cut two of the card.

Okie? Where is Okie??

Well I am right here! *okie cracks up laughin*

I decided this weekend I would get the rest of my stamps unmounted and put in the DVD cases I ordered from Stampin Up. I didn't decide this until Friday night, and I didn't finish until Saturday night! WHEW talk about a job! But it was totally worth it. I got 10 sets of Stampin Up stamps to fit in 3 DVD cases.

Now I knew if I posted about doing this you guys would be hollering "hey okie we need pictures!" so in my foresight I took pictures! Okay everyone say "YYEEAHHH OKIEEEEE!"....I can't hear you! *okie puts one hand behind her ear and waves up with her other arm to get the people cheering*. That was much better!!

I got the static cling foam on eBay from a seller named 941nmb and I got the product quickly. The seller did combine shipping. I ordered 7 sheets and I now only have 1/2 sheet left.

1. In order to save on foam I laid out a sheet of foam and then arranged my stamps to maximize usage of the product *okie thinks she sounded very professional just then*. Okay, let's break it down, ya'll know I am cheap and I am gonna find the best way I can to get the most out of anything! HA HA HA


2. Here you can see where I stamped the images with Stazon ink. I used Stazon so it would be permanent and not rub off. I left the stamps on the foam as I was stamping so I could get them positioned where they were originally. I did sometimes have to move a stamp or two so I could get an image stamped.


3. I unmounted my stamps by peeling them off the blocks and foam. Usually the foam stayed on the block and I was just able to peel the stamp off the foam. If you have problems you can stick the stamp in the microwave for a few seconds to loosen up the adhesive. Luckily I didn't have any problems and mine come off pretty easy. Some of the older ones took a little bit more elbow grease but it wasn't bad.


4. I lined up the image on the foam by holding it up to the light. I actually had the stamped side toward the light and the stamp facing me. I thought about trying to find my little light table thing I have but I was too lazy to go look for it. The good thing about the foam is that it takes a few hours for it to become permanent so if you don't get it straight the first time *okie thinks...or the first four times* don't worry, you can just pull the stamp up and reposition.


5. After trimming the foam on a few I noticed my scissors were getting sticky and I go the Undu out and cleaned them off. I decided to use the little device shown in the picture to get rid of the sticky and it made it a lot easier to trim the stamp. I can't remember the name of the thing, but it has talcum powder in it.
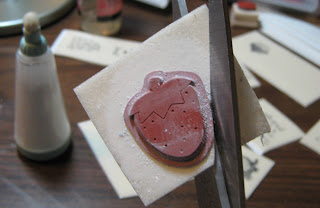


6. Next I trimmed right next to the stamped image. The foam cuts very easily. I was using big scissors at first but then went to using my Cutterbee's because I could get in the corners a lot easier on some of the stamps.


7. TADA! *okie throws her hands in the air like she just did the most fabulous magic trick* And this is what you end up with after you get the stamp stamped on the foam, unmounted from the block, positioned on the foam and then trimmed! A nice little stamp that takes up about 1/4 of the room you were using before!


8. Now you can see why I unmounted my stamps! What you see in the picture is actually space saving proof. All 10 sets of the stamps fit in 3 DVD cases! A few of the sets were smaller ones but at least half were the large sets.


Well now you guys see why I didn't post this weekend! Oh I know you are thinking "okay so what did you do all day today!" I worked on my Naughty Princess card set that will start tomorrow!


*****UPDATE DUE TO THAT PAIN IN MY AZZ JANN!*****

Jann asked about my stamp binders. Well I still use them. And that was part of the reason it took me so long to finish the whole stamp thing. I had some Stampin Up stamps in my binders and as I was going through the binders I noticed my stamps had somehow gotten disorganized. So of course I had to re-organize them! I do still love my binders and use them for my acrylic stamps.


You can click on the pictures to make them bigger if you want to see more detail.

Here is a picture of what my table looked like while I was in the middle of the process. It was quite a task redoing them all but now I can easily find what I need. I actually knew they had gotten a little disorganized but I just didn't want to do the task. But felt I had no choice this weekend since I had them all out anyway.


Here are my binders on the shelf. The white binders hold my Studio G and Inkadinkado stamps in baseball sleeves. Don't they look so neat?

And yes those are CARDS magazines you see on the shelf. I LOVE THAT MAGAZINE!


Here is a close up of the Tim Holtz binder tags all relabeled more appropriately now. It will be a lot easier to just grab the binder I need rather than thinking I had the right one and then finding out I didn't!

I HOPE YOU ARE HAPPY NOW JANN! *okie cracks up laughin*

Friday, October 1, 2010

Guess What......

I USED THE GYPSY! Yep you heard me. I used the Gypsy! While I was on my road trip this past weekend I took my Gypsy with me thinking I might be able to try and get use to it. Well I was able to use it but not too much because I found it using the Gypsy while in the car makes me feel the same as reading does....sick to my stomach! *okie closes eyes and shakes head remembering the feeling*

BUT...the important thing to remember here is that I did use IT! I do have to admit I liked the feature of being able to hide contour and then copy the image and the contour still be hidden.

I chose to go with some cuts from the Cricut Lite cartridge Lovely Floral. While I am not sure I like the papers I do like the concept *okie thinks she says that way too much*.

The paper I used is Stampin Up!, except the polka dot and that is some scrap I had.


On this close up picture you can see where I did use a hot fix gem for the eye of the bird and you can also see the doodling I did to the images.

I am hoping that one day I can feel about my Gypsy that so many others feel about theirs. But for right now....I still LOVE my Design Studio!

Thursday, September 30, 2010

Pink ATG giveaway!

Nope, again it is not me giving the Pink ATG away! My frienemy Melissa Allore, aka EVIL Melissa Allore, or EMA as I like to call her is giving away a Pink ATG gun on her blog! So hop on over to Disney Dreamer Designs and enter to win!

Oh and ya better hurry since her contest ends tomorrow night! She will be drawing a winner on Saturday.

Princess Place Cards...thank goodness for Cri-Kits!

A friend of mine asked if I could make some placecards for her daughters 4th birthday party. Of course I told her I could and then I asked the theme. When she told me Disney Princess's I thought I was going to have a seizure after remembering the horrible time I had with Tinkerbell. I was going to do something simple with crowns but then in the long run I ended up getting Happily Ever After and Dreams Come True so I could cut the princess's that matched the plates for the party.

I have to tell you that the Cri-Kits came in so handy!! I wanted to make the names in something glittery and wanted the font to match a fairytale. I thought I could use Storybook for the font if it would work okay with the Cri-Kits. I was thrilled with the results!! I did go back and fill in a bit with my Stampin Up markers but the names came out wonderfully!

I was pleased that all the little swirls and notches were clear and precise.

Here is the whole set of the place cards all finished. I was told the little girls really liked the place cards, and my friend was quite pleased with the end results.

While it was quite a task cutting all the princess's I do have to say they weren't too bad to cut. Putting them together took some time and patience but it was worth the work.


Here is a picture of Cinderella. I wanted to show the shadowing I did. I used Stampin Up inks and blender pen to do the shading on the images and I think it really added to the dimension of the characters. I also added a little glitz to each princess, whether it was Stickles or gems, I wanted each to have a little sparkle.


Here are pictures that you can see a little better if you want to see more detail. Don't forget you can click to enlarge the picture.


I think I will be using the Cri-Kits for making details on my projects!

Wednesday, September 29, 2010

Oh I think I like the Cri-Kits!

I recently acquired some Cri-Kits and after trying some other gel pens I was quite skeptical but thought I would give them a shot. I kept thinking about what to do and I thought I would also try out my 3 Birds on Parade cartridge so I came up with a design in Design Studio and then it was off to try the Cri-Kits.

I have to tell you I was quite impressed with how easy the pens were to load and unload in the holder. There is a magnet that holds them so they are able to slide in and out very easily *okie is all about easy*. Loading and unloading the holder was a breeze and if you have ever used Cricut Markers it is the same principle.

Cri-Kits are offered in Regular/Neon, Metallic, Glitter and Pastel. They also have a Swirl set of two pens available. If you order all 4 sets you will get the holder and the Swirl pens for $59.96. Oh and the shipping will be free since they offer free shipping on orders over $29.00! If you just want to order one set of pens and a holder the price is $29.99 and the shipping is still free. If you order just the pen set it is $9.99.

The card design is definitely a simple one but I like how the Cri-Kit pen was able to draw the bird stand making the bird stand out more but still yet showing the stand clearly.

I didn't have any problems with the pens skipping and I think they gave a very sharp and clear image.

I added some brads to the round areas on the stand for a little extra embellishment.


Here is a close up so you can see how sharp the drawing is with the Cri-Kits. I used a blue metallic pen for the stand. I think these and the glitter will be my favorites. You can click on the picture if you would like to see the results more clearly.


I also used the pens to do the inside sentiment which I think turned out quite nicely! I like being able to have the thinner lines than the Cricut markers make because the detail is more clear. I thought the pens worked especially nice for the font on 3 Birds on Parade that I chose to use. I think with the markers the little feet pattern would have been lost a little due to thickness.

Come back tomorrow to see how the Cri-Kits were able to save my hiney on a very special project!

Tuesday, September 28, 2010

Imaginisce Apple Cider cards

I am a fan of Imaginisce and when I got some of the Apple Cider collection I was so excited! I have been wanting to play with the goodies for sometime but was just recently able to get use them. The line has some great accented paper, chipboard shapes, rubons, ribbon, stickers and stamps!

Supplies Used:
Imaginisce Apple Cider Collection
Making Memories cardstock
EK Success punches, circle, scallop circle, leaves
3/8" Grosgrain ribbon
Janome Sew-Mini
Hot fix studs

I used the same layout but different elements to make 3 different cards.

I think this one is my favorite. I like the leaves punched and placed below the ribbon. The brown leaves are actually punched from the packaging that the chipboard shapes came in. I thought it just looked too good to waste! The chipboard sentiment has a bit of a glossy look to it so it didn't' need any extra embellishing. I did pop dot it on the card though.


Some of the collection includes some really cool clear stickers. I put it on some green paper so it would show up better and then pop dotted to give a bit of a corner decoration to the sentiment chipboard shape.


On this one I applied a rub-on to some beige cardstock and then punched it out. I then punched two different size scallop circles to mat the image on. The larger scallop circle is punched out of the packaging like the two of the leaves were. Remember I always say...waste not want not!

I am wanting to use some of this line to make a few layouts. The colors are just so wonderful and the embellishments they have available are top notch and will make doing a layout a breeze. Heck I won't even have to use *okie leans in and whispers softly*...my Cricut!

Sunday, September 26, 2010

I want to say THANK YOU!! I am going on a cruise!

I just wanted to post THANK YOU to all of those who signed up for the Cricut Circle through my referral. As most of you probably know by now I was one of the top two members in the referral program and I won a ticket for THE CRICUT CRUISE!!!

I just can't even begin to say how excited I am and how appreciative I am to all of those who signed up. I honestly had no idea that I would win! I thought I might get some extra rewards points out of the deal and if I was real lucky I might get a years free membership. BUT WOW WOW WOW!! I only wish I could take everyone with me! I have never been on a cruise before so I am as nervous as I am excited!

I do apologize for the late delay in this thank you post but I left Friday afternoon before the email went out in the Circle Round up for a quick weekend trip to Harvard Illinois and I am just now settling back in at home after spending a total of about 28 hours in a car this weekend.

So once again THANK YOU THANK YOU THANK YOU!!

Thursday, September 23, 2010

Cuttlebug Butterfly

I forget about having this Cuttlebug butterfly set and I am not sure why since I really like it. I was looking for something to make and I came across it in my Cuttlebug drawer and then went to looking in one of my CARDS magazines for some inspiration.

I found this layout and decided it would work with the butterfly. In the picture in the magazine it had a large bird about where I placed the butterfly. I think it was the tag that got me interested in using this layout. I like tags on cards but I never know how to incorporate them and make them look good.


Supplies Used:
Cuttlebug Butterfly Embossing set, Polka Dot
Cardstock -Little Yellow Bicycle, Stampin Up
Karen Foster Floss
Prima flowers
Studio G rhinestones
Martha Stewart double arch border punch
Spareparts brads
Plastic Clamshell from Cricut Cartridge
Button
Stampin Up! sentiment


I cut the butterfly and embossed it from some word print cardstock and then did the same with the plastic clamshell from a Cricut Cartridge. I did have to add a chipboard shim to get it to cut through the plastic. I inked the edges and used Walnut stain on the print. Three brads were used to keep the butterflies together.

I followed the layout pretty much how it was in the magazine with just a few variations on the embellishments. This was a pretty simple card to make and went together pretty fast. I think it could be used for a variety of occasions. I made the tag by simply cutting the corners at a 45 degree angle. I did add an eyelet at the top that you can't see so I wouldn't tear the paper when tying the button on.

If you guys have a Cuttlebug and don't have this set it might be one you consider getting. I really do love it!

Wednesday, September 22, 2010

Weekend Road Trip!

I will be taking a bit of a weekend road trip Friday - Sunday and I am not sure I will have anything new to post while I am gone. Since I will be on the highway I likely won't be able to approve comments if I do but I will approve them as soon as I get back.

My cousin called me earlier this week and asked if I wanted to ride up to Illinois with her. We are going up to get her son and his girlfriend. We will be making a mad dash from Oklahoma to up around Chicago and then back home again. Good thing my cousin and I get along well! LOL

Sometimes things are worth repeating...Tri-Shutter card

A little over a year ago I decided I wanted to make a Tri-Shutter card since I thought they were just so beautiful. But you guys know I am lazy and I don't want to make a bunch of cuts since I have a Cricut so I made cut files for the card. I made one with George and one with Plantin Schoolbook.

Recently a wonderful woman named Cathy emailed me about using the tri-shutter .cut file and included the picture of the Tri-Shutter card she made using my cut file.

This is part of Cathy's email to me:
"Thanks again for the file. I really do use it all the time. It is my favorite go to for a special occasion. Just thought you might like to see one of the finished products of your files."

I just love the Sesame Street characters she made to go on the card and I am sure it will be a card that will be treasured for years to come!

It's always so glad to know people use the files I have made. Thank you so much Cathy for sharing your wonderful creation and allowing me to post it!

If you guys haven't seen the Tri-Shutter card .cut file or instructions you can see it ---> HERE! If you have been wanting to make one and have thought it was too much work believe me with the cut file it is so simple to make and the instructions do have pictures and are very easy to follow.

Tuesday, September 21, 2010

A Woman is like a tea bag....

You guys may get tired of seeing cards with this Stampin Up set because I really like it! Besides I want to make sure to get my money's worth. But I have to tell ya the new clear stamps are a few bucks cheaper and so much easier to store!

Supplies used:
Cricut - George and Straight From The Nest cartridges
DCWV At Home glitter and cardstock stacks
Stampin Up! - Morning Cup and Favorite Thoughts stamp sets, inks, blender pen, Ticket Punch
Martha Stewart pearl strips
K & Co pearl brad
Prima flowers
Grosgrain Ribbon


I used the adjustable scallop oval .cut file that I designed sometime ago for the scallop oval. I actually have a circle, rectangle, square and heart .cut files that are scalloped and adjustable if you would like to download those. They are all made with George and can be copy and pasted if you want to cut more than one at a time.

I adjusted a plain oval to be 1/4" bigger than the punched image and then layered the ovals. I did ink the edges of all the layers.

I cut the rectangle mats at 2.25 x 3" and then 2.5 x 3.25" and used the Ticket Punch on the corners.

Oh yes and then the rectangles are pop dotted. Yeah yeah I know BIG SURPRISE! *okie rolls her eyes at her smart aleck readers* I guess I a pretty predictable sometimes.


Straight From The Nest was used for the border along the bottom. For the larger border I used two images and nudged and welded them together so the borders would have a layered effect. I tought about adding some small pearls to the points on the border but then I forgot *okie shrugs and wonders if she is suppose to remember everything*.

I layered two of the Primas and then added the pearl brad to the center and then added the pearl strip on top of the ribbon.


I used a Versamark pad to stamp teabags around the sentiment. I wanted to add a little embellishment without taking away from the sentiment and I think this method just helped enhance the sentiment and card theme. You might need to click the picture to see the teabags in the background.

I think this card could be used for a birthday, thinking of you or a congrats card. I guess that is why I like this sentiment so well, it is just pretty dog gone versatile!