Saturday, October 23, 2010

WHAT A DIFFERENCE!

My craft room has went through quite a transformation over the last 3 years!

I was going through pictures on my computer and found some that shows the progression of my craft room! I figured what the heck why not share them on my blog!! So here goes! Oh and you can click on the pictures to make them larger if you would like to see more detail.

So this was April of 2008. Not long after I got my little Baby Bug! As you see there was a total freakin mess!! *okie thinks she is very brave for posting these pictures*


Evidently I thought I needed to clean up the mess because I found some pictures that aren't quite as bad! I remember being quite proud of myself for getting everything cleaned up and the room looking half way decent!


There for awhile I reorganized way more than I crafted! I had to get more stuff to organize my stuff! Of course over a year's time I had accumulated quite a bit more supplies! I soon out grew this set up also.


I hated the carpet and the paneling and after years of saying he would do it, my landlord decided to put down linoleum and paint! My friend Linda, aka LGuild and I made a trip to Texas to go to Ikea and I was able to get a wonderful Expedit unit that I just love!


I have always spent a lot of time in my craft room and looking at the pictures from a few years ago I wonder why I did! It was so dark and depressing looking! But I guess I didn't know it then since it was what I was use to!

Friday, October 22, 2010

An old layout!

I was browsing through my pictures and found this picture of a layout I did WAY BACK when I first got my Cricut. My cats, Simon and Sebastian, were totally intrigued by the Cricut.

As you can tell this was way before I started inking things and looking at this now I would love to rip it apart and get the ink after it! LOL

I love the picture at the bottom of my cat Simon, he looks like he is smiling!

I made the cat faces and the bug head with George. I would say the title is with Base Camp and Opposites Attract.

Wednesday, October 20, 2010

FINALLY!!

The winner of the Naughty Princess cards is....*okie waits for drumroll*


*and is still waiting for the drumroll*


CAN I GET A FRIKKIN DRUMROLL SOMEONE??


*okie finally hears a drumroll*


NanaJo said...

You had me going for a moment with all the requirements - almost deleted your post but my primary room teacher taught me to read the all the directions so did and happy I did - lol. Guess I should know better - what a giveaway and what fun to use those cards to the winner.

October 17, 2010 11:56 AM


Wouldn't ya know it! She didn't leave contact information. So if I don't her from her in 3 days from this post I will draw a different winner!

ONE ONE ONE!

ONLY ONE MORE HOUR!!

Don't ya'll love suspense? *okie laughs evilly*

TWO

Hours until we know who won the Naughty Princess series!

Getting closer

only 3 more hours until the winner announcement

FOUR

more hours until the winner announcement!

And the winner.....

Will be announced in 5........


hours.......

Saturday, October 16, 2010

Naughty Princess Giveaway!

I made 3 sets of the Naughty Princess series and after all the wonderful comments I received about the series I have decided to do a giveaway of one set! Yep you heard me! One lucky winner *okie thinks...or maybe unlucky* will receive a complete set of the Naughty Princess series!

All you need to do to enter is become a follower of my blog, post on 3 other websites making sure you post the links in your comment, subscribe to my email, follow my friend Linda's blog, visit 25 of my sponsors saying I referred you to them, post on your Facebook page "Okie is the most awesome person in the world", tell three of your friends to follow me and last but not least...send me a pound of beef jerky! *okie so loves beef jerky* Now isn't that simple and so worth winning this great set of cards? *okie laughs so hard she almost cracks a rib*

Now ya'll know me better than that! All you need to do is leave a comment on THIS post, making sure you leave some type of contact information.

I also should admit that it usually takes me awhile to get to the post office. BUT...if the package has to wait too long to get mailed there are always extra goodies included because I have a tendency to keep tossing things in the box!

ENTER ONLY ONCE! I have to approve all comments so it may take awhile before your comment shows up in the list. So please be patient and enter only once.

I will end the contest on Tuesday, October 19th at midnight!

Friday, October 15, 2010

Lazy like Maxine...

I know you think these are the cards I posted yesterday but in fact they are not! They are completely different images. Okay okay the layout is the same SHEESH!

I promise to try and post something good in the next few days but right now I am busy with Naomi again getting her settled in to the nursing home again for a few weeks. She looks pretty good and sounds good. Just hope she can get her strength up enough to come home soon.

Oh anyway back to these two cards....don't forget to click on the picture and make it bigger so you can read the sentiment.

I wanted to show you some close up shots of the leaves that I used to make a border and I actually meant to do that on yesterday's card but I guess I forgot *okie can hear her friend DCDoll saying "okie you are suffering from CRS again!*. I didn't go in any certain order, I just tried to mix up the colors. I do like the leaves being out of patterned paper as I think it adds a little more interest to them.

You can also see the twine better in this picture. I really love using this medium to add to a card or layout. It is different than ribbon and it gives a more informal look at times. And another reason I love using it is because IT WAS FREE! My friend Linda, aka LGuild, gave me a whole big spool of it, and she can't have it back!

On one of the images I added a few stray leaves on top of where there were leaves on the image. While I know I can cut leaves with my Cricut you guys know how I love my punches! I was totally against them at first but I think they are great for being able to use up even the most tiniest of scraps!

Linda posted her cards she made while at Stamp Club also. I think she cheated off me because I am almost positive I had started mine before she started hers! so be sure to check her Maxine cards ---> HERE <---.

Thursday, October 14, 2010

Who doesn't love a good Maxine!

Ya know no matter the age of a woman I think a woman always appreciates Maxine's candor about life!

Last week at stamp club I got a sheet of Maxine images to make some cards with. The lady who runs stamp club is always so nice to bring printed sheets of different images for use. She only charges $1 for the laser printed ones and then she has some for free.

I used several size leaf punches for the embellishments at the bottom of the images. I wish I actually owned the punches but alas...I borrowed them at stamp club! I wrapped some twine around and tied a bow with it. The border is done with the Fiskars Threading Water punch.

These were super simple to make and I think they turned out really cute! Make sure you click the picture to enlarge the image so you can read the sentiments. Tomorrow I will be posting two more Maxine cards.

Wednesday, October 13, 2010

And wrappin up th Naughty Princess series

Is none other than Cinderella!

To be honest I don't think I ever had a favorite Disney Princess and even further honest I always thought they were a little hokey with all the honey sweetness in their lives. I do believe I like them a little better now though. Now that they are more real and got down and dirty! *okie cracks up laughin*

So for Cinderella I kept trying to think of something for the sentiment. I was on the phone with my friend Linda, aka LGuild, and she is the one that came up with the sentiment. She told me I had to give her credit or she would smear my good name through the mud on the Cricut message board *okie has no idea why people think okie picks on Linda when it is totally the other way around*.

Of pattern pink paper is SEI and is double sided with the flowers. The green is a bit of scrap I had of some Stampin Up. You maybe not be able to see unless you click on the pictures, but the pink flower paper has bits of silver in it and that is why I chose to go with silver brads on the card.

I used the Stampin Up word window and modern label punches for the sentiment on the front.

I did pop dot Cinderella and the sentiment.


I didn't do a lot of embellishing because I was just too tired when I put the card together. But I think the use of 3 different patterns of papers does help with dressing up the card without adding other embellishment.

For the inside I stamped some cherries next to the sentiment *okie starts to explain the use of cherries but then decides she will leave it up to the imagination of others*. The cherry stamp is from Stampin Up Tart and Tangy.

Well this winds down the Naughty Princess series! I hope you guys enjoyed it as much as I enjoyed showing it to you!

Pin It

Monday, October 11, 2010

Snow White is a little bad....

So you may not want to look any further than this!


But if you are daring then have a peek!

I have heard jokes about Snow White and the Seven Dwarfs so that is how I came up with the sentiment for this card *okie wonders why she can never remember full jokes, usually just the punch line*.

I thought the apple paper was appropriate and it is from Stampin Up as is the green stripe paper. I got them on the clearance rack a few months ago. The corners were made with the Stampin Up scallop square punch and then cut to fit the card. I used the Stampin Up scallop circle punch for the sentiment on the front, and the circle punch is the 1 3/8 Stampin Up punch.

I used the black Stampin Up marker for the faux stitching around the card. The ribbon color is banana and I got it from Ribbons and Bows Oh My, which you guys know I love that online website!

The sentiment circle and corners are pop dotted but Snow White I applied directly on the card.

For the inside sentiment I found an image on the internet and used copy and paste in Microsoft Word to add it to the sentiment.

I know the inside sentiment will likely offend some, but I thought it was pretty dang funny.

I hope some of you can find the humor in this one because I know my friend and they will think it is hilarious! At least most of them will....okay, yep, pretty much all of them!


Tomorrow will end the Naughty Princess series and we will be finishing off with Cinderella.

Pin It

Ariel! You naughty girl!

So after a little hiatus from the Naughty Princess cards I am back to finish the series! For today we have Ariel who lives under the sea!

It was easy for me to choose the sentiment for this card because it was actually something I said to a man one time. But that is a whole notha story! *okie cracks up laughing remember that night*

But I do have to tell you I added "and right after that sign there is another sign.....DO NOT ENTER" It was actually funny since it was at a company Christmas party and the man was like a supervisor and I knew he was kidding around. He about died laughing when I answered him. I so enjoy people with a good sense of humor!

The background paper is one that I have no idea who it is made by. I got it for 10 cents a sheet last year at the LSS because it had a corner that had water damage. Which is a bit ironic since the paper is sea creatures! When I decided to do the card I did think of this paper for Ariel and I think it worked out pretty good.

Her flower is made with two of those wedding flowers from Michaels, the kind that come in a bucket. I added a green brad in the middle. I used purple brads in the corners.


The sentiments are computer generated in Microsoft Word. I used a Stampin Up punch for the sentiment on the front and then used the Cozzule puzzle maker to make the mat. A wonderfully nice person from the Cricut message board sent me this little tool. She said she never used it and hoped I could. Well I have used it several times and thought I should post about it. I just use a pen in the hole in the center and the wheel glides around the edge of what I am wanting to matte. It does require hand cutting but it makes it nice when I don't have a larger punch for matting purposes.

I adhered Ariel directly to the card and then pop dotted the flower in her hair and the sentiment. You can see a bit more of the sparkle of the paper in this picture, especially if you click it to enlarge.

I am not sure which princess will be tomorrow but I better get crackin with some ideas!!

Pin It

Sunday, October 10, 2010

Oh what a wonderful day yesterday!

I met my BFF Andrea and youngest God Daughter Amber the parade. I got there a little late and guess what...as soon as Andrea saw me she says "YOU JUST MISSED THEM!" So off the street I went running! Now picture in your mind a 200 plus pound woman running down the sidewalk on main street with camera in hand! Okay maybe you didn't want to picture it....*okie laughs because she knows that image will be burned into everyone's brains now*.

But by golly I got my pictures! I plan on using the pictures I took yesterday for layout kits to take to the Swarm with me in two weeks.

Here are pictures at the parade. I think they did a great job on their float! My oldest God Daughter Ashley is in the picture of the float, she is in the little Greek Tiki hut waving. My daughter is in the picture of people walking next to the truck. She is the one waving at me.


After the parade we went to the Chi-O lounge to watch the girls do their skit for the alumni. They did a great job! We got some pictures outside before the skit started.

It was great to get to spend that time with my family and we all had a good time yesterday.Here are some of the pictures we took.


But now after such a crazy, busy, full few days I am definitely ready to get back to crafting! LOL

Saturday, October 9, 2010

Gel Pen Winners!!

I bet ya'll figured I would forget didn't ya! Did ya think I would forget?? HUH HUH HUH? *okie cracks up laughin* Well I didn't forget! I will be contacting the following people today for their mail information so I can send it to Cri- Kits.

I certainly hope you guys like the pens as much as I do! My friend Linda, aka LGuild, was playing with them a little when she was here this week. She was comparing them to another pen and she said "Oh the Cri-Kits are definitely better!" She agreed they didn't skip and were easy to get in and out of the pen holder.

Thank you for someone suggesting about posting pictures of of my daughter in the parade today. I guess I should ask you guys do you want me to post something everyday even if it isn't scrap related? I mean I can do that easily. But that doesn't mean I am going to slow down on crafting. I just get busy with Nana Donna on the message board or I might be dreamin about being a Scrappin KY Momma where I can enjoy the green rolling hills of home! But about pictures, I really do need to take some! I am going to a swarm in two weeks and need to get some layout kits ready!

I will be finishing up the princess cards this weekend. We still have Ariel, Snow White and Cinderella to showcase. I am so glad most of you are enjoying the cards. I thought they were rather funny.

Oh yeah still waiting for the winners? Well I already posted who won. Their names are in the post somewhere and it ain't Linda! LOL

Friday, October 8, 2010

Another day with nothing to post....

I had planned on getting Ariel done today and posted but my plans changed. I know a lot of you have heard me talk about my dear neighbor friend Naomi. She called this morning and needed some help. She wasn't looking too good but said she thought she would be okay. I tried to get her to go to the hospital two days ago because I was worried about her breathing. When I came home this afternoon to check on her she was having a terrible time breathing. Her physical therapist was there and told me that Naomi had decided she needed to go to the hospital. Evidently she decided that in the nick of time because the doctor said we could have lost her had she even waited a few more hours.

I am not sure I will have anything to post tomorrow either as my daughter is in the Homecoming parade and I am going to the hospital to be with Naomi for awhile.

Hopefully I will have something to post soon.

Thursday, October 7, 2010

Sorry guys

I didn't get something posted today. I spent some quality time with my daughter last night and was tired when I got home. I am not sure I will have a princess card tomorrow as tonight is Stamp Club. Linda, aka LGuild, is here and we have gotten some errands done like always before we got to Stamp Club. I would write more but she is sitting behind me yammering about specs and holiday mini's and how glitter from glitter pens rub off easily. Ya know between me and you guys, I ignore her most of the time and just do the "uh huh" "yep" "oh yeah" when she is talking. But ya'll don't tell her I said that! Well we gotta get the stuff in the car and head out to Stamp Club!

See ya'll soon!

Wednesday, October 6, 2010

OH BELLE! A gal after my own heart!

You guys almost didn't get a card today! I was having a bit of a problem with a headache last night and then realized I hadn't taken my medication for the day! *okie would give herself a V-8 smack on the forehead but doesn't want her headache to come back*.


Today's card is a little bit more tame in innuendo's.......I think *okie tries to analyze but just shrugs and gives up*. Of course since it is Belle it wouldn't be right without mentioning the beast!

This card also measures 4.25 x 6.25 inches. The background paper is Stampin Up as is the base card. The corners are with Prism and they were done with the Heritage cartridge. The scroll for the sentiment on the front was with Heritage also.


I used Storybook font in MS word to generate the sentiment on the front and inside the card. I again used Word Art. I also used the PRINT ON CARDSTOCK SHAPE method to get the sentiment on the scroll. I didn't do very much embellishing because I was running out of time, and I thought the scroll corners made a nice touch. I again used the Color Values Chart from Stefani Williams so I could match the sentiment color closely with the cardstock I used.


For the mat of the card I crumpled and then smoothed it out a little before applying to the card base. I curled the edges up a little also and since the paper was double sided it gives a nice little effect of the pink paper on the back side.

Oh and I did use Cat Eye chalk ink on the edges *okie figures everyone knows that but thinks she should mention it just the same*.

Tomorrow I will be featuring........OH COME ON!! Did ya really think I was gonna tell ya?? HA HA HA

Pin It

Tuesday, October 5, 2010

Oh that naughty Jasmine!

IF YOU ARE EASILY OFFENDED PLEASE LEAVE NOW.....


For today's naughty princess I am featuring Jasmine. Who knew she could be such a lamp polisher?

I had more difficulty coming up with a little naughty saying for Princess Jasmine and after I got them done I thought of some others that would have probably been better. Oh well there are always future cards to be made!! *okie thinks she should have written down the others she thought of since she will likely forget them.*

She does look rather innocent doesn't she?


The card measures 4.25 x 6.25 inches. The background paper is Sassafrass Lass. The frame behind Jasmine is from French Manor. I thought it gave a lattice look that you might see in a palace. I used Stardream Mica to cut it and then some Prism cardstock for the dark purple.

I just cut a piece of gold cardstock to put behind the lattice frame with my paper trimmer and clipped the corners so they wouldn't stick out. I looked at it without the gold but it was too busy and the lattice got lost in the background paper pattern.

For the inside of the card I used the same gold metallic cardstock as the lamp and used an EK Success photo corner punch.

The sentiment on the front of the card was generated in Microsoft Word using Word Art. I used a 1 3/8" and 1 1/2" circle punch and the Scallop Circle is a Stampin Up punch. The lamp is cut from Dreams Come True and I don't know if I would have been able to set it that small without Design Studio. I used some shiny metallic cardstock to cut the lamp. I think it gave it a nice look.

I was able to match the coloring on the sentiment with the Lovely Lilac Stampin Up cardstock I used with the base by using the Color Value Chart that Stefanie Williams of Stationary With Style came up with. You might want to check back later for a neat little giveaway I will be doing from Stefanie!

I honestly don't know which princess will be featured tomorrow. I guess I better put my thinking cap on ASAP!

Pin It

Monday, October 4, 2010

Would you like your own set of Cri-Kits??


I got quite a good response from my posts using the Cri-kits! And now guess what. I am doing a giveaway! Two winners will win a set of Cri-Kit pens from www.cri-kits.com. All you need to do is leave a comment on this post in order to be eligible to win. Also please make sure you leave some type of contact information or come back and check to see if you won. If you win I will contact you for mailing information to forward to Cri-Kits so they can send you your prize.

Make sure you leave a comment on this post before Friday, October 8th midnight for your chance to win. I will announce a winner on Saturday, October 9th.


And here is a special offer from Cri-Kits...
If you place an order from www.cri-kits.com you will get a set of swirl pens and three extra Halloween (orange, black and white) pens for FREE! All you need to do is click this LINK that will take you to their page and automatically put them in your cart, then just go shop and when you check out POOF the free pens are yours upon your payment of your order. Cri-Kits says not to worry if you don't see the free pens in your cart. They will definitely ship them with your order.

Naughty Princess....Sleeping Beauty (PG 13)

It's Time! It's Time! IT'S TIME FOR THE NAUGHTY PRINCESS SERIES!!

If you are easily offended please leave now. If you don't like foul language, LEAVE NOW! If you don't like sexual innuendo's.....GET OUT OF HERE! Now if those things don't bother you...then stick around and keep coming back over the next few days!

When I made the place cards a few weeks ago I cut extra of the princess's. Ya'll know I don't believe in making one of something so I just cut 4 of each. When I was getting them laid out in Design Stuido I figured I would just make some cards but then I decided to make some "naughty" cards with them *okie hopes Walt isn't turning over in his grave right now*.

To start off the series I used Sleeping Beauty. I got the sentiment from my key chain. A few years ago my cousin Teresa got me this key chain and I thought it was hilarious and when piecing Sleeping Beauty together the idea popped into my head to use it as a sentiment.

Can you believe I decorated the inside of my card! I never do that but decided to live on the edge this time *okie can be such a risk taker and adrenaline junkie sometimes*. I do think it made it look nice.


I did have to make the card a bit bigger than an A2 since the princess was cut rather large. The card measure's 4.25 x 6.25 inches. I can't remember if it is called an A9 or what, but I did have envies that they fit in. The background paper is Stampin Up. I used an EK Success photo corner punch to frame the bottom green paper. The sentiment was done on the computer with the Storybook font. I used Word Art to get the "Damn Right" curved. The frame for the sentiment is from Heritage. I used Stardream Mica for the frame.


Here you can see the "Bling" a little better. These are some of the hot fix gems I got off eBay. I use them like crazy and I am so glad I have quite or I would be ordering more already! I am liking my I-Rock even though I had to tape the battery compartment door shut and the end wobbles. It heats up and cools down rather quickly so I think it makes it a little safer to use than my Hot Marks tool.


You can see the sentiment better in this picture. I used a Color Value chart to get the colors to match my Stampin Up paper, quite a handy device. Once I hear from the person I got it from I will give you the information if it is still available. I matched Mellow Moss and dang it I can't remember which pink! I went over part of the sentiment with a Sakura Gelly Roll Stardust pen. I love those things! I only use the clear since I use them over a color. I added some white dots on the photo corners and some 2mm hot fix gems in the swirl.

Come back tomorrow as I will be featuring Princess Jasmine!! Oh that naughty naughty girl!

Pin It

Sunday, October 3, 2010

Gypsy file for the Tri-Shutter

Someone on the Cricut MB asked about a Gypsy file for the Tri Shutter card so I thought I would go in and quickly convert the file and make it a TRI-SHUTTER GYPSY file. This is set for the Expression using Plantin Schoolbook. There are mats for cutting only one of the card and then mats if you want to cut two of the card.

Okie? Where is Okie??

Well I am right here! *okie cracks up laughin*

I decided this weekend I would get the rest of my stamps unmounted and put in the DVD cases I ordered from Stampin Up. I didn't decide this until Friday night, and I didn't finish until Saturday night! WHEW talk about a job! But it was totally worth it. I got 10 sets of Stampin Up stamps to fit in 3 DVD cases.

Now I knew if I posted about doing this you guys would be hollering "hey okie we need pictures!" so in my foresight I took pictures! Okay everyone say "YYEEAHHH OKIEEEEE!"....I can't hear you! *okie puts one hand behind her ear and waves up with her other arm to get the people cheering*. That was much better!!

I got the static cling foam on eBay from a seller named 941nmb and I got the product quickly. The seller did combine shipping. I ordered 7 sheets and I now only have 1/2 sheet left.

1. In order to save on foam I laid out a sheet of foam and then arranged my stamps to maximize usage of the product *okie thinks she sounded very professional just then*. Okay, let's break it down, ya'll know I am cheap and I am gonna find the best way I can to get the most out of anything! HA HA HA


2. Here you can see where I stamped the images with Stazon ink. I used Stazon so it would be permanent and not rub off. I left the stamps on the foam as I was stamping so I could get them positioned where they were originally. I did sometimes have to move a stamp or two so I could get an image stamped.


3. I unmounted my stamps by peeling them off the blocks and foam. Usually the foam stayed on the block and I was just able to peel the stamp off the foam. If you have problems you can stick the stamp in the microwave for a few seconds to loosen up the adhesive. Luckily I didn't have any problems and mine come off pretty easy. Some of the older ones took a little bit more elbow grease but it wasn't bad.


4. I lined up the image on the foam by holding it up to the light. I actually had the stamped side toward the light and the stamp facing me. I thought about trying to find my little light table thing I have but I was too lazy to go look for it. The good thing about the foam is that it takes a few hours for it to become permanent so if you don't get it straight the first time *okie thinks...or the first four times* don't worry, you can just pull the stamp up and reposition.


5. After trimming the foam on a few I noticed my scissors were getting sticky and I go the Undu out and cleaned them off. I decided to use the little device shown in the picture to get rid of the sticky and it made it a lot easier to trim the stamp. I can't remember the name of the thing, but it has talcum powder in it.
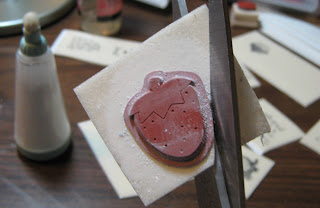


6. Next I trimmed right next to the stamped image. The foam cuts very easily. I was using big scissors at first but then went to using my Cutterbee's because I could get in the corners a lot easier on some of the stamps.


7. TADA! *okie throws her hands in the air like she just did the most fabulous magic trick* And this is what you end up with after you get the stamp stamped on the foam, unmounted from the block, positioned on the foam and then trimmed! A nice little stamp that takes up about 1/4 of the room you were using before!


8. Now you can see why I unmounted my stamps! What you see in the picture is actually space saving proof. All 10 sets of the stamps fit in 3 DVD cases! A few of the sets were smaller ones but at least half were the large sets.


Well now you guys see why I didn't post this weekend! Oh I know you are thinking "okay so what did you do all day today!" I worked on my Naughty Princess card set that will start tomorrow!


*****UPDATE DUE TO THAT PAIN IN MY AZZ JANN!*****

Jann asked about my stamp binders. Well I still use them. And that was part of the reason it took me so long to finish the whole stamp thing. I had some Stampin Up stamps in my binders and as I was going through the binders I noticed my stamps had somehow gotten disorganized. So of course I had to re-organize them! I do still love my binders and use them for my acrylic stamps.


You can click on the pictures to make them bigger if you want to see more detail.

Here is a picture of what my table looked like while I was in the middle of the process. It was quite a task redoing them all but now I can easily find what I need. I actually knew they had gotten a little disorganized but I just didn't want to do the task. But felt I had no choice this weekend since I had them all out anyway.


Here are my binders on the shelf. The white binders hold my Studio G and Inkadinkado stamps in baseball sleeves. Don't they look so neat?

And yes those are CARDS magazines you see on the shelf. I LOVE THAT MAGAZINE!


Here is a close up of the Tim Holtz binder tags all relabeled more appropriately now. It will be a lot easier to just grab the binder I need rather than thinking I had the right one and then finding out I didn't!

I HOPE YOU ARE HAPPY NOW JANN! *okie cracks up laughin*

Friday, October 1, 2010

Guess What......

I USED THE GYPSY! Yep you heard me. I used the Gypsy! While I was on my road trip this past weekend I took my Gypsy with me thinking I might be able to try and get use to it. Well I was able to use it but not too much because I found it using the Gypsy while in the car makes me feel the same as reading does....sick to my stomach! *okie closes eyes and shakes head remembering the feeling*

BUT...the important thing to remember here is that I did use IT! I do have to admit I liked the feature of being able to hide contour and then copy the image and the contour still be hidden.

I chose to go with some cuts from the Cricut Lite cartridge Lovely Floral. While I am not sure I like the papers I do like the concept *okie thinks she says that way too much*.

The paper I used is Stampin Up!, except the polka dot and that is some scrap I had.


On this close up picture you can see where I did use a hot fix gem for the eye of the bird and you can also see the doodling I did to the images.

I am hoping that one day I can feel about my Gypsy that so many others feel about theirs. But for right now....I still LOVE my Design Studio!