Showing posts with label Cricut Cart Box. Show all posts

Monday, July 7, 2014

Cricut Cartridge Storage - SVG File Available

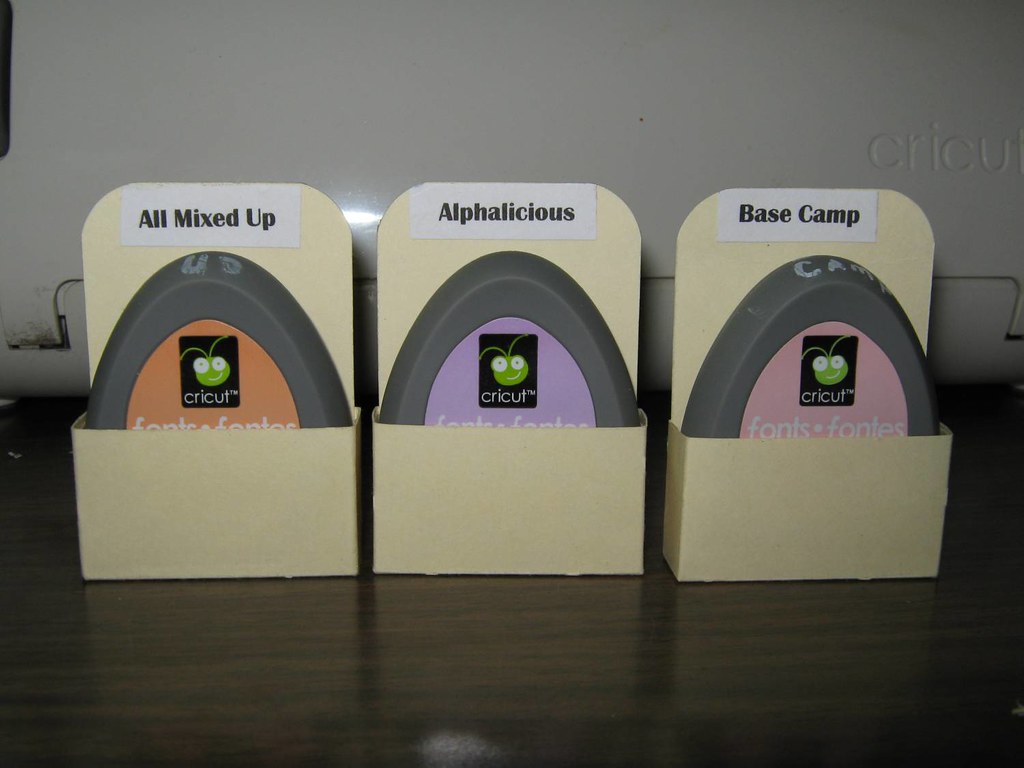
Quite some time ago I made a post CRICUT CART STORAGE and included videos on how I stored my cartridges and handbooks. I have long given up a on the cartridge based system but I still think this was the best way I found to store all those carts and handbooks and it took up a lot less space and made it easy to find what cartridge I was looking to use. I have gotten some questions lately about the little cart box and if I have the file still available. I made the original file in Design Studio and then I did make a file to use with the Gypsy.

I know that the new Cricut Explore has a program where you can use SVG files and I am now sharing the file in SVG format *okie  hears the gasps from those who  know that okie hates converting files* because I truly believe this is an awesome way to store those pesky little cartridges.


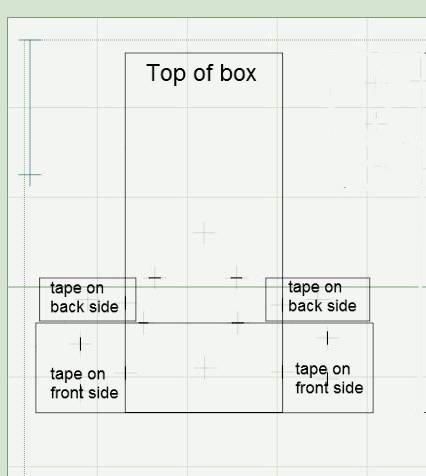
This is an old picture from when I did the file in Design Studio so don't pay attention to all the lines.  To assemble fold on all the scored lines, which will be cut for you. You can just line it up and fold, no need for a bone folder *is that what it is called?* for this. Apply adhesive *I used my ATG gun* to the side flaps on the back side and then apply adhesive on the front side bigger flaps.

Fold the smaller side flaps up and then fold the larger flaps to the back of the box.

Oh and I did use a corner rounded just because I thought it looked better.

This file is made to cut 6 boxes at a time.

Wednesday, August 24, 2011

Cricut Cart Box - Gypsy file

I had tried to convert my DS file of the Cricut Cart Box to use on the Gypsy but couldn't get it to work. I kept having problems with the Gypsy going back to the home screen when I tried to cut. I emailed the file to a Cricut friend and when she went to use it, well it did the same thing. I told her "huh maybe I just need to see if I can recreate it in the Gypsy". Once I did that I was able to copy and paste to where there were 6 on a 12X12 mat. With my fingers crossed *okie remembers how hard it was to load that mat and open the file with her fingers crossed* I plugged in my Gypsy to the E2 to see if it worked...

AND IT DID!!

I hope you guys are able to download this file. I am still not sure this method is working for my files to be downloaded as no one has let me know yet. So someone please let me know if you are able to download and use the file.

Here is the file ---> CRICUT CART BOX 6 CUT

Here is a picture showing the fold lines.


The narrow flaps are on the inside of the box.

Since I did this on my Gypsy I was unable to make the score lines. You will need to score, or you can just fold if you wish, 3/8" away from the outside edge of the larger flaps. This is indicated by the red dash lines in the picture. The flap then can either tucked inside on the back or flapped around the back of the tall part of the box.

Be sure to decide which you want to do before applying your adhesive so you don't tape the wrong side of the flaps.

Okay I hope you guys can use this sucker! I really like my carts done this way!

Tuesday, August 23, 2011

Cricut Cartridge Storage - VIDEO

I had posted some pictures on Facebook of a container I got at Staples to store my cartridges. The container is a Really Useful Box *okie wonders how many people are going to understand that is the name* and is the 4L size. I had quite a few responses and thought I would make a video showing the container and how it works. In the video I said it holds 74 carts, but it actually holds 84 cartridges.

The little boxes in that I keep my carts in are made from a .cut file I made years ago. The file uses George and cuts 3 at a time. I had another file that cut more but I am unable to find it right now. Here is the file for the one I have...CRICUT CARTRIDGE BOX and hopefully you guys can download this. I am trying Google Docs to store the file and not sure if it will work.

Here is the video....


If you are unable to get to a Staples or find the Really Useful Boxes they can be ordered online at REALLY USEFUL PRODUCTS. I would like to thank Kymberlee of The Paper Midwife for sharing this information with me!

So you don't have to go searching for the handbook video I am re-posting it now in case you want to see more details on the handbook storage and missed it before.


UPDATE: I have been asked to post how many handbooks the 9L containers hold and it really depends on the handbooks you are using. I would say you can fit approximately 30-40 handbooks to a box, it depends on if it is a full content, lite or solutions handbook.

Tuesday, September 23, 2008

Cricut Cart Box available for download

I have had a few requests for the cut file for the CRICUT CART BOX so I decided to post the file for download. The height is 2.5 inches. I am not going to lie and post measurements of the rest because I just don't remember and right now after adding my ladybug stamp to like 6 dozen or more cards I am just too darn lazy to go over there and measure them....don't ya appreciate my honesty? HA! The carts do fit in there snugly and won't fall out. I am really liking this storage solution for my purposes.

Someone asked what I did with my layovers and books.....well I don't use them since I use DS so they are in their respective boxes, and all stored in a big box that my friend LGuild gave me. THANKS LINDA!

To assemble fold on all the scored lines, which will be cut for you. You can just line it up and fold, no need for a bone folder *is that what it is called?* for this. Apply adhesive *I used my ATG gun* to the side flaps on the back side and then apply adhesive on the front side bigger flaps.

Fold the smaller side flaps up and then fold the larger flaps to the back of the box.

If anyone has problems just let me know and I will cut one and take pictures of how to assemble.

Oh and I did use a corner rounded just because I thought it looked better.

This file is made to cut 3 boxes at a time.